Model Serving in the NERC RHOAI
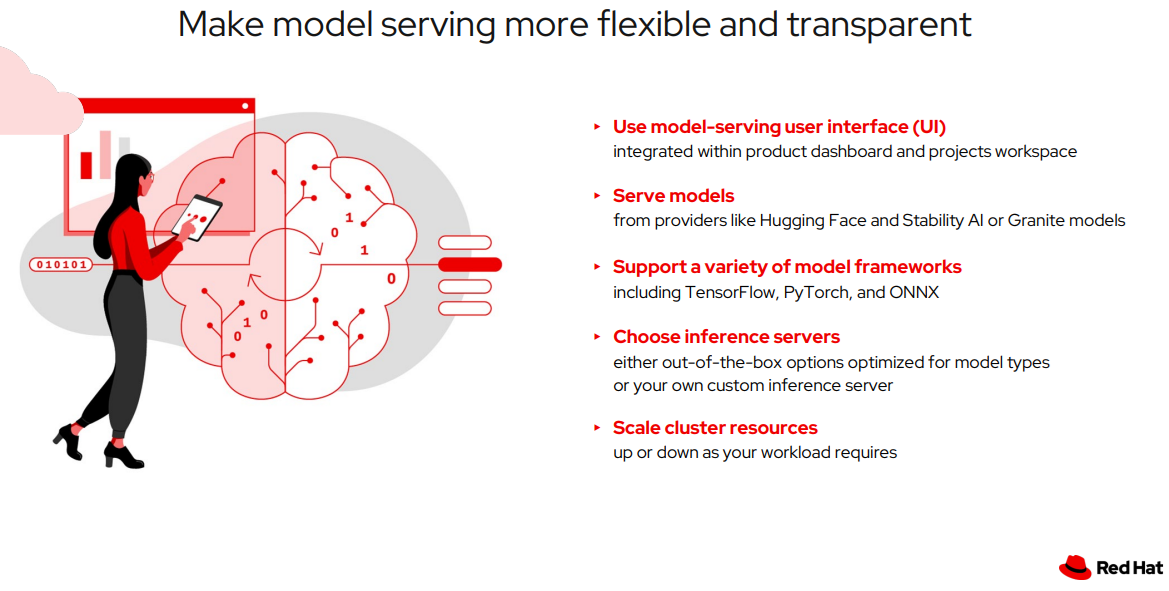
Model Serving Features
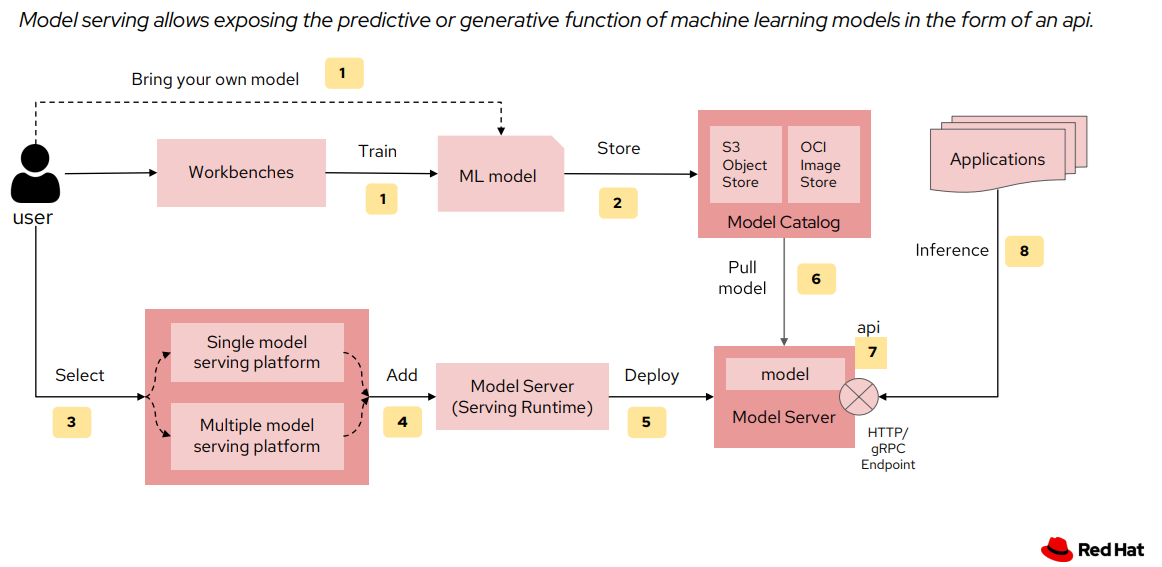
Model Serving Workflow
Prerequisites:
To run a model server and deploy a model on it, you need to have:
- Select the correct data science project and create workbench, see Populate the data science project for more information.
Create a model server
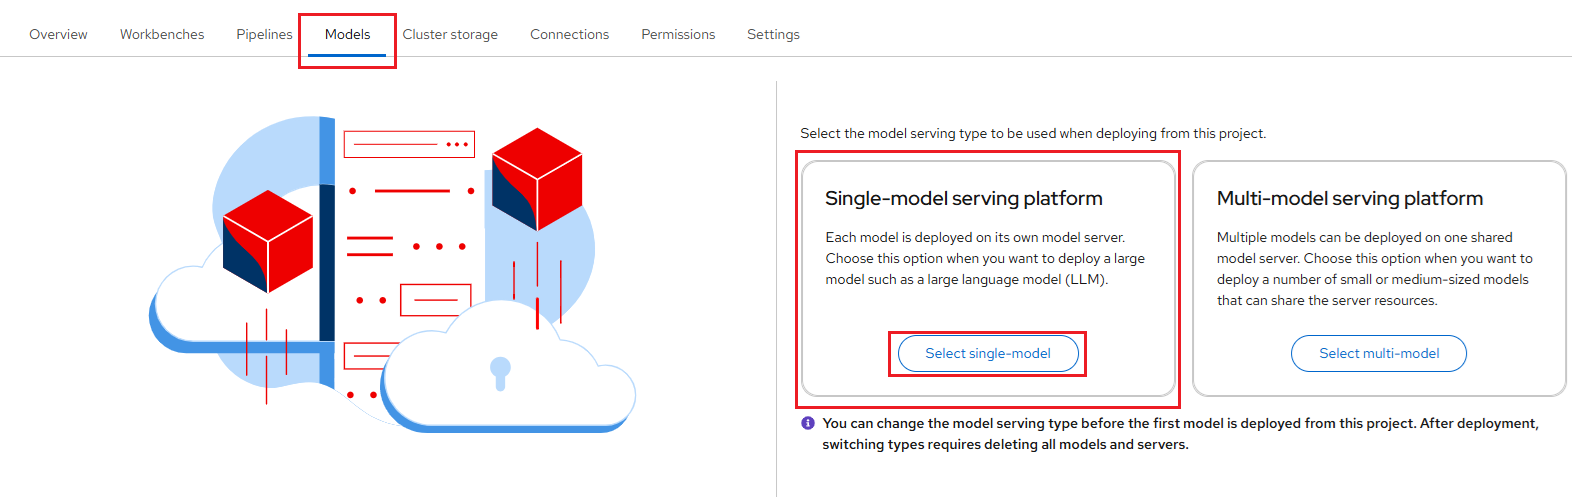
After creating the connection, you can add your model server. In the OpenShift AI dashboard, navigate to the data science project details page and click the Models tab. If this is the first time, then you will be able to choose the model serving type, either a Single-model serving platform or a Multi-model serving platform to be used when deploying from this project. The model-serving UI is integrated into the OpenShift AI dashboard and project workspaces, and cluster resources scale up or down with demand.

OpenShift AI offers two options for model serving:
1. Single-model Serving
Each model is deployed on its own dedicated model server. This approach is ideal for:
-
Large language models (LLMs)
-
Generative AI
-
Models that require dedicated resources
The single-model serving platform is based on the KServe component.
Important Note
If you want to deploy each model on its own runtime server, or use a serverless deployment, select the Single-model serving platform. This option is recommended for production use.
Setting up the Single-model Server
-
In the left menu, click Data science projects.
The Data science projects page opens.
-
Click the name of the project that you want to deploy a model in.
A project details page opens.
-
Click the Models tab.
-
Perform one of the following actions:
-
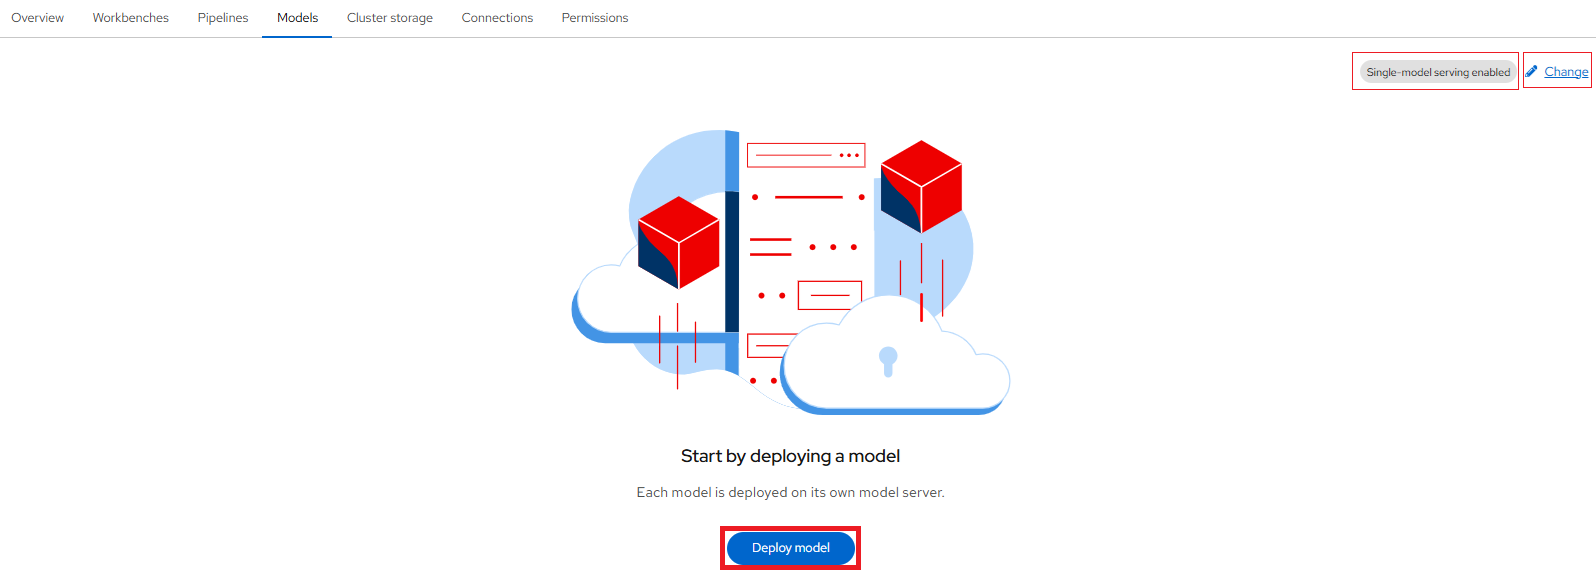
If you see a Single-model serving platform tile, click Select single-model on the tile and then click the Deploy model button.
-
If you don't see any tiles, ensure that you've already selected the "Single-model serving platform" then click the Deploy model button.
-
-
The Deploy model dialog opens.
In the pop-up window that appears, you can specify the following details:
-
Model deployment name: This is the name of the inference service created when the model is deployed.
-
Serving runtime: Select a model-serving runtime framework from the available options in your OpenShift Data Science deployment. This framework is used to deploy and serve machine learning models. For LLMs that need maximum scalability and throughput, OpenShift AI offers parallelized, multi-node serving with vLLM runtimes to handle high volumes of concurrent, real-time requests.
-
Model framework (name - version): This will be auto selected based on your Serving runtime selection.
-
Deployment mode: Deployment modes determine the technology stack used to deploy a model, providing different levels of management, flexibility, and scalability. You can read more about KServe deployment modes here.
The options available are:
i. Advanced: Advanced deployment mode uses Knative Serverless. By default, KServe integrates with Red Hat OpenShift Serverless and Red Hat OpenShift Service Mesh to deploy models on the single-model serving platform.
-
Number of model server replicas to deploy: This defines the number of instances of the model server engine you want to deploy.
Using the "Advanced" deployment mode, you can scale it up as needed by specifying the Minimum replicas and Maximum replicas, depending on the expected number of incoming requests.
Auto-Scaling & Scale-to-Zero for Significant Cost Savings
Once you deploy your model and obtain the inference endpoints, you can edit the deployment and set the Minimum replicas to 0. This enables intelligent auto-scaling of your model's compute resources (CPU, GPU, RAM, etc.), allowing replicas to scale up during high traffic and scale down when idle. With
scale-to-zeroenabled, the system reduces pods to zero during inactivity, eliminating idle compute costs—especially beneficial for GPU workloads. The model then scales back up instantly as soon as a new request arrives.
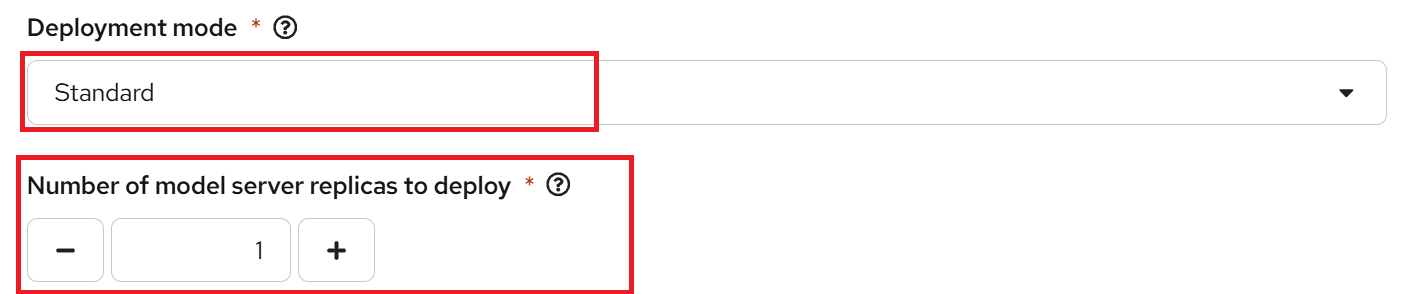
ii. Standard: Alternatively, you can use standard deployment mode, which uses KServe RawDeployment mode.
-
Number of model server replicas to deploy: This defines the number of instances of the model server engine you want to deploy.
In "Standard" deployment mode, you cannot scale the number of replicas up or down, unlike in "Advanced" deployment mode.
-
-
Model server size: This is the amount of resources, CPU, and RAM that will be allocated to your server. Select the appropriate configuration for size and the complexity of your model.
Custom Model Server Size Option
With the Custom option, you can tailor the CPU and Memory allocations of your model server to match the specific needs of your workload.
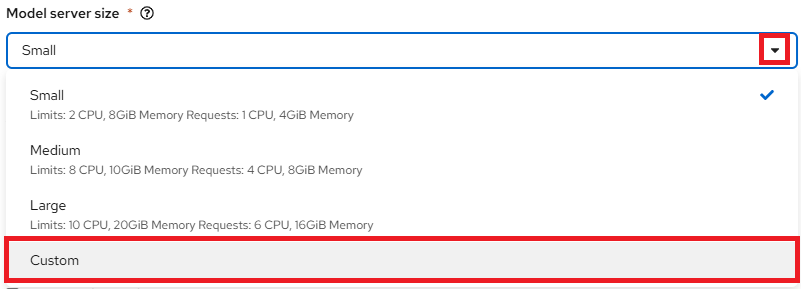
If you select Custom from the dropdown menu, you can configure the following settings in the Model server size section to customize your model server:
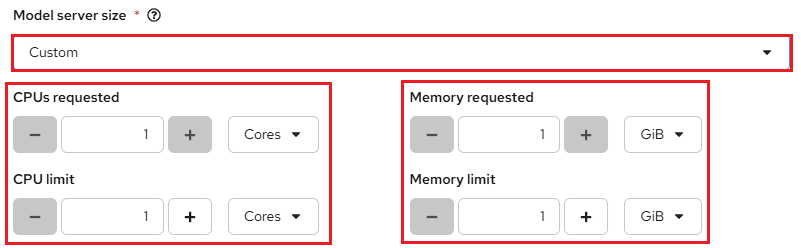
-
CPUs requested – Specify the number of CPUs to allocate for your model server. Use the dropdown beside this field to choose the value in cores or millicores.
-
CPU limit – Set the maximum number of CPUs the model server can use. Use the dropdown beside this field to specify the value in cores or millicores.
-
Memory requested – Specify the amount of memory requested for the model server in gibibytes (Gi).
-
Memory limit – Set the maximum memory limit for the model server in gibibytes (Gi).
-
-
Accelerator: This allows you to add a GPU to your model server, enabling it to leverage optimized hardware for faster inference and improved efficiency.
Serving Runtime and Accelerator Compatibility
If you need to use an Accelerator, it is recommended to select a compatible Serving runtime for optimal performance. Also, Number of accelerators (GPUs) is based on your available quota for GPUs for your project.
-
Model route: select the Make deployed models available through an external route checkbox, if you want the serving endpoint (the model serving API) to be accessible outside of the OpenShift cluster through an external route.
-
Token authorization: To require token authentication for inference requests to the deployed model, perform the following actions:
i. Select Require token authentication.
ii. In the Service account name field, enter the service account name that the token will be generated for.
iii. To add an additional service account, click Add a service account and enter another service account name.
-
Source model location: To specify the location of your model, either select an existing connection you previously created or create a new one.
Very Important
If your connection type is an S3-compatible object storage, you must provide the folder path that contains your data file. The OpenVINO Model Server runtime has specific requirements for how you specify the model path. For more information, see known issue RHOAIENG-3025 in the OpenShift AI release notes.
-
Optional: Customize runtime settings in the Configuration Parameters section.
Configuration Parameters: Adjust runtime behavior using the Additional Serving Runtime Arguments field. However, no arguments are required by default.
Additional Serving Runtime Arguments: These parameters define how the deployed model operates. Any changes apply only to the current deployment. You can also review the Predefined Arguments for the selected serving runtime. To override any of them, provide a new value in this field.
After adding and selecting options within the Deploy model pop-up window, click Deploy to create the model server.
-
Serving vLLM and Large Language Models (LLMs) with Red Hat OpenShift AI
To learn how to deploy a Llama 3.2 3B quantized model - or any other Large Language Model (LLM) - with GPU acceleration, refer to the Deploying Llama 3.2 with KServe Guide.
This guide also includes examples that demonstrate how to serve models using different Connection types, such as:
-
A locally hosted S3-compatible object storage system like MinIO - to store and access your model artifacts directly within your own project.
-
A URI that references a ModelCar Container Image.
All deployment scenarios use the vLLM runtime, ensuring efficient and scalable model serving on OpenShift AI.
To deploy a lightweight FLAN-T5 Small model without GPU acceleration using the TGIS Standalone ServingRuntime for KServe, refer to the Serving Text Generation Inference Service (TGIS) and FLAN-T5 Small Model.
2. Multi-model Serving
Very Important
Starting with OpenShift AI version 2.19, the multi-model serving platform based on ModelMesh is deprecated. You can continue to deploy models on the multi-model serving platform, but it is recommended that you migrate to the single-model serving platform.
All models within the project are deployed on a shared model server. This setup is best suited for:
-
Efficient resource sharing among models
-
Lightweight models with lower resource demands
The multi-model serving platform is based on the ModelMesh component.
Important Note
If you want to deploy multiple models using a single runtime server, select the Multi-model serving platform. This option is ideal when deploying more than 1,000 small or medium-sized models and aiming to reduce resource consumption.
Setting up the Multi-model Server
-
In the left menu, click Data science projects.
The Data science projects page opens.
-
Click the name of the project that you want to deploy a model in.
A project details page opens.
-
Click the Models tab.
-
Perform one of the following actions:
-
If you see a Multi-model serving platform tile, click Select multi-model.
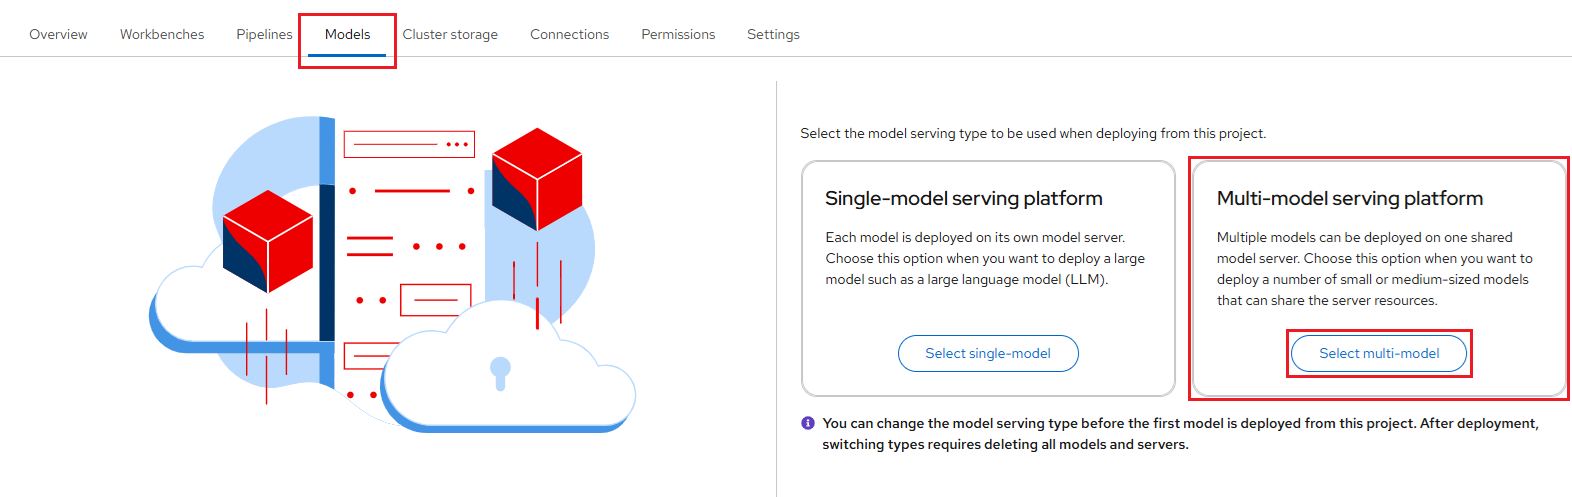
-
If you don't see any tiles, ensure that you've already selected the "Multi-model serving platform".
-
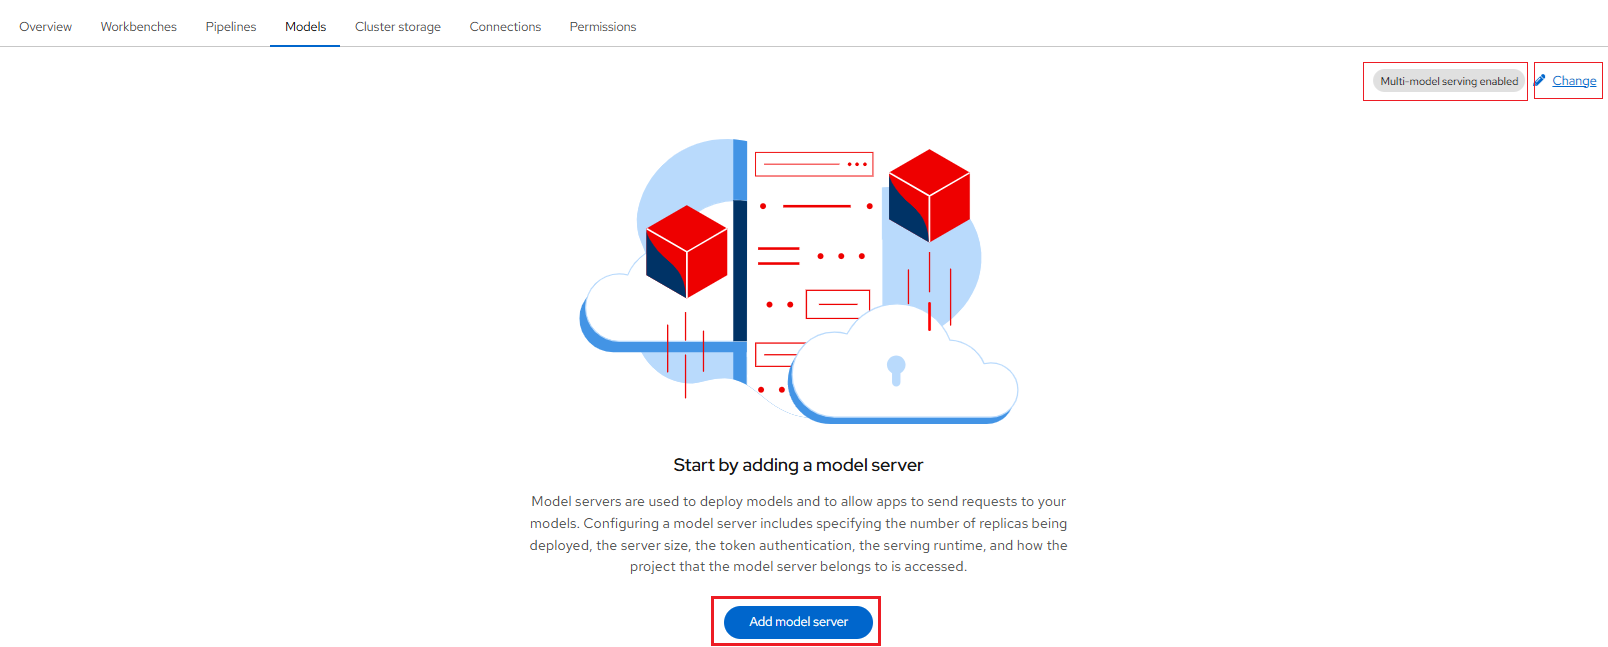
You will be able to create a new model server by clicking the Add model server button, as shown below:
-
-
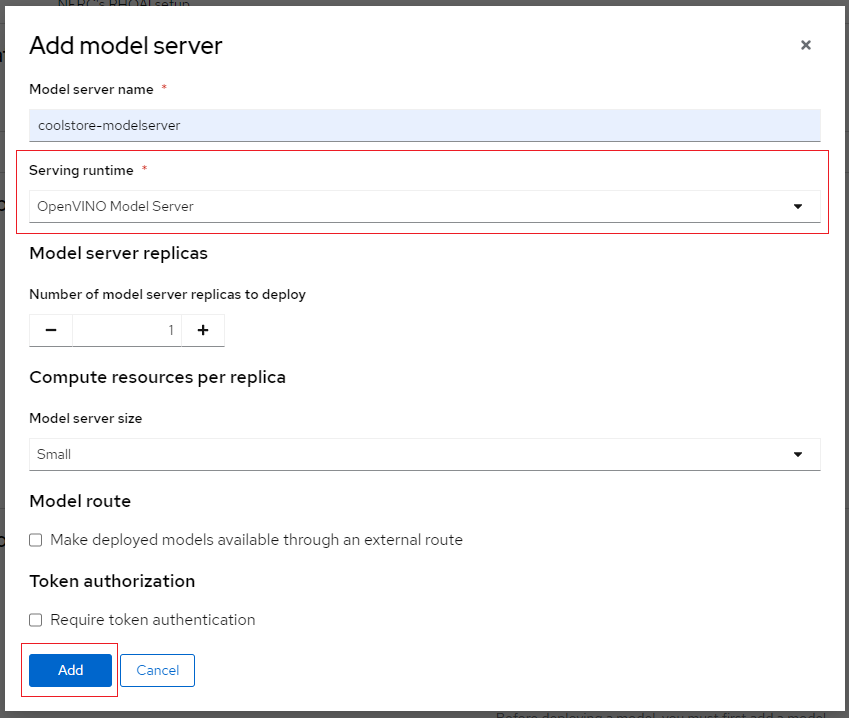
In the pop-up window that appears, you can specify the following details:
-
Model server name: Enables users to enter a unique name for the model server.
-
Serving runtime: Select a model-serving runtime framework from the available options in your OpenShift Data Science deployment. This framework is used to deploy and serve machine learning models.
-
Number of model server replicas to deploy: This is the number of instances of the model server engine that you want to deploy. You can scale it up as needed, depending on the number of requests you will receive.
-
Model server size: This is the amount of resources, CPU, and RAM that will be allocated to your server. Select the appropriate configuration for size and the complexity of your model.
Custom Model Server Size Option
With the Custom option, you can tailor the CPU and Memory allocations of your model server to match the specific needs of your workload.
If you select Custom from the dropdown menu, you can configure the following settings in the Model server size section to customize your model server:
-
CPUs requested – Specify the number of CPUs to allocate for your model server. Use the dropdown beside this field to choose the value in cores or millicores.
-
CPU limit – Set the maximum number of CPUs the model server can use. Use the dropdown beside this field to specify the value in cores or millicores.
-
Memory requested – Specify the amount of memory requested for the model server in gibibytes (Gi).
-
Memory limit – Set the maximum memory limit for the model server in gibibytes (Gi).
-
-
Accelerator: This allows you to add a GPU to your model server, enabling it to leverage optimized hardware for faster inference and improved efficiency.
Serving Runtime and Accelerator Compatibility
If you need to use an Accelerator, it is recommended to select a compatible Serving runtime for optimal performance. Also, Number of accelerators (GPUs) is based on your available quota for GPUs for your project.
-
Model route: Check this box if you want the serving endpoint (the model serving API) to be accessible outside of the OpenShift cluster through an external route.
-
Token authorization: Check this box if you want to secure or restrict access to the model by forcing requests to provide an authorization token.
After adding and selecting options within the Add model server pop-up window, click Add to create the model server.
-
For our example project, we will choose "Multi-model serving platform" and then add a new model server and let's name the Model server "coolstore-modelserver". We'll select the OpenVINO Model Server in Serving runtime.
Please leave the other fields with their default settings, such as replicas set to 1, size set to Small, and Accelerator set to None. At this point, do not check Make model available via an external route, as shown below:
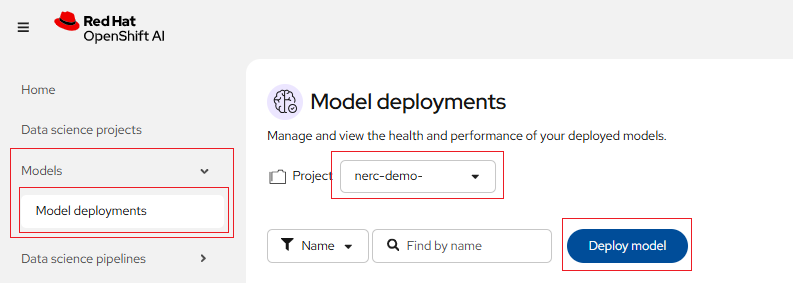
Once you've configured your model server, you can deploy your model by clicking on "Deploy model" located on the right side of the running model server as shown below:

Alternatively, you can also do this from the main RHOAI dashboard's "Model Serving" menu item as shown below:
If you wish to view details for the model server, click on the link corresponding to the Model Server's Name. You can also modify a model server configuration by clicking on the three dots on the right side, and selecting Edit model server. This will bring back the same configuration page we used earlier. This menu also has the option for you to delete model server.
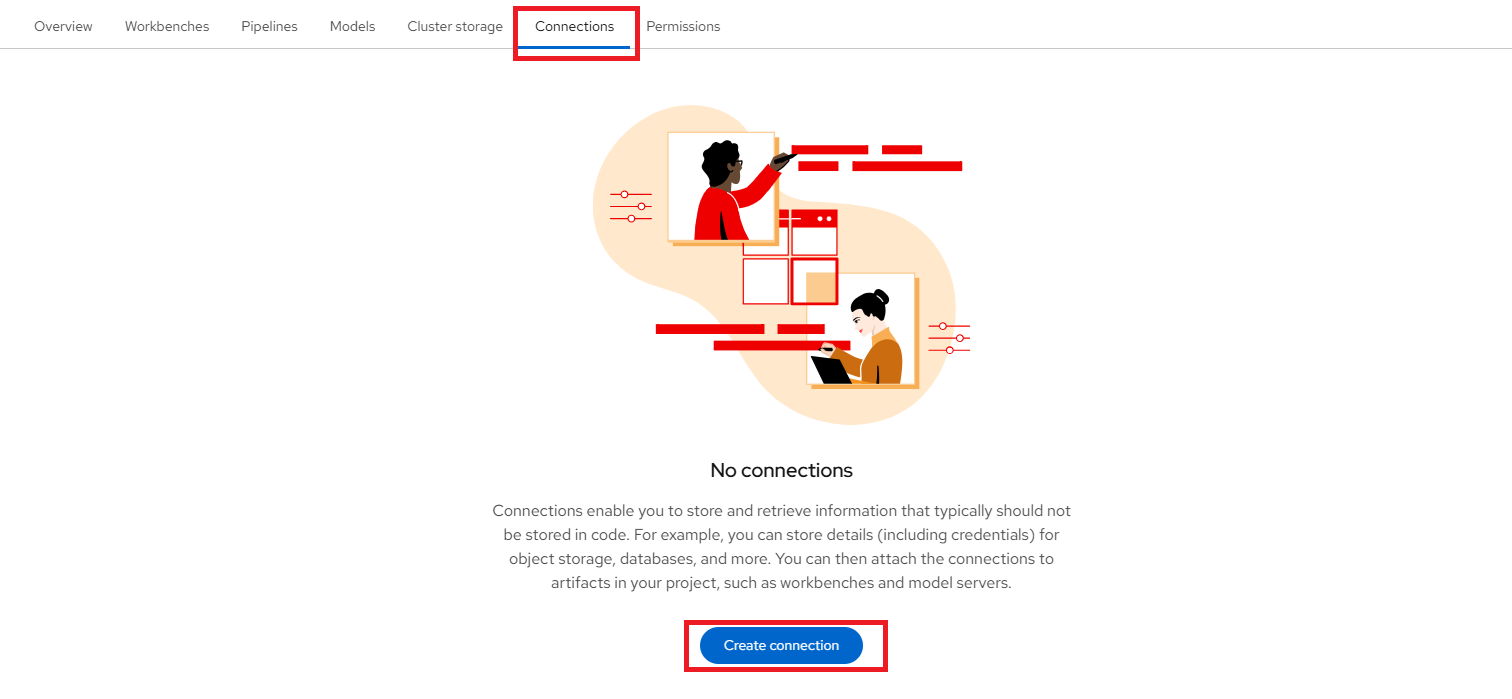
Create a connection
Once we have our workbench and cluster storage set up, we can create connections. Click the "Create connection" button to open the connection configuration window as shown below:
Connections are configurations for remote data location. In the Add connection modal, select a Connection type. The OCI-compliant registry, S3 compatible object storage, and URI options are pre-installed connection types. Please select "S3 compatible object storage - v1" as your Connection type as shown below:
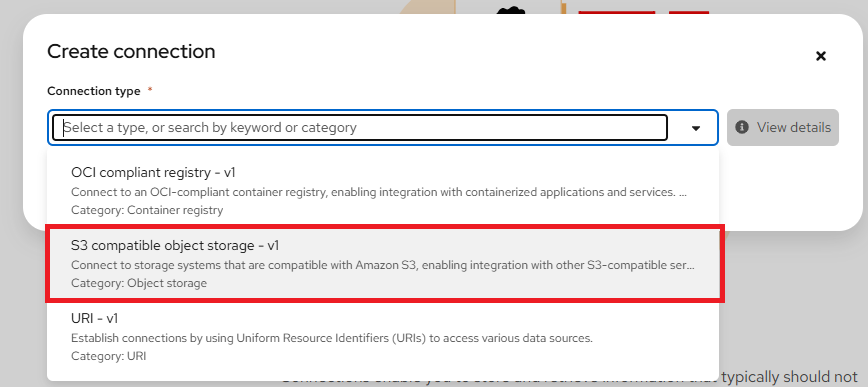
Other Connection Types
OpenShift AI supports three connection types for accessing model:
-
OCI-compliant registry: For proprietary images requiring authentication. If you selected OCI-compliant registry, in the Registry host field, enter the path to the OCI-compliant registry where model is stored. Deploying models from OCI containers is also known as Modelcars in KServe.
-
S3 compatible object storage: For cloud storage solutions, which is the one used in this demonstration. For S3-compatible object storage, in the Path field, enter the folder path that contains the model in your specified data source.
-
URI: For publicly available resources. If you selected URI in the preceding step, in the URI field, enter the model Uniform Resource Identifier (URI) where the model is located.
Within this window, enter the information about the S3-compatible object bucket where the model is stored. Enter the following information:
-
Connection name: Enter a unique name for the connection. A resource name is generated based on the name of the connection. A resource name is the label for the underlying resource in OpenShift.
Optional: Edit the default resource name. Note that you cannot change the resource name after you create the connection.
Optional: Provide a description of the connection.
-
Access Key: The access key to the bucket.
-
Secret Key: The secret for the access key.
-
Endpoint: The endpoint to connect to the storage.
-
Region: The region to connect to the storage.
-
Bucket: The name of the bucket.
NOTE: However, you are not required to use the S3 service from Amazon Web Services (AWS). Any S3-compatible storage i.e. NERC OpenStack Container (Ceph), Minio, AWS S3, etc. is supported.
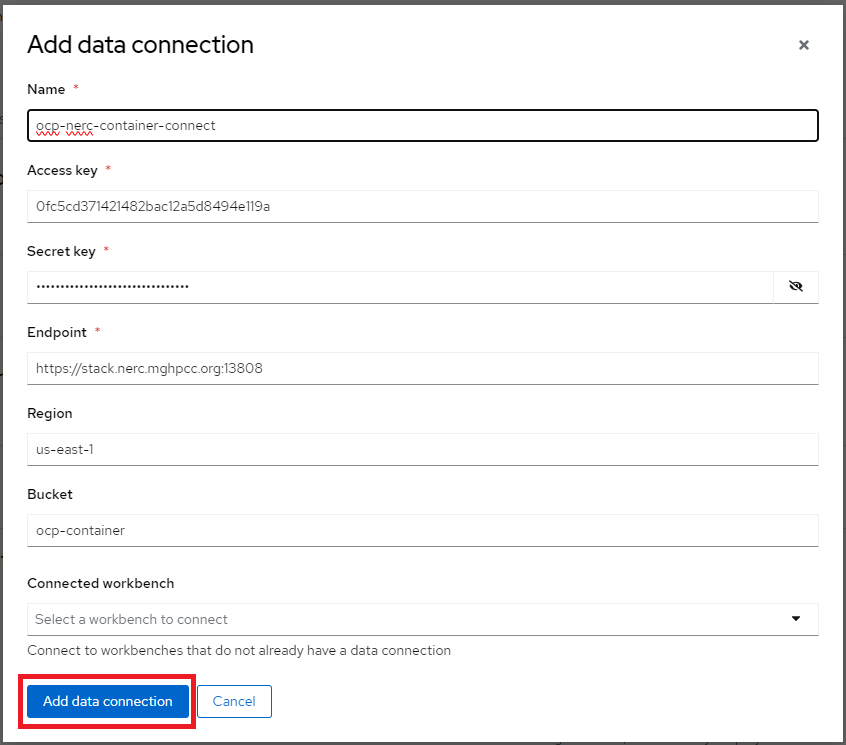
For our example project, let's name it "ocp-nerc-container-connect", we'll select the "us-east-1" as Region, choose "ocp-container" as Bucket.
The API Access EC2 credentials can be downloaded and accessed from the NERC OpenStack Project as described here. This credential file contains information regarding Access Key, Secret Key, and Endpoint.
Very Important Note: If you are using an AWS S3 bucket, the Endpoint needs to be set as https://s3.amazonaws.com/. However, for the NERC Object Storage container, which is based on the Ceph backend, the Endpoint needs to be set as https://stack.nerc.mghpcc.org:13808, and the Region should be set as us-east-1.
How to store & connect to the model file in the object storage bucket?
The model file(s) should have been saved into an S3-compatible object storage bucket (NERC OpenStack Container [Ceph], Minio, or AWS S3) for which you must have the connection information, such as location and credentials. You can create a bucket on your active project at the NERC OpenStack Project by following the instructions in this guide.
The API Access EC2 credentials can be downloaded and accessed from the NERC OpenStack Project as described here.
For our example project, we are creating a bucket named "ocp-container" in one of our NERC OpenStack project's object storage. Inside this bucket, we have added a folder or directory called "coolstore-model", where we will store the model file in ONNX format, as shown here:
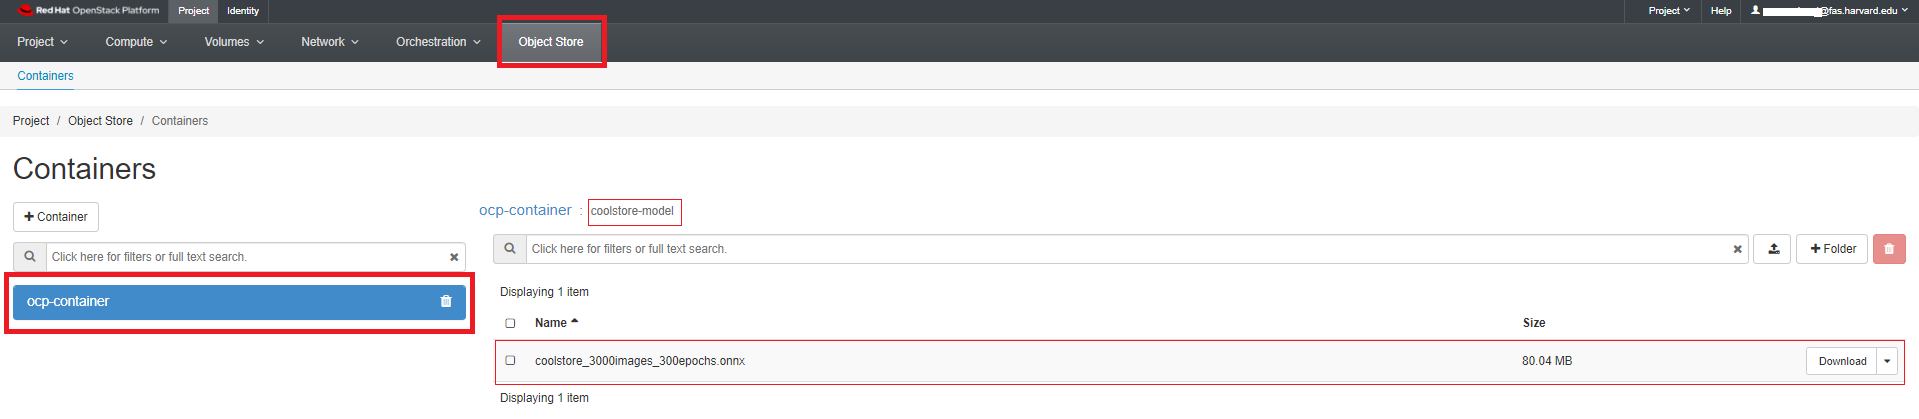
ONNX: An open standard for machine learning interoperability.
After completing the required fields, click Create. You should now see the connection displayed in the main project window as shown below:

Deploy the model
To add a model to be served, click the Deploy model button. Doing so will initiate the Deploy model pop-up window as shown below:
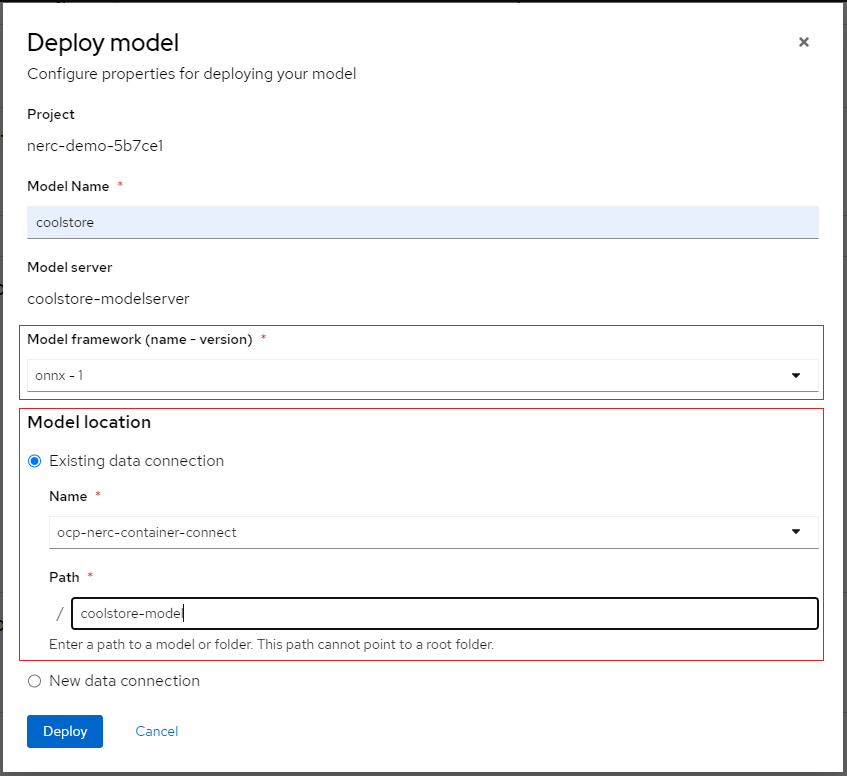
Enter the following information for your new model:
-
Model Name: The name you want to give to your model (e.g., "coolstore").
-
Model framework (name-version): The framework used to save this model. At this time, OpenVINO IR or ONNX or Tensorflow are supported.
-
Model Location: Select the connection you created as described here to store the model. Alternatively, you can create a new connection directly from this menu.
-
Folder path: If your model is not located at the root of the bucket of your connection, you must enter the path to the folder it is in.
For our example project, let's name the Model as "coolstore", select "onnx-1" for the framework, select the Data location you created before for the Model location, and enter "coolstore-model" as the folder path for the model (without leading /).
When you are ready to deploy your model, select the Deploy button.
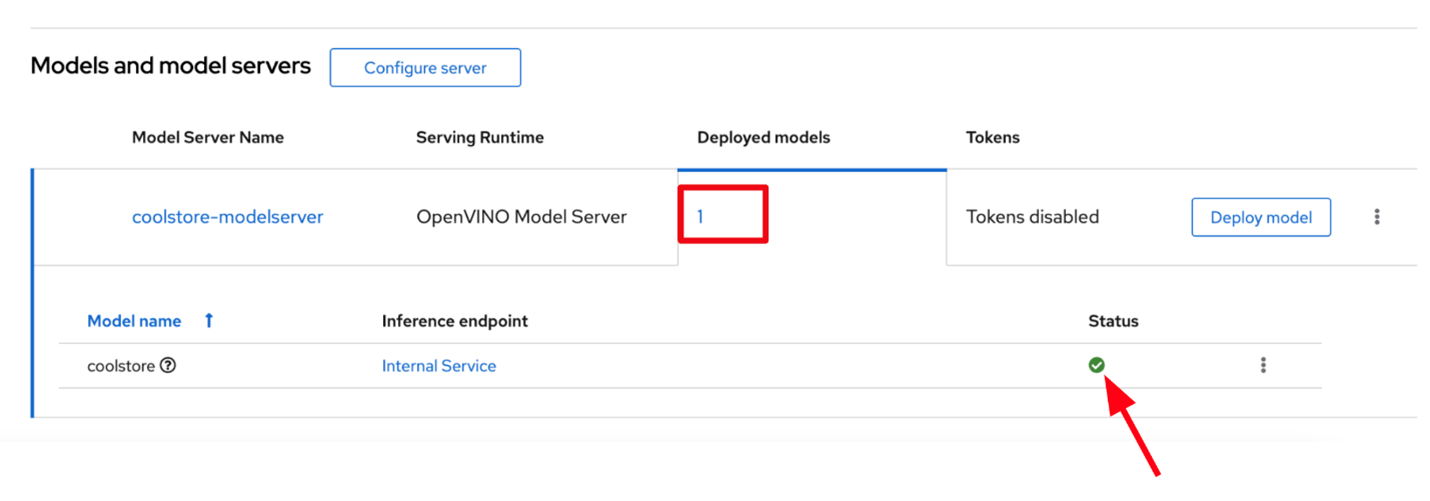
When you return to the Deployed models page, you will see your newly deployed model. You should click on the 1 on the Deployed models tab to see details. When the model has finished deploying, the status icon will be a green checkmark indicating the model deployment is complete as shown below:
Important Note
When you delete a model server, all models hosted on it are also removed, making them unavailable to applications.
Check the Model API
The deployed model is now accessible through the API endpoint of the model server. The information about the endpoint is different, depending on how you configured the model server.
If you did not expose the model externally through a route, click on the "Internal endpoint details" link in the Inference endpoint section. A popup will display the address for the gRPC and the REST URLs for the inference endpoints as shown below:
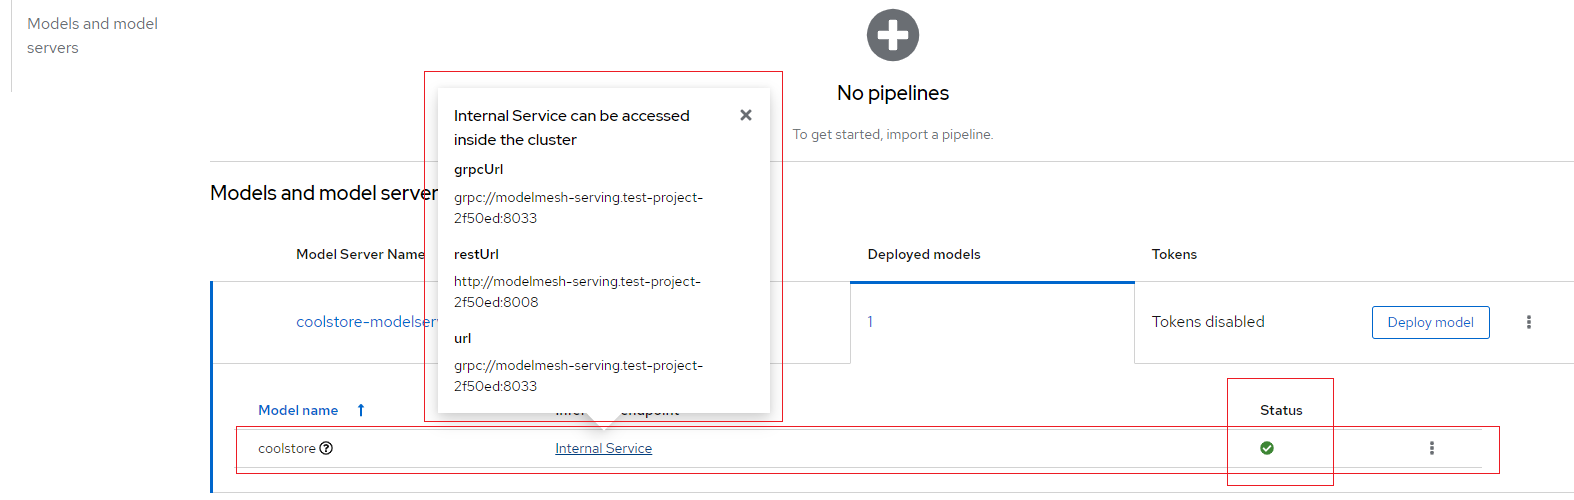
Your model is now deployed and ready to use!
Notes:
-
The REST URL displayed is only the base address of the endpoint. You must append
/v2/models/name-of-your-model/inferto it to have the full address. Example:http://modelmesh-serving.name-of-your-project-namespace:8008/v2/models/coolstore/infer -
The full documentation of the API (REST and gRPC) is available here.
-
The gRPC proto file for the Model Server is available here.
-
If you have exposed the model through an external route, the Inference endpoint displays the full URL that you can copy.
Important Note
Even when you expose the model through an external route, the internal ones are still available. They use this format:
-
REST:
http://modelmesh-serving.name-of-your-project:8008/v2/models/name-of-your-model/infer -
gRPC:
grpc://modelmesh-serving.name-of-your-project:8033. Please make note of the grpcURL value, we will need it later.