Kubespray
Pre-requisite
We will need 1 control-plane(master) and 1 worker node to create a single control-plane kubernetes cluster using Kubespray. We are using following setting for this purpose:
-
1 Linux machine for Ansible master,
ubuntu-22.04-x86_64or your choice of Ubuntu OS image,cpu-su.2flavor with 2vCPU, 8GB RAM, 20GB storage. -
1 Linux machine for master,
ubuntu-22.04-x86_64or your choice of Ubuntu OS image,cpu-su.2flavor with 2vCPU, 8GB RAM, 20GB storage - also assign Floating IP to the master node. -
1 Linux machines for worker,
ubuntu-22.04-x86_64or your choice of Ubuntu OS image,cpu-su.1flavor with 1vCPU, 4GB RAM, 20GB storage. -
ssh access to all machines: Read more here on how to set up SSH on your remote VMs.
-
To allow SSH from Ansible master to all other nodes: Read more here Generate SSH key for Ansible master node using:
ssh-keygen -t rsa

Generating public/private rsa key pair.
Enter file in which to save the key (/root/.ssh/id_rsa):
Enter passphrase (empty for no passphrase):
Enter same passphrase again:
Your identification has been saved in /root/.ssh/id_rsa
Your public key has been saved in /root/.ssh/id_rsa.pub
The key fingerprint is:
SHA256:OMsKP7EmhT400AJA/KN1smKt6eTaa3QFQUiepmj8dxroot@ansible-master
The key's randomart image is:
+---[RSA 3072]----+
|=o.oo.           |
|.o...            |
|..=  .           |
|=o.= ...         |
|o=+.=.o SE       |
|.+*o+. o. .      |
|.=== +o. .       |
|o+=o=..          |
|++o=o.           |
+----[SHA256]-----+
Copy and append the contents of SSH public key i.e.
~/.ssh/id_rsa.pubto other nodes's~/.ssh/authorized_keysfile. Please make sure you are logged in asrootuser by doingsudo subefore you copy this public key to the end of~/.ssh/authorized_keysfile of the other master and worker nodes. This will allowssh <other_nodes_internal_ip>from the Ansible master node's terminal. -
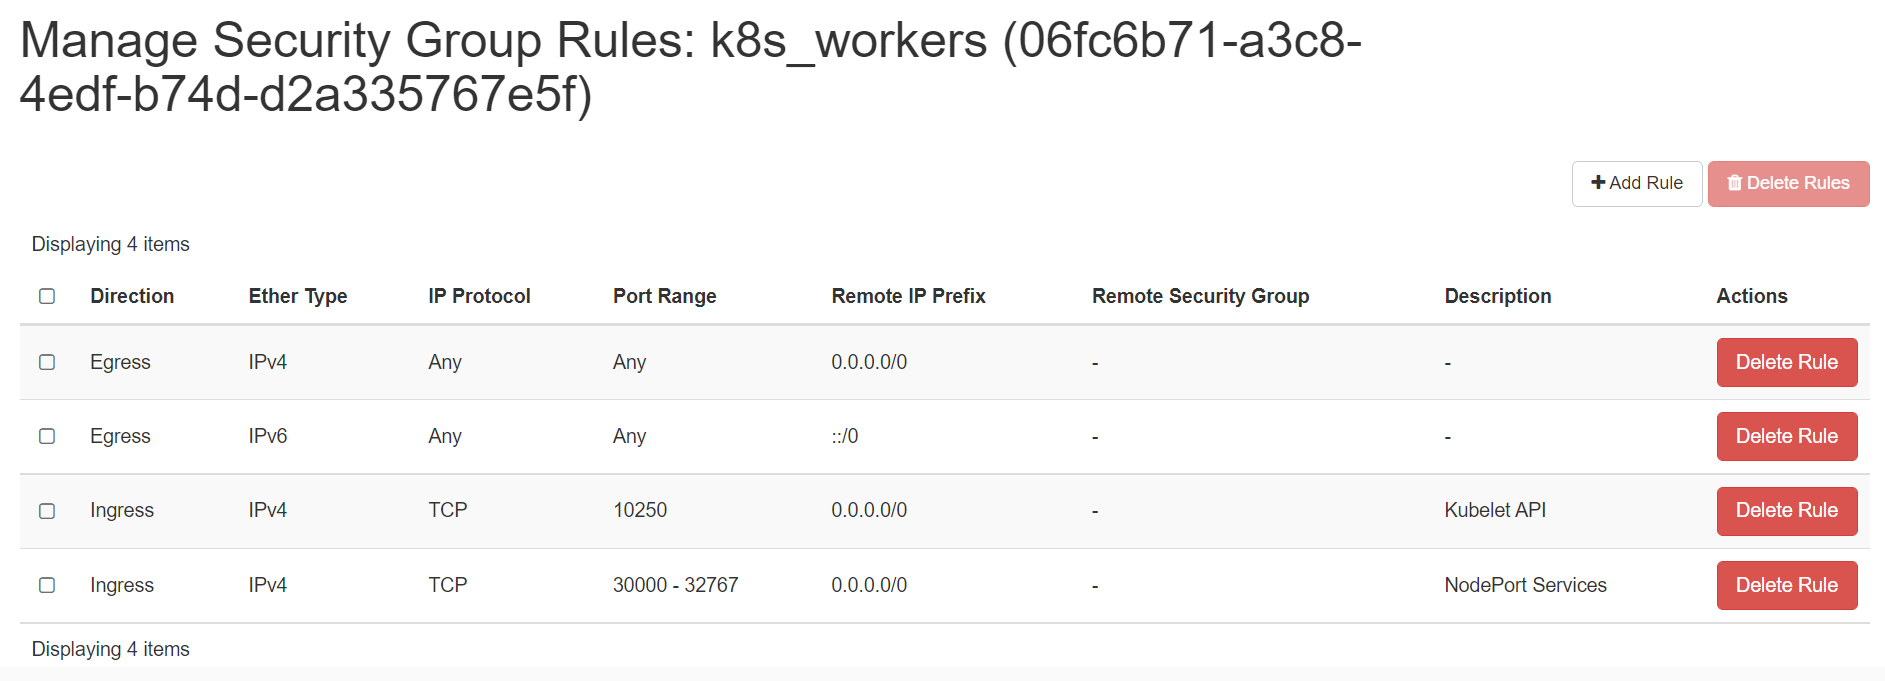
Create 2 security groups with appropriate ports and protocols:
i. To be used by the master nodes:
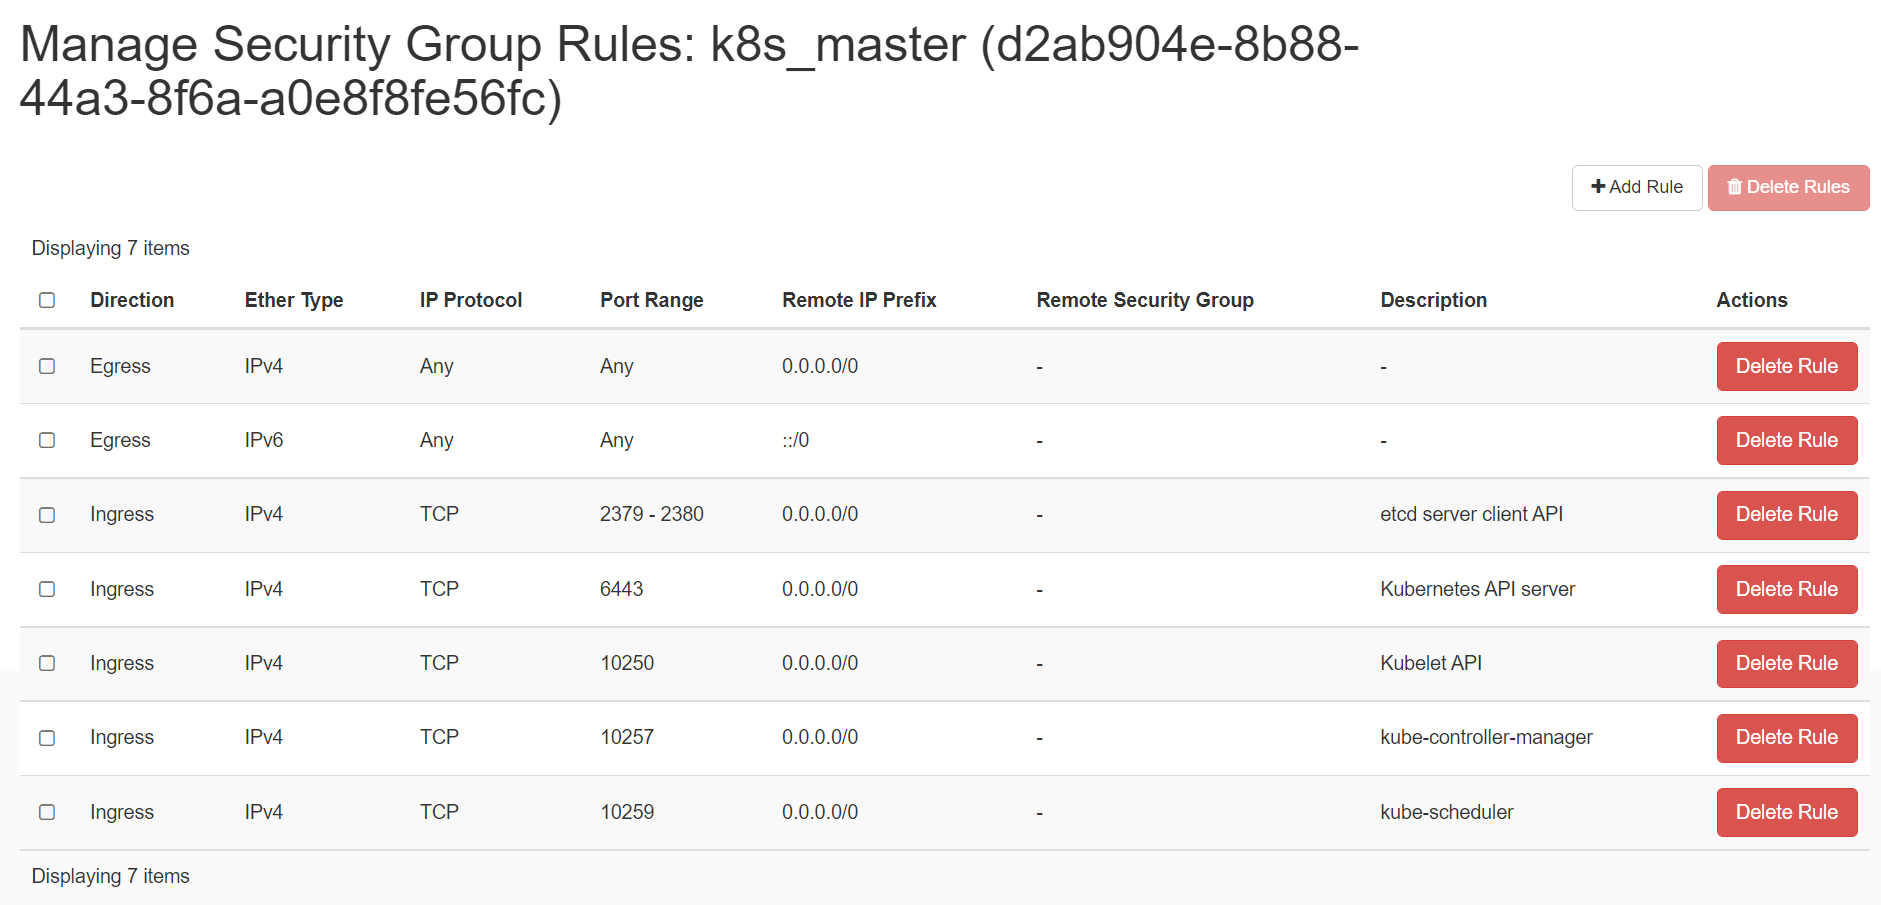
ii. To be used by the worker nodes:
-
setup Unique hostname to each machine using the following command:
For example:
In this step, you will update packages and disable swap on the all 3 nodes:
-
1 Ansible Master Node - ansible_master
-
1 Kubernetes Master Node - kubspray_master
-
1 Kubernetes Worker Node - kubspray_worker1
The below steps will be performed on all the above mentioned nodes:
-
SSH into all the 3 machines
-
Switch as root:
sudo su -
Update the repositories and packages:
-
Turn off
swap
Configure Kubespray on ansible_master node using Ansible Playbook
Run the below command on the master node i.e. master that you want to setup as control plane.
-
SSH into ansible_master machine
-
Switch to root user:
sudo su -
Execute the below command to initialize the cluster:
-
Install Python3 and upgrade pip to pip3:
-
Clone the Kubespray git repository:
-
Install dependencies from
requirements.txt: -
Copy
inventory/sampleasinventory/mycluster -
Update Ansible inventory file with inventory builder:
This step is little trivial because we need to update
hosts.ymlwith the nodes IP.Now we are going to declare a variable "IPS" for storing the IP address of other K8s nodes .i.e. kubspray_master(192.168.0.130), kubspray_worker1(192.168.0.32)
declare -a IPS=(192.168.0.130 192.168.0.32)
CONFIG_FILE=inventory/mycluster/hosts.yml python3 \
    contrib/inventory_builder/inventory.py ${IPS[@]}
This outputs:
DEBUG: Adding group all DEBUG: Adding group kube_control_plane DEBUG: Adding group kube_node DEBUG: Adding group etcd DEBUG: Adding group k8s_cluster DEBUG: Adding group calico_rr DEBUG: adding host node1 to group all DEBUG: adding host node2 to group all DEBUG: adding host node1 to group etcd DEBUG: adding host node1 to group kube_control_plane DEBUG: adding host node2 to group kube_control_plane DEBUG: adding host node1 to group kube_node DEBUG: adding host node2 to group kube_node -
After running the above commands do verify the
hosts.ymland its content:The contents of the
hosts.ymlfile should looks like:all: hosts: node1: ansible_host: 192.168.0.130 ip: 192.168.0.130 access_ip: 192.168.0.130 node2: ansible_host: 192.168.0.32 ip: 192.168.0.32 access_ip: 192.168.0.32 children: kube_control_plane: hosts: node1: node2: kube_node: hosts: node1: node2: etcd: hosts: node1: k8s_cluster: children: kube_control_plane: kube_node: calico_rr: hosts: {} -
Review and change parameters under
inventory/mycluster/group_vars -
It can be useful to set the following two variables to true in
inventory/mycluster/group_vars/k8s_cluster/k8s-cluster.yml:kubeconfig_localhost(to make a copy ofkubeconfigon the host that runs Ansible in{ inventory_dir }/artifacts) andkubectl_localhost(to downloadkubectlonto the host that runs Ansible in{ bin_dir }).Very Important
As Ubuntu 20 kvm kernel doesn't have dummy module we need to modify the following two variables in
inventory/mycluster/group_vars/k8s_cluster/k8s-cluster.yml:enable_nodelocaldns: falseandkube_proxy_mode: iptableswhich will Disable nodelocal dns cache and Kube-proxy proxyMode to iptables respectively. -
Deploy Kubespray with Ansible Playbook - run the playbook as
rootuser. The option--becomeis required, as for example writing SSL keys in/etc/, installing packages and interacting with varioussystemddaemons. Without--becomethe playbook will fail to run!Note
Running ansible playbook takes little time because it depends on the network bandwidth also.
Install kubectl on Kubernetes master node .i.e. kubspray_master
-
Install kubectl binary
This outputs:
kubectl 1.26.1 from Canonical✓ installed -
Now verify the kubectl version:
Validate all cluster components and nodes are visible on all nodes
-
Verify the cluster
Deploy A Hello Minikube Application
-
Use the kubectl create command to create a Deployment that manages a Pod. The Pod runs a Container based on the provided Docker image.
-
View the deployments information:
-
View the port information:
-
Expose the service locally
Go to browser, visit http://<Master-Floating-IP>:8080 i.e. http://140.247.152.235:8080/ to check the hello minikube default page.
Clean up
Now you can clean up the app resources you created in your cluster: