Creating a Single Master cluster with kubeadm
Objectives
-
Install a single control-plane(master) Kubernetes cluster
-
Install a Pod network on the cluster so that your Pods can talk to each other
-
Deploy and test a sample app
-
Deploy K8s Dashboard to view all cluster's components
Components and architecure
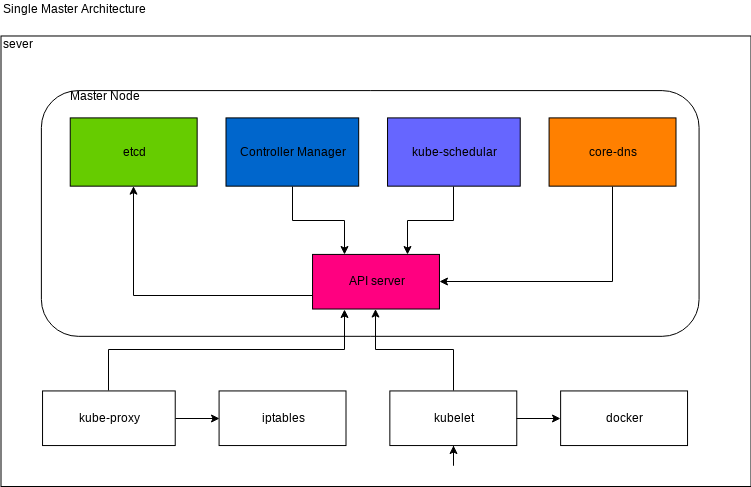
You can learn about each component from Kubernetes Componets.
Pre-requisite
We will need 1 control-plane(master) and 2 worker node to create a single control-plane kubernetes cluster using kubeadm. We are using following setting for this purpose:
-
1 Linux machine for master,
ubuntu-20.04-x86_64,cpu-su.2flavor with 2vCPU, 8GB RAM, 20GB storage. -
2 Linux machines for worker,
ubuntu-20.04-x86_64,cpu-su.1flavor with 1vCPU, 4GB RAM, 20GB storage - also assign Floating IPs to both of the worker nodes. -
ssh access to all machines: Read more here on how to set up SSH on your remote VMs.
-
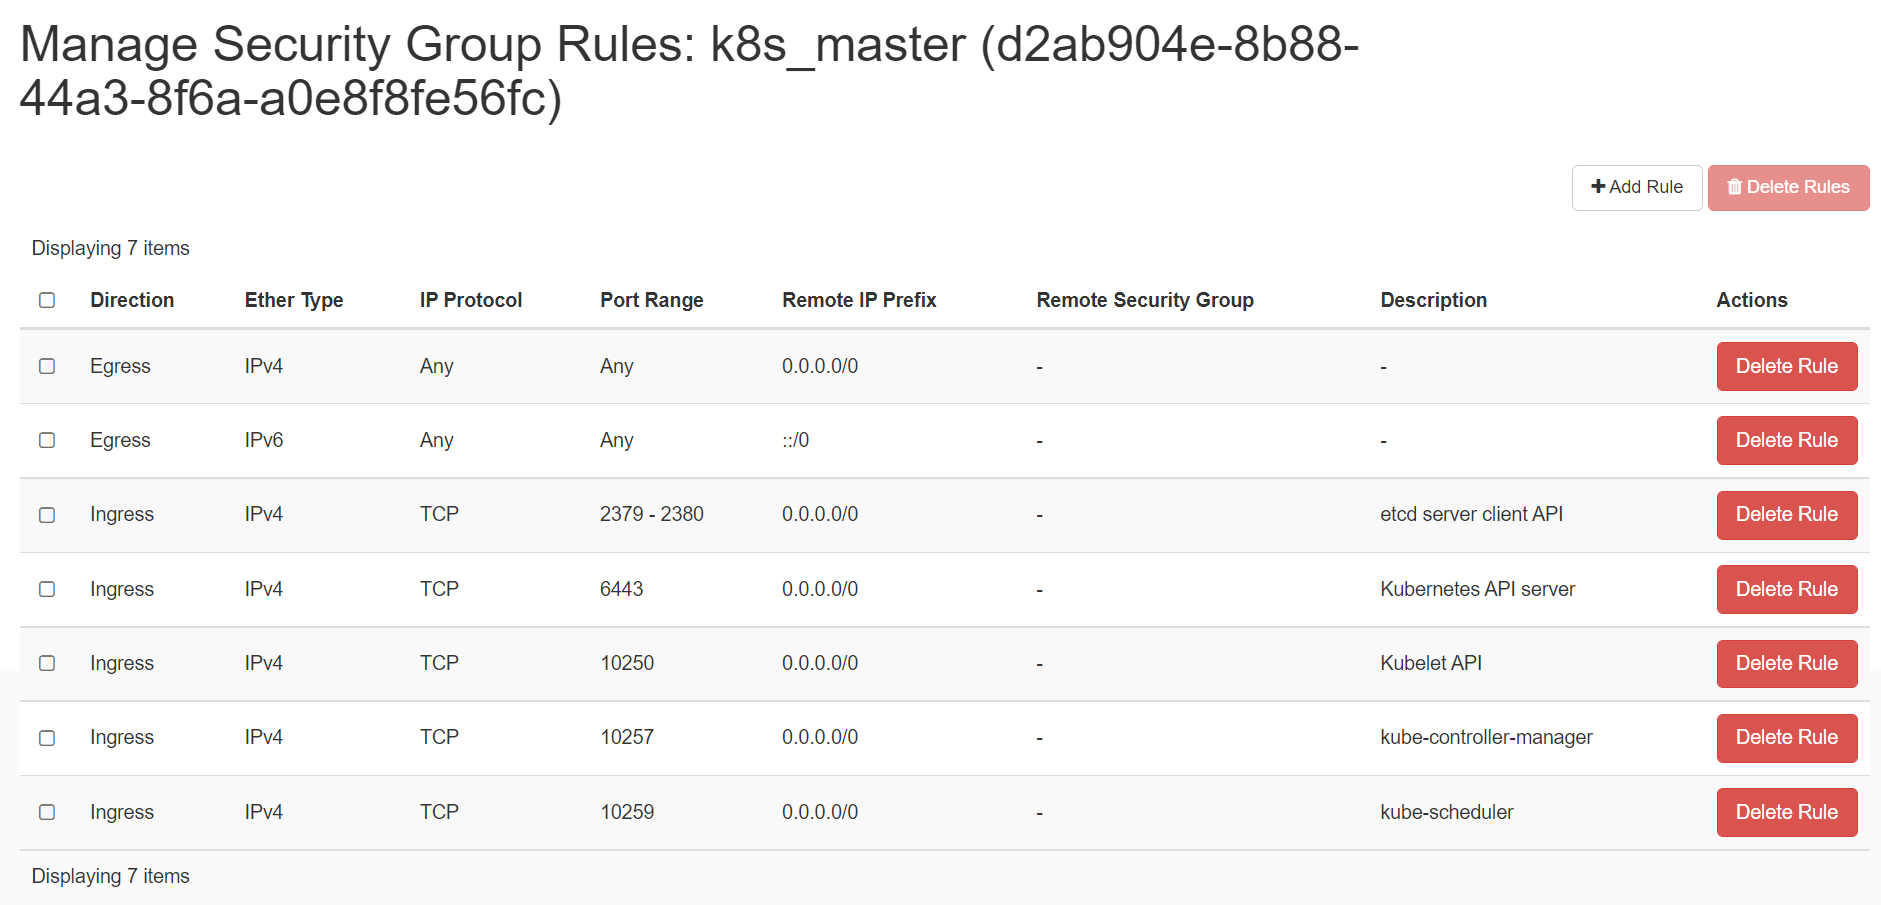
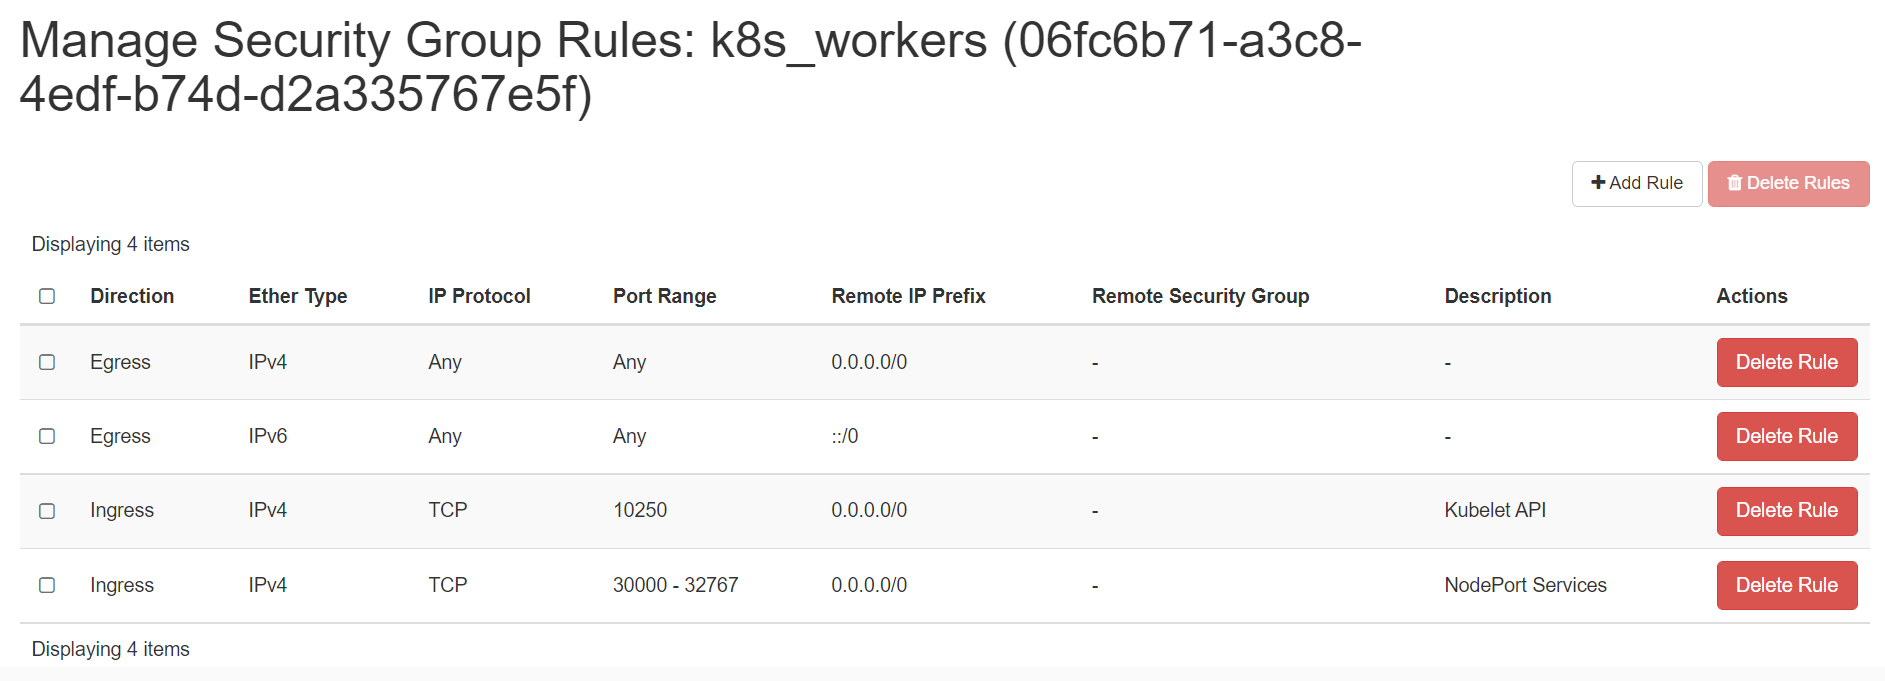
Create 2 security groups with appropriate ports and protocols:
i. To be used by the master nodes:
ii. To be used by the worker nodes:
-
setup Unique hostname to each machine using the following command:
For example:
Steps
-
Disable swap on all nodes.
-
Install
kubeadm,kubelet, andkubectlon all the nodes. -
Install container runtime on all nodes- you will be using
containerd. -
Initiate
kubeadmcontrol plane configuration on the master node. -
Save the worker node join command with the token.
-
Install CNI network plugin i.e. Flannel on master node.
-
Join the worker node to the master node (control plane) using the join command.
-
Validate all cluster components and nodes are visible on master node.
-
Deploy a sample app and validate the app from master node.
Install kubeadm, kubelet and containerd on master and worker nodes
kubeadm will not install or manage kubelet or kubectl for you, so you will need to ensure they match the version of the Kubernetes control plane you want kubeadm to install for you. You will install these packages on all of your machines:
• kubeadm: the command to bootstrap the cluster.
• kubelet: the component that runs on all of the machines in your cluster and does things like starting pods and containers.
• kubectl: the command line util to talk to your cluster.
In this step, you will install kubelet and kubeadm on the below nodes
-
master
-
worker1
-
worker2
The below steps will be performed on all the above mentioned nodes:
-
SSH into all the 3 machines
-
Update the repositories and packages:
-
Turn off
swap -
Install
curlandapt-transport-https -
Download the Google Cloud public signing key and add key to verify releases
-
add kubernetes apt repo
-
Install kubelet, kubeadm, and kubectl
-
apt-mark holdis used so that these packages will not be updated/removed automatically
Install the container runtime i.e. containerd on master and worker nodes
To run containers in Pods, Kubernetes uses a container runtime.
By default, Kubernetes uses the Container Runtime Interface (CRI) to interface with your chosen container runtime.
-
Install container runtime - containerd
The first thing to do is configure the persistent loading of the necessary
containerdmodules. This forwarding IPv4 and letting iptables see bridged trafficis is done with the following command: -
Ensure
net.bridge.bridge-nf-call-iptablesis set to1in your sysctl config: -
Apply sysctl params without reboot:
-
Install the necessary dependencies with:
-
The
containerd.iopackages in DEB and RPM formats are distributed by Docker. Add the required GPG key with:curl -fsSL https://download.docker.com/linux/ubuntu/gpg | sudo apt-key add - sudo add-apt-repository "deb [arch=amd64] https://download.docker.com/linux/ubuntu $(lsb_release -cs) stable"It's now time to Install and configure containerd:
sudo apt update -y
sudo apt install -y containerd.io
containerd config default | sudo tee /etc/containerd/config.toml

# Reload the systemd daemon with
sudo systemctl daemon-reload

# Start containerd
sudo systemctl restart containerd
sudo systemctl enable --now containerd
You can verify
containerdis running with the command:Configuring the kubelet cgroup driver
From 1.22 onwards, if you do not set the
cgroupDriverfield underKubeletConfiguration,kubeadmwill default it tosystemd. So you do not need to do anything here by default but if you want you change it you can refer to this documentation.
Configure kubeadm to bootstrap the cluster on master node
Run the below command on the master node i.e. master that you want to setup as control plane.
-
SSH into master machine
-
Switch to root user:
sudo su -
Execute the below command to initialize the cluster:
export MASTER_IP=<Master-Internal-IP>
kubeadm config images pull
kubeadm init --apiserver-advertise-address=${MASTER_IP} --pod-network-cidr=10.244.0.0/16
Important Note
Please make sure you replace the correct IP of the node with
<Master-Internal-IP>which is the Internal IP of master node.--pod-network-cidrvalue depends upon what CNI plugin you going to use so need to be very careful while setting this CIDR values. In our case, you are going to use Flannel CNI network plugin so you will use:--pod-network-cidr=10.244.0.0/16. If you are opted to use Calico CNI network plugin then you need to use:--pod-network-cidr=192.168.0.0/16and if you are opted to use Weave Net no need to pass this parameter.For example, our
FlannelCNI network plugin based kubeadm init command with master node with internal IP:192.168.0.167look like below:For example:
export MASTER_IP=192.168.0.167
kubeadm config images pull
kubeadm init --apiserver-advertise-address=${MASTER_IP} --pod-network-cidr=10.244.0.0/16
Save the output in some secure file for future use. This will show an unique token to join the control plane. The output from
kubeadm initshould looks like below:Your Kubernetes control-plane has initialized successfully! To start using your cluster, you need to run the following as a regular user: mkdir -p $HOME/.kube sudo cp -i /etc/kubernetes/admin.conf $HOME/.kube/config sudo chown $(id -u):$(id -g) $HOME/.kube/config Alternatively, if you are the root user, you can run: export KUBECONFIG=/etc/kubernetes/admin.conf You should now deploy a pod network to the cluster. Run "kubectl apply -f [podnetwork].yaml" with one of the options listed at: https://kubernetes.io/docs/concepts/cluster-administration/addons/ You can now join any number of the control-plane node running the following command on each worker nodes as root: kubeadm join 192.168.0.167:6443 --token cnslau.kd5fjt96jeuzymzb \ --discovery-token-ca-cert-hash sha256:871ab3f050bc9790c977daee9e44cf52e15ee3 7ab9834567333b939458a5bfb5 \ --control-plane --certificate-key 824d9a0e173a810416b4bca7038fb33b616108c17abcbc5eaef8651f11e3d146 Please note that the certificate-key gives access to cluster sensitive data, keep it secret! As a safeguard, uploaded-certs will be deleted in two hours; If necessary, you can use "kubeadm init phase upload-certs --upload-certs" to reload certs afterward. Then you can join any number of worker nodes by running the following on each as root: kubeadm join 192.168.0.167:6443 --token cnslau.kd5fjt96jeuzymzb \ --discovery-token-ca-cert-hash sha256:871ab3f050bc9790c977daee9e44cf52e15ee37ab9834567333b939458a5bfb5The output consists of 2 major tasks:
A. Setup
kubeconfigusing on current master node: As you are running asrootuser so you need to run the following command:We need to run the below commands as a normal user to use the kubectl from terminal.
mkdir -p $HOME/.kube
sudo cp -i /etc/kubernetes/admin.conf $HOME/.kube/config
sudo chown $(id -u):$(id -g) $HOME/.kube/config
Now the machine is initialized as master.
Warning
Kubeadm signs the certificate in the admin.conf to have
Subject: O = system:masters, CN = kubernetes-admin. system:mastersis a break-glass, super user group that bypasses the authorization layer (e.g. RBAC). Do not share the admin.conf file with anyone and instead grant users custom permissions by generating them a kubeconfig file using thekubeadm kubeconfig usercommand.B. Join worker nodes running following command on individual worker nodes:
kubeadm join 192.168.0.167:6443 --token cnslau.kd5fjt96jeuzymzb \
    --discovery-token-ca-cert-hash sha256:871ab3f050bc9790c977daee9e44cf52e15ee37ab9834567333b939458a5bfb5
Important Note
Your output will be different than what is provided here. While performing the rest of the demo, ensure that you are executing the command provided by your output and dont copy and paste from here.
If you do not have the token, you can get it by running the following command on the control-plane node:
The output is similar to this:
TOKEN     TTL  EXPIRES      USAGES           DESCRIPTION            EXTRA GROUPS
8ewj1p... 23h  2018-06-12   authentication,  The default bootstrap  system:
                            signing          token generated by     bootstrappers:
                                            'kubeadm init'.         kubeadm:
                                                                    default-node-token
If you missed the join command, execute the following command
kubeadm token create --print-join-commandin the master node to recreate the token with the join command.root@master:~$ kubeadm token create --print-join-command kubeadm join 10.2.0.4:6443 --token xyzeyi.wxer3eg9vj8hcpp2 \ --discovery-token-ca-cert-hash sha256:ccfc92b2a31b002c3151cdbab77ff4dc32ef13b213fa3a9876e126831c76f7faBy default, tokens expire after 24 hours. If you are joining a node to the cluster after the current token has expired, you can create a new token by running the following command on the control-plane node:
The output is similar to this:
5didvk.d09sbcov8ph2amjwWe can use this new token to join:
Now that you have initialized the master - you can now work on bootstrapping the worker nodes.
-
SSH into worker1 and worker2
-
Switch to root user on both the machines:
sudo su -
Check the output given by the init command on master to join worker node:
-
Execute the above command on both the nodes:
-
Your output should look like:
Validate all cluster components and nodes are visible on all nodes
-
Verify the cluster
Install CNI network plugin
CNI overview
Managing a network where containers can interoperate efficiently is very important. Kubernetes has adopted the Container Network Interface(CNI) specification for managing network resources on a cluster. This relatively simple specification makes it easy for Kubernetes to interact with a wide range of CNI-based software solutions. Using this CNI plugin allows Kubernetes pods to have the same IP address inside the pod as they do on the VPC network. Make sure the configuration corresponds to the Pod CIDR specified in the kubeadm configuration file if applicable.
You must deploy a CNI based Pod network add-on so that your Pods can communicate with each other. Cluster DNS (CoreDNS) will not start up before a network is installed. To verify you can run this command: kubectl get po -n kube-system:
You should see the following output. You will see the two coredns-* pods in a pending state. It is the expected behavior. Once we install the network plugin, it will be in a Running state.
Output Example:
root@master:~$ kubectl get po -n kube-system
 NAME                               READY  STATUS   RESTARTS  AGE
coredns-558bd4d5db-5jktc             0/1   Pending   0        10m
coredns-558bd4d5db-xdc5x             0/1   Pending   0        10m
etcd-master1                         1/1   Running   0        11m
kube-apiserver-master1               1/1   Running   0        11m
kube-controller-manager-master1      1/1   Running   0        11m
kube-proxy-5jfh5                     1/1   Running   0        10m
kube-scheduler-master1               1/1   Running   0        11m
Supported CNI options
To read more about the currently supported base CNI solutions for Kubernetes read here and also read this.
The below command can be run on the master node to install the CNI plugin:
As you had passed --pod-network-cidr=10.244.0.0/16 with kubeadm init so this should work for Flannel CNI.
Using Other CNI Options
For Calico CNI plugin to work correctly, you need to pass --pod-network-cidr=192.168.0.0/16 with kubeadm init and then you can run: kubectl apply -f https://docs.projectcalico.org/v3.8/manifests/calico.yaml
For Weave Net CNI plugin to work correctly, you don't need to pass --pod-network-cidr with kubeadm init and then you can run: kubectl apply -f "https://cloud.weave.works/k8s/net?k8s-version=$(kubectl version | base64 | tr -d '\n')"
Dual Network:
It is highly recommended to follow an internal/external network layout for your cluster, as showed in this diagram:
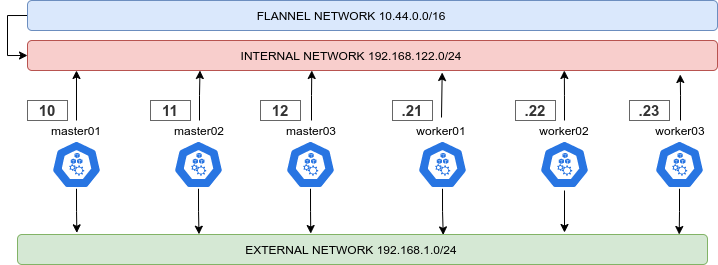
To enable this just give two different names to the internal and external interface, according to your distro of choiche naming scheme:
Also you can decide here what CIDR should your cluster use
Once you successfully installed the Flannel CNI component to your cluster. You can now verify your HA cluster running:
kubectl get nodes

NAME      STATUS   ROLES                    AGE   VERSION
master    Ready    control-plane,master     22m   v1.26.1
worker1   Ready    <none>                   10m   v1.26.1
worker2   Ready    <none>                   10m   v1.26.1
Watch Recorded Video showing the above steps on setting up the cluster
Here's a quick recorded demo video upto this point where we successfully setup single master K8s cluster using Kubeadm.
Deploy A Sample Nginx Application From the master node
Now that we have all the components to make the cluster and applications work, let's deploy a sample Nginx application and see if we can access it over a NodePort that has port range of 30000-32767.
The below command can be run on:
To check which NodePort is opened and running the Nginx run:
The output will show:

Once the deployment is up, you should be able to access the Nginx home page on the allocated NodePort from either of the worker nodes' Floating IP.
To check which worker node is serving nginx, you can check NODE column running the following command:
OR,
This will show like below:
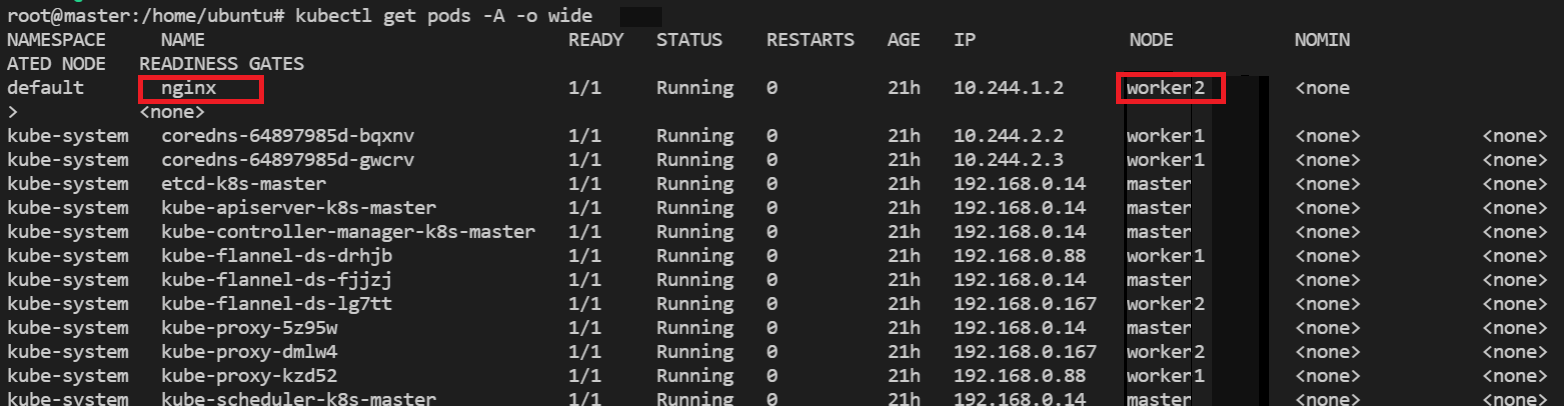
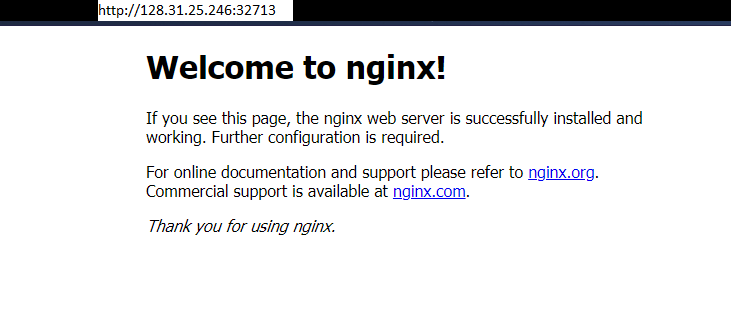
Go to browser, visit http://<Worker-Floating-IP>:<NodePort> i.e. http://128.31.25.246:32713 to check the nginx default page. Here Worker_Floating-IP corresponds to the Floating IP of the nginx pod running worker node i.e. worker2.
For your example,
Deploy A K8s Dashboard
You will going to setup K8dash/Skooner to view a dashboard that shows all your K8s cluster components.
-
SSH into
masternode -
Switch to root user:
sudo su -
Apply available deployment by running the following command:
kubectl apply -f https://raw.githubusercontent.com/skooner-k8s/skooner/master/kubernetes-skooner-nodeport.yamlThis will map Skooner port 4654 to a randomly selected port from the master node. The assigned NodePort on the master node can be found running:
OR,

To check which worker node is serving
skooner-*, you can check NODE column running the following command:OR,
This will show like below:
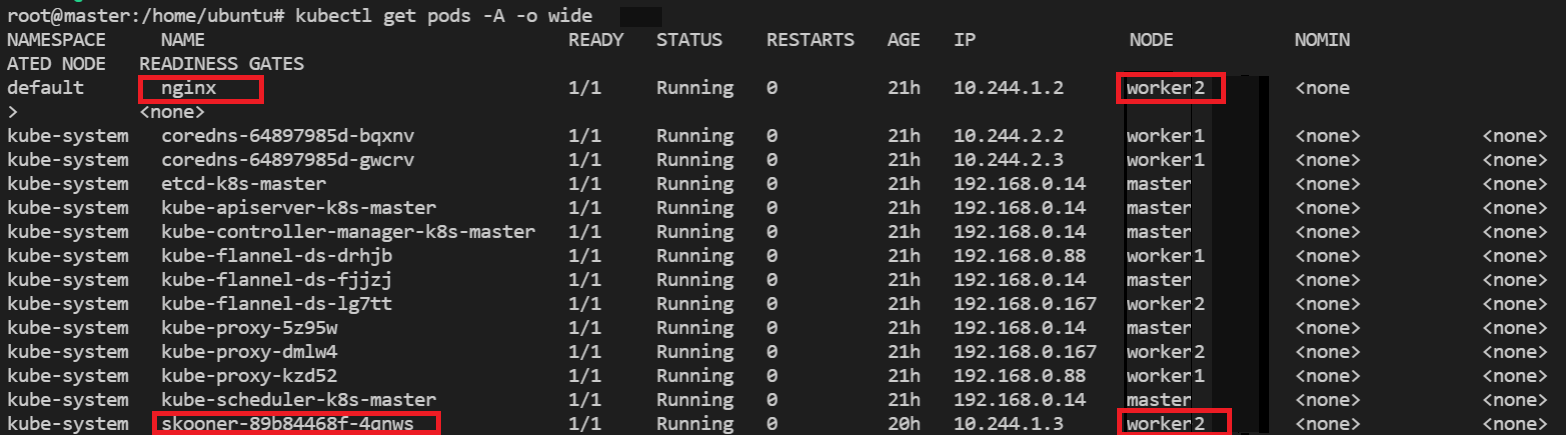
Go to browser, visit
http://<Worker-Floating-IP>:<NodePort>i.e. http://128.31.25.246:30495 to check the skooner dashboard page. HereWorker_Floating-IPcorresponds to the Floating IP of theskooner-*pod running worker node i.e.worker2.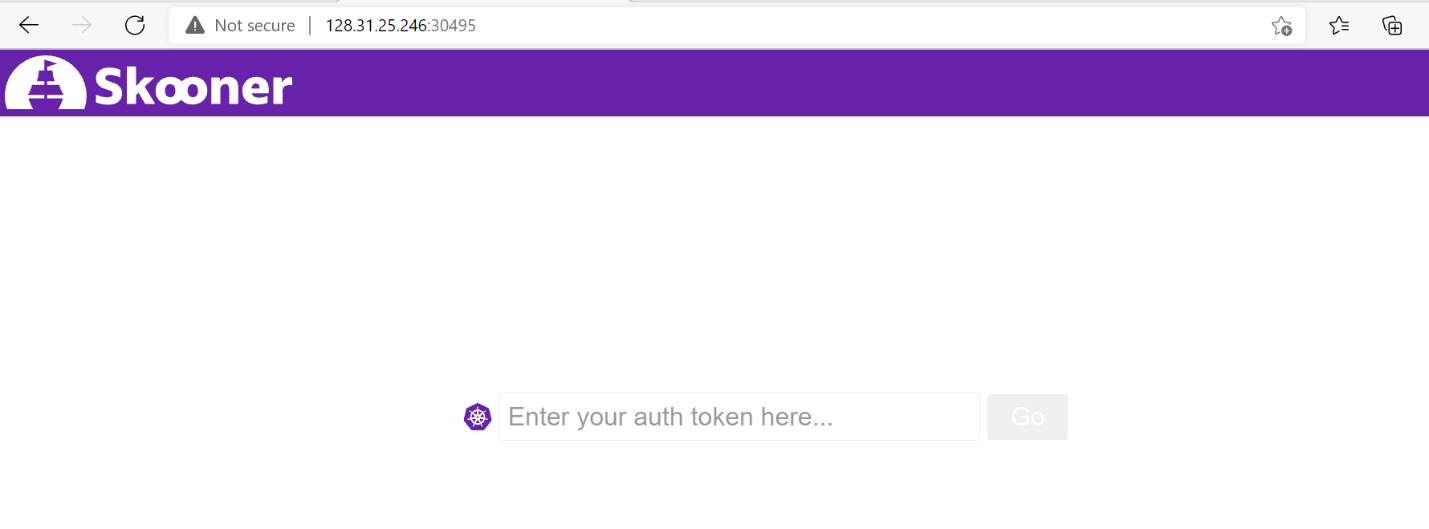
Setup the Service Account Token to access the Skooner Dashboard:
The first (and easiest) option is to create a dedicated service account. Run the following commands:
-
Create the service account in the current namespace (we assume default)
-
Give that service account root on the cluster
-
Create a secret that was created to hold the token for the SA:
kubectl apply -f - <<EOF
apiVersion: v1
kind: Secret
metadata:
    name: skooner-sa-token
    annotations:
        kubernetes.io/service-account.name: skooner-sa
type: kubernetes.io/service-account-token
EOF
Information
Since 1.22, this type of Secret is no longer used to mount credentials into Pods, and obtaining tokens via the TokenRequest API is recommended instead of using service account token Secret objects. Tokens obtained from the TokenRequest API are more secure than ones stored in Secret objects, because they have a bounded lifetime and are not readable by other API clients. You can use the
kubectl create tokencommand to obtain a token from the TokenRequest API. For example:kubectl create token skooner-sa, whereskooner-sais service account name. -
Find the secret that was created to hold the token for the SA
-
Show the contents of the secret to extract the token
Copy the token value from the secret detail and enter it into the login screen to access the dashboard.
Watch Demo Video showing how to deploy applications
Here's a recorded demo video on how to deploy applications on top of setup single master K8s cluster as explained above.
Very Important: Certificates Renewal
Client certificates generated by kubeadm expire after one year unless the Kubernetes version is upgraded or the certificates are manually renewed.
To renew certificates manually, you can use the kubeadm certs renew command with the appropriate command line options. After running the command, you should restart the control plane Pods.
kubeadm certs renew can renew any specific certificate or, with the subcommand all, it can renew all of them, as shown below:
Once renewing certificates is done. You must restart the kube-apiserver, kube-controller-manager, kube-scheduler and etcd, so that they can use the new certificates by running:
Then, update the new kube config file:
export KUBECONFIG=/etc/kubernetes/admin.conf
sudo cp -i /etc/kubernetes/admin.conf $HOME/.kube/config
Don't Forget to Update the older kube config file
Update wherever you are using the older kube config to connect with the cluster.
Clean Up
-
To view the Cluster info:
-
To delete your local references to the cluster:
How to Remove the node?
Talking to the control-plane node with the appropriate credentials, run:
-
Before removing the node, reset the state installed by kubeadm:
The reset process does not reset or clean up iptables rules or IPVS tables. If you wish to reset iptables, you must do so manually:
If you want to reset the IPVS tables, you must run the following command:
-
Now remove the node:
If you wish to start over, run kubeadm init or kubeadm join with the appropriate arguments.