Decommission OpenShift Resources
You can decommission all of your NERC OpenShift resources sequentially as outlined below.
Prerequisite
-
Backup: Back up any critical data or configurations stored on the resources that going to be decommissioned. This ensures that important information is not lost during the process as described here.
-
Kubernetes Objects (Resources): Please review all OpenShift Kubernetes Objects (Resources) to ensure they are not actively used and ready to be decommissioned.
-
Install and configure the OpenShift CLI (oc), see How to Setup the OpenShift CLI Tools for more information.
Delete all resources from the NERC OpenShift and OpenShift AI
Run oc login in your local machine's terminal using your own token to authenticate and access all your projects on the NERC OpenShift as described here. Please ensure you have already selected the correct project that needs to be decommissioned, as shown below:
oc login --token=<your_token> --server=https://api.shift.nerc.mghpcc.org:6443
Logged into "https://api.shift.nerc.mghpcc.org:6443" as "test1_user@fas.harvard.edu" using the token provided.

You have access to the following projects and can switch between them with 'oc project <projectname>':

    test-project-1
* test-project-2
    test-project-3

Using project "test-project-2".
Switching to your project that need to be decommissioned by running oc project <projectname> command:
oc project <your_openshift_project_to_decommission>
Using project "<your_openshift_project_to_decommission>" on server "https://api.shift.nerc.mghpcc.org:6443".
Please confirm the correct project is being selected by running oc project, as shown below:
oc project
Using project "<your_openshift_project_to_decommission>" on server "https://api.shift.nerc.mghpcc.org:6443".
Important Note: Best Practice for Specifying Namespace in oc Commands.
The best practice is to specify the namespace in each oc command using the -n option, e.g., -n <your_openshift_project_to_decommission>. This ensures that your commands are always executed in the intended project, minimizing the risk of affecting the wrong resources.
For example, the oc get all command can also be executed by specifying the namespace using the -n option, like this: oc get all -n <your_openshift_project_to_decommission>.
Please review all resources currently being used by your project by running oc get all, as shown below:
oc get all

NAME                                                                  READY   STATUS             RESTARTS       AGE
pod/ds-pipeline-persistenceagent-pipelines-definition-868665f7z9lpm   1/1     Running            0              141m
...

NAME                                       TYPE        CLUSTER-IP       EXTERNAL-IP   PORT(S)                               AGE
service/ds-pipeline-pipelines-definition   ClusterIP   172.30.133.168   <none>        8443/TCP,8888/TCP,8887/TCP            141m
...

NAME                                                                 READY   UP-TO-DATE   AVAILABLE   AGE
deployment.apps/ds-pipeline-persistenceagent-pipelines-definition    1/1     1            1           141m
...

NAME                                                                            DESIRED   CURRENT   READY   AGE
replicaset.apps/ds-pipeline-persistenceagent-pipelines-definition-868665f748    1         1         1       141m
...

NAME                                                 IMAGE REPOSITORY
                                                TAGS   UPDATED
imagestream.image.openshift.io/simple-node-app-git   image-registry.openshift-image-registry.svc:5000/test-project-gpu-dc1e23/simple-node-app-git

NAME                                                        HOST/PORT
                                                PATH   SERVICES                           PORT            TERMINATION          WILDCARD
route.route.openshift.io/ds-pipeline-pipelines-definition   ds-pipeline-pipelines-definition-test-project-gpu-dc1e23.apps.shift.nerc.mghpcc.org          ds-pipeline-pipelines-definition   oauth           reencrypt/Redirect   None
...
To list all Resources with their Names only.
To list all resources with their names only, you can run this command: oc get all -oname.
Here, -oname flag specifies the output format. In this case, it instructs the command to output only the names of the resources.
Run the oc delete command to delete all resource objects specified as parameters after --all within your selected project (namespace).
Danger
The oc delete operation will cause all resources specfied will be deleted. This command can be very powerful and should be used with caution as it will delete all resources in the specified project.
Always ensure that you are targeting the correct project (namespace) when using this command to avoid unintentional deletion of resources. If you're unsure which namespace you're currently in, run the oc project command to display the current project. To be safe, you can also specify the namespace in all oc commands by using the -n option, e.g., -n <your_openshift_project_to_decommission>.
Make sure to backup any important data or configurations before executing this command to prevent accidental data loss.
oc delete pod,deployment,deploymentconfig,pvc,route,service,build,buildconfig,
statefulset,replicaset,replicationcontroller,job,cronjob,imagestream,revision,
configuration,notebook --all
How to Delete All Allocations on a Project at Once
If you have multiple allocations within a ColdFront project and want to delete all allocations associated with that project, you can run the following script.
# pattern used for the "Allocated Project Name" attribute for the Allocation
# that is based on the ColdFront Project Title
pattern="^<your_openshift_project_to_decommission>"
for proj in $(oc get projects -o jsonpath='{range .items[*]}{.metadata.name}{"\n"}{end}' | grep "$pattern"); do
    echo "deleting resources"
    oc -n "$proj" delete pod,deployment,deploymentconfig,pvc,route,service,build,buildconfig,statefulset,replicaset,replicationcontroller,job,cronjob,imagestream,revision,configuration,notebook --all --ignore-not-found --wait=true || true
done
Please check all the resources currently being used by your project by running oc get all, as shown below:
oc get all
NAME                        TYPE        CLUSTER-IP   EXTERNAL-IP   PORT(S)                               AGE
service/modelmesh-serving   ClusterIP   None         <none>        8033/TCP,8008/TCP,8443/TCP,2112/TCP   7m4s
Important Note
The last remaining service, i.e., service/modelmesh-serving, shown when running the oc get all command, is a REQUIRED resource, and so you don't need to clean it up.
Optional: Remove User(s) from your ColdFront Project
Removing users from your ColdFront project via the NERC's ColdFront interface is straightforward. Simply click the "Remove Users" button for the corresponding project. This will display the following interface:
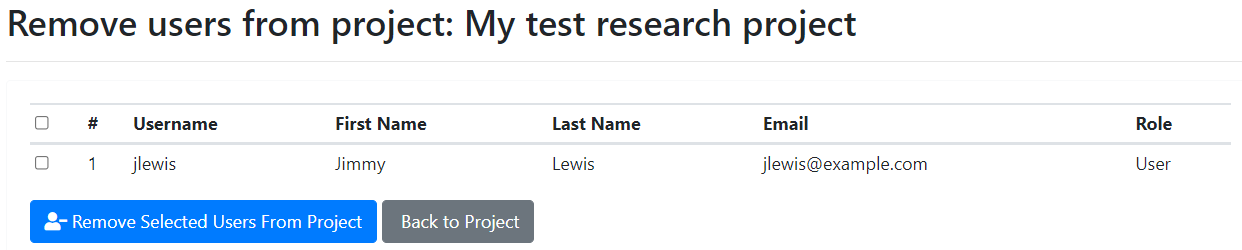
PI or project managers can select the user(s) and then click on the "Remove Selected Users From Project" button.
Very Important
If you remove a user (or users) from a project, they will automatically be removed from all allocations they were previously assigned to within that project.
Use ColdFront to reduce the Storage Quota to Zero
Each allocation, whether requested or approved, will be billed based on the pay-as-you-go model. The exception is for Storage quotas, where the cost is determined by your requested and approved allocation values to reserve storage from the total NESE storage pool. For NERC-OCP (OpenShift) Resource Allocations, storage quotas are specified by the "OpenShift Request on NESE Storage Quota (GiB)" and "OpenShift Limit on Ephemeral Storage Quota (GiB)" allocation attributes.
Even if you have deleted all Persistent Volume Claims (PVC) in your OpenShift project. It is very essential to adjust the approved values for your NERC-OCP (OpenShift) resource allocations to zero (0) otherwise you will still be incurring a charge for the approved storage as explained in Billing FAQs.
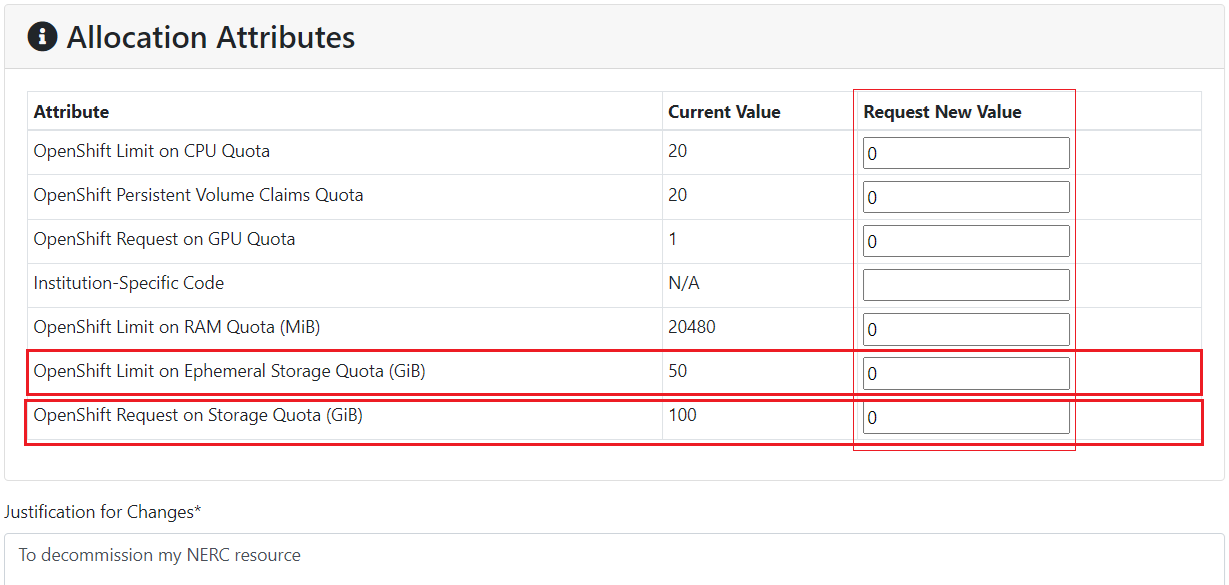
To achieve this, you must submit a final change request to reduce the Storage Quotas for "OpenShift Request on NESE Storage Quota (GiB)" and "OpenShift Limit on Ephemeral Storage Quota (GiB)" to zero (0) for your NERC-OCP (OpenShift) resource type. You can review and manage these resource allocations by visiting the resource allocations. Here, you can filter the allocation of your interest and then proceed to request a change request.
Very Important Note
Although other allocated resources i.e. CPU, RAM, GPU, etc. operate on a pay-as-you-go model, wherein charges are incurred solely based on usage, Active (Needs Renewal) allocations after "End Date" will remain accessible to the users assigned under the allocation. It is advisable to set all other allocation quota attributes to zero (0) during the change request. This measure ensures that existing users will not accidentally use the resources from the project.
Alternatively, PIs can control access to the allocation by removing users assigned to their NERC-OCP (OpenShift) allocation. This ensures that even if the allocation ends, users will not have access to the unused resources.
Please make sure your change request looks like this:
Wait until the requested resource allocation gets approved by the NERC's admin.
After approval, kindly review and verify that the quotas are accurately reflected in your resource allocation and OpenShift project. Please ensure that the approved quota values are accurately displayed as explained here.
Review your Project Usage
Run the oc describe quota command to obtain detailed information about the resource quotas for all Resources defined within your selected project (namespace). Please note the name of the resource quota in the output of this command, i.e., <your_openshift_project_resource_quota_name>.
oc get quota

NAME                              AGE   REQUEST                                                                               LIMIT
<your_openshift_project_resource_quota_name>   105s   persistentvolumeclaims: 0/0, requests.nvidia.com/gpu: 0/0, requests.storage: 0/0   limits.cpu: 0/0, limits.ephemeral-storage: 0/0, limits.memory: 0/0
Very Important: Ensure No Resources that will be Billed are Used
Most importantly, ensure that there is no active usage for any of your currently allocated project resources.
To review the resource quota usage for your project, you can run oc describe quota <your_openshift_project_resource_quota_name>.
Please ensure the output appears as follows, with all Used and Hard resources having a value of zero (0) as shown below:
oc describe quota <your_openshift_project_resource_quota_name>

Name:                     <your_openshift_project_resource_quota_name>
Namespace:                <your_openshift_project_to_decommission>
Resource                  Used  Hard
--------                  ----  ----
limits.cpu                0     0
limits.ephemeral-storage  0     0
limits.memory             0     0
persistentvolumeclaims    0     0
requests.nvidia.com/gpu   0     0
requests.storage          0     0
Important Information
Make sure to replace <your_openshift_project_resource_quota_name> with the actual name you find in the output, which is typically in this format: <your_openshift_project_to_decommission>-project.
Review your Project's Resource Quota from the OpenShift Web Console
After removing all OpenShift resources and updating all resource quotas to set them to zero (0), you can review and verify that these changes are reflected in your OpenShift Web Console as well.
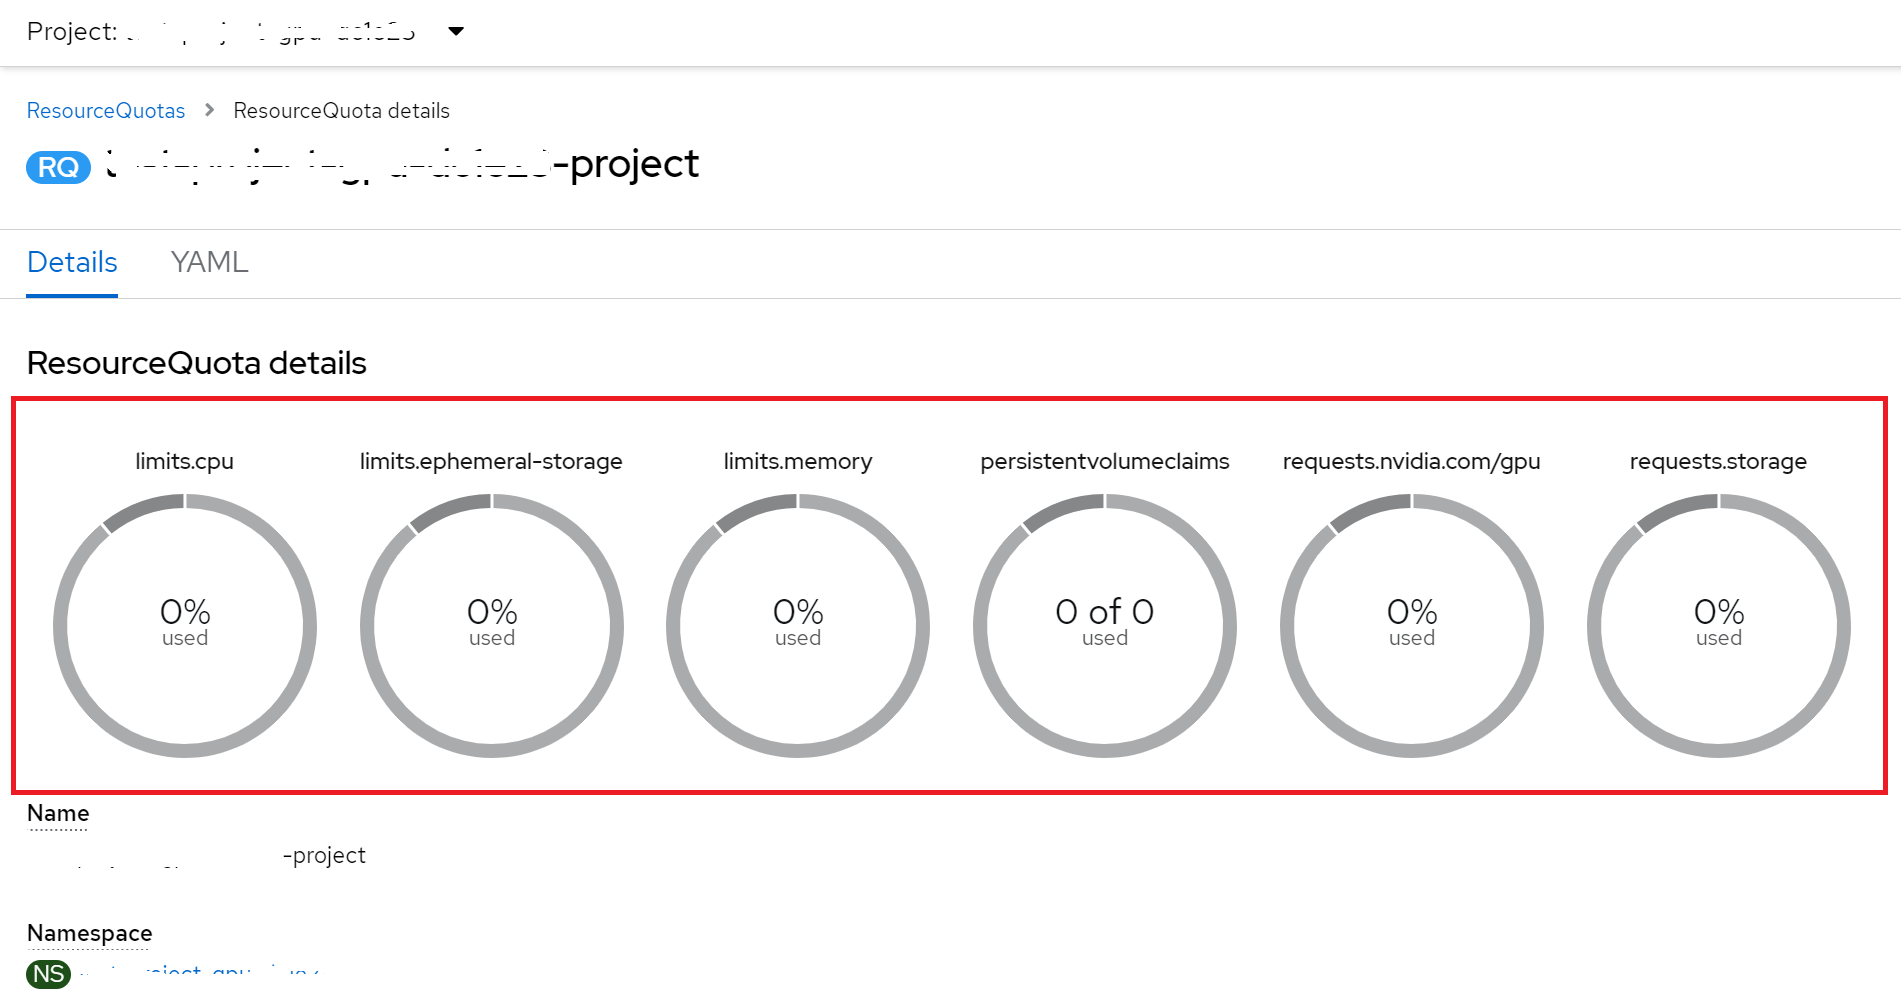
When you are logged-in to the NERC's OpenShift Web Console, you can also view the resource quota for your project in the web console by navigating to Administration -> ResourceQuotas.
Click on your appropriate project name, i.e., <your_openshift_project_to_decommission>, to view the Resource Quota details.
Very Important Note
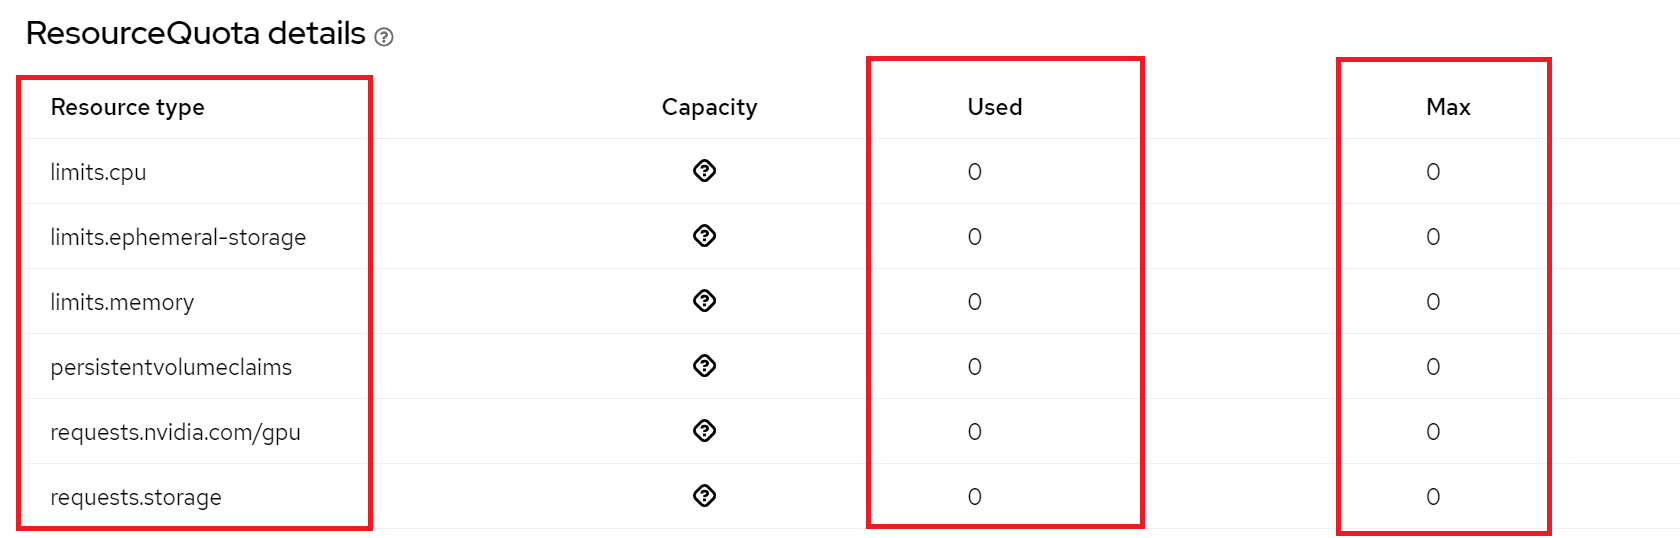
It should also indicate that all resources have NO usage, i.e., zero (0), and also NO maximum set, i.e., zero (0), as shown below:
Finally, Archive your ColdFront Project
As a PI, you will now be able to Archive your ColdFront Project via accessing NERC's ColdFront interface. Please refer to these intructions on how to archive your projects that need to be decommissioned.