Set up Domain names for your VMs
What is DNS?
The Domain Name System (DNS) is a ranked and distributed system for naming resources connected to a network, and works by storing various types of record, such as an IP address associated with a domain name.
DNS simplifies the communication between computers and servers through a network and provides a user-friendly method for users to interact with and get the desired information.
What is a "A record"?
A record: The primary DNS record used to connect your domain to an IP address that directs visitors to your website.
How to get user-friendly domain names (hostnames) for your NERC VMs?
NERC does not currently offer integrated domain name service management.
You can use one of the following methods to configure name resolution (DNS) for your NERC's virtual instances.
1. Using freely available free Dynamic DNS services
Get a free domain or host name from no-ip.com or other
Here we will describe how to use No-IP to configure dynamic DNS.
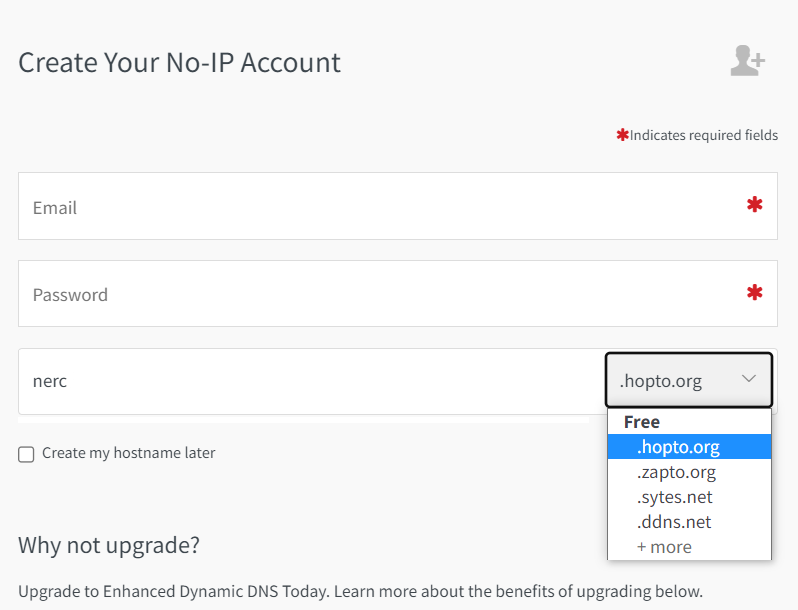
Step 1: Create your No-IP Account.

During this process you can add your desired unique hostname with pre-existing domain name or you can choose to create your hostname later on.
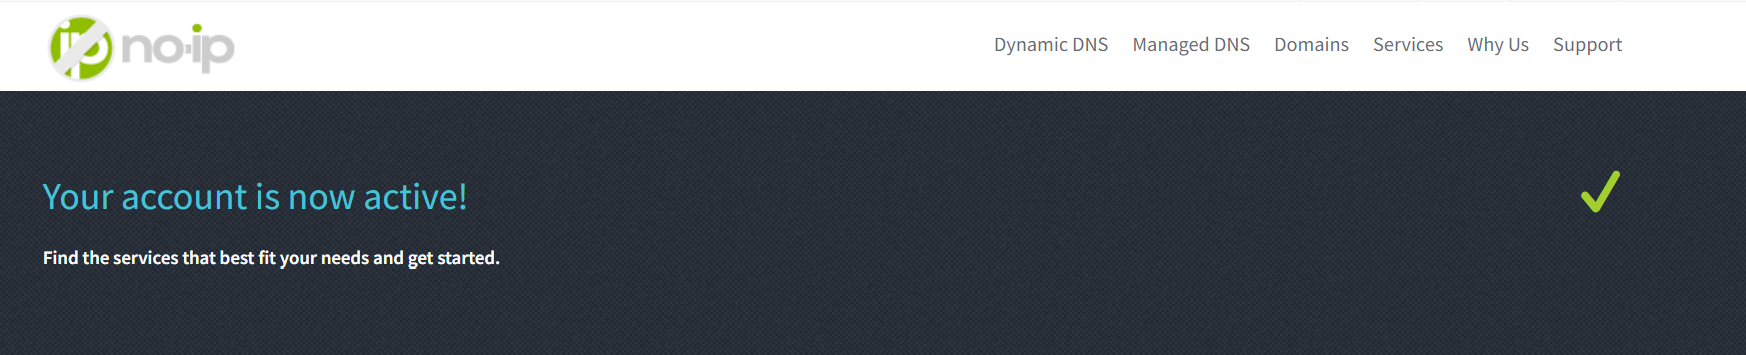
Step 2: Confirm Your Account by verifing your email address.
Step 3: Log In to Your Account to view your dashboard.
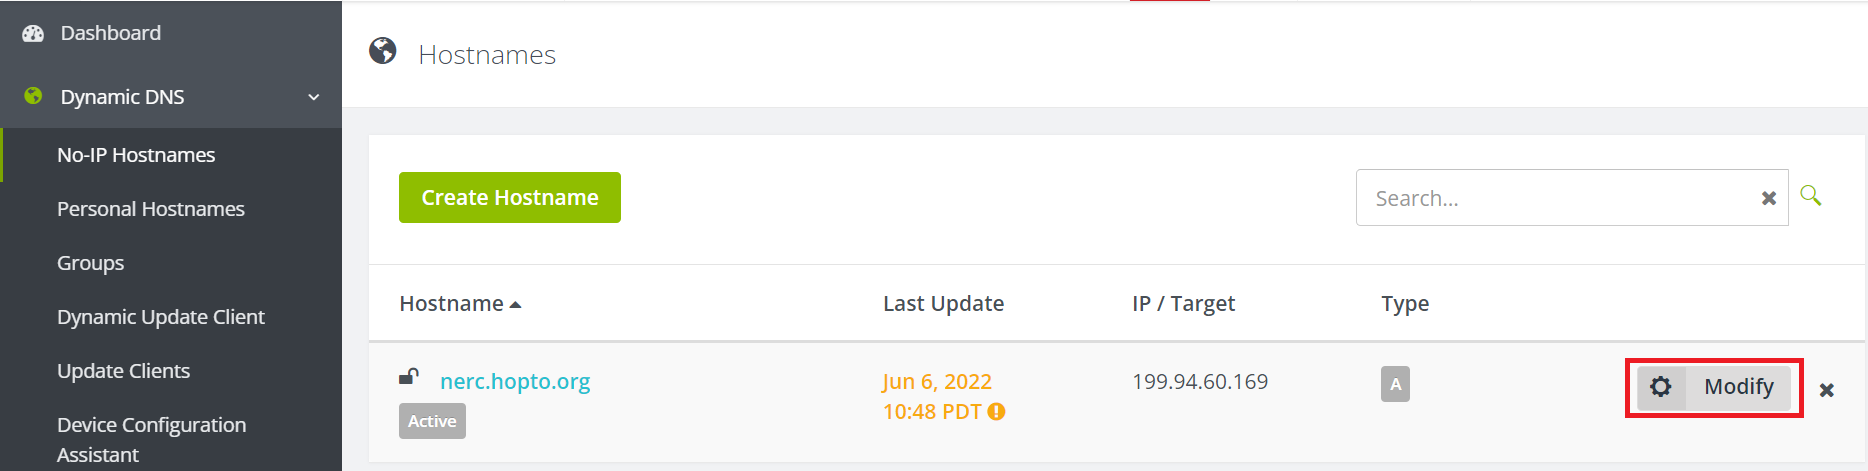
Step 4: Add Floating IP of your instance to the Hostname.
Click on "Modify" to add your own Floating IP attached to your NERC virtual instance.
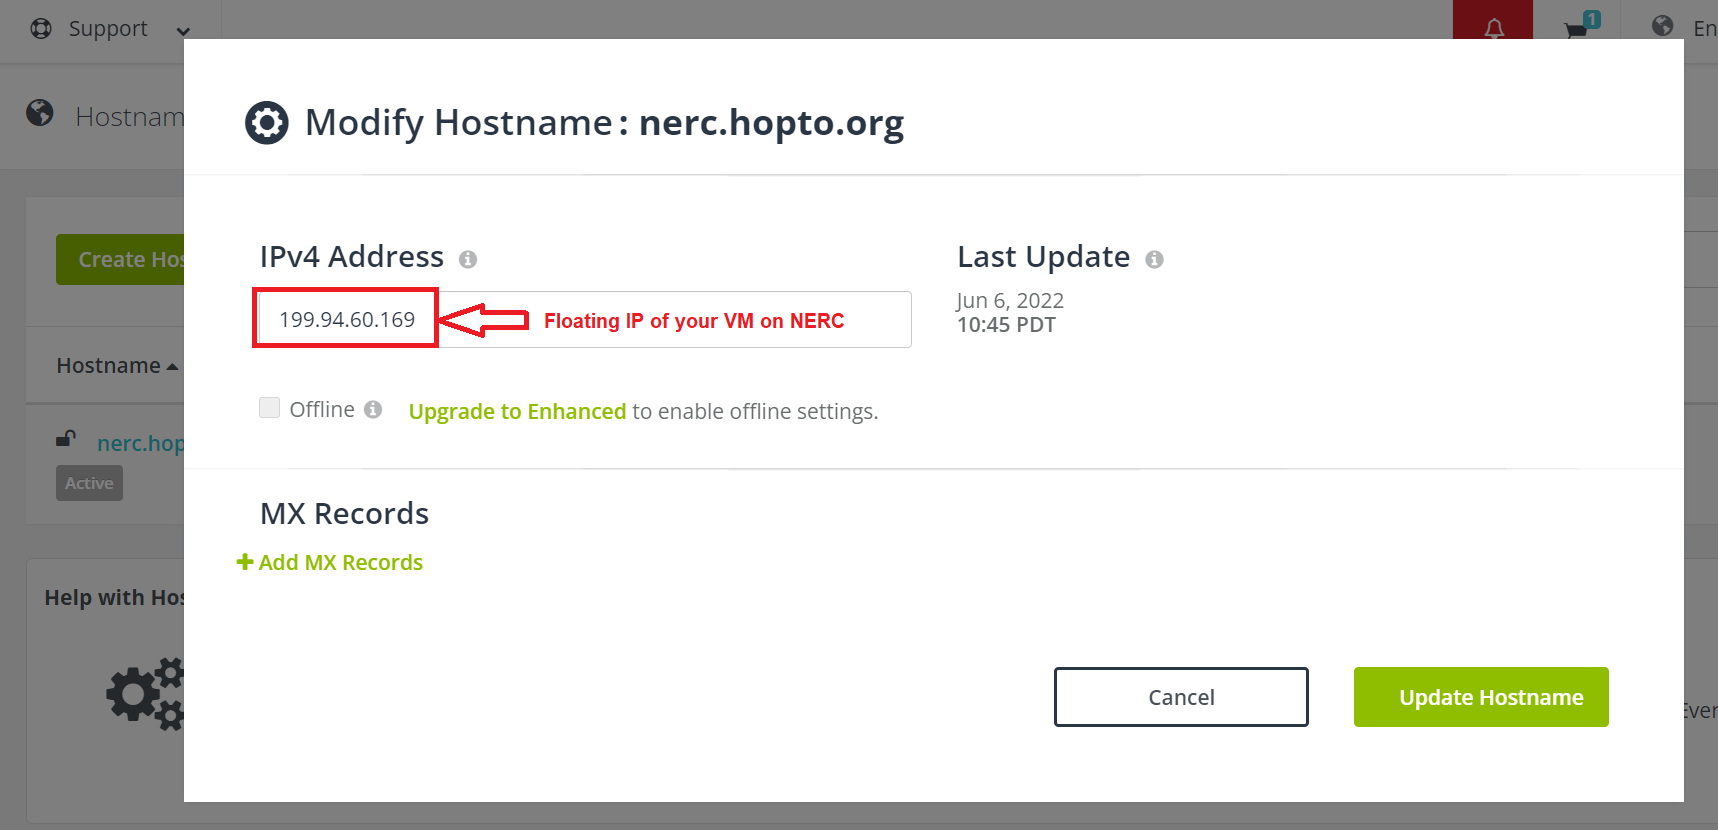
Then, browse your host or domain name as you setup during registration or later i.e. http://nerc.hopto.org on above example.
Easy video tutorial can be found here.
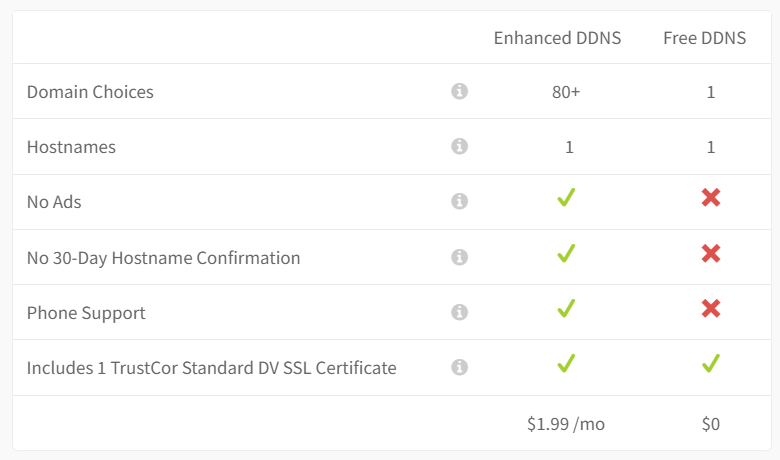
Having a free option is great for quick demonstrate your project but this has the following restrictions:
2. Using Nginx Proxy Manager
You can setup Nginx Proxy Manager on one of your NERC VMs and then use this Nginx Proxy Manager as your gateway to forward to your other web based services.
Quick Setup
i. Launch a VM with a security group that has opened rule for port 80, 443 and 22 to enable SSH Port Forwarding, aka SSH Tunneling i.e. Local Port Forwarding into the VM.
ii. SSH into your VM using your private key after attaching a Floating IP.
iii. Install Docker and Docker-Compose based on your OS choice for your VM.
iv. Create a docker-compose.yml file similar to this:
version: "3"
services:
    app:
        image: "jc21/nginx-proxy-manager:latest"
        restart: unless-stopped
        ports:
            - "80:80"
            - "81:81"
            - "443:443"
        volumes:
            - ./data:/data
            - ./letsencrypt:/etc/letsencrypt
v. Bring up your stack by running:
vi. Once the docker container runs successfully, connect to it on Admin Web Port i.e. 81 opened for the admin interface via SSH Tunneling i.e. Local Port Forwarding from your local machine's terminal by running:
ssh -N -L <Your_Preferred_Port>:localhost:81 <User>@<Floating-IP> -i <Path_To_Your_Private_Key>
Here, you can choose any port that is available on your machine as <Your_Preferred_Port> and then VM's assigned Floating IP as <Floating-IP> and associated Private Key pair attached to the VM as <Path_To_Your_Private_Key>.
For e.g. ssh -N -L 8081:localhost:81 ubuntu@199.94.60.24 -i ~/.ssh/cloud.key
vii. Once the SSH Tunneling is successful, log in to the Nginx Proxy Manager Admin UI on your web browser: http://localhost:<Your_Preferred_Port> i.e. http://localhost:8081
Information
It may take some time to spin up the Admin UI. Your terminal running the SSH Tunneling i.e. Local Port Forwarding will not show any logs or output when successfully done. Also your should not close or terminate the terminal while runnng the tunneling sessions and using the Admin UI.
Default Admin User:
Immediately after logging in with this default user you will be asked to modify your admin details and change your password.
How to create a Proxy Host with Let's Encrypt SSL Certificate attached to it
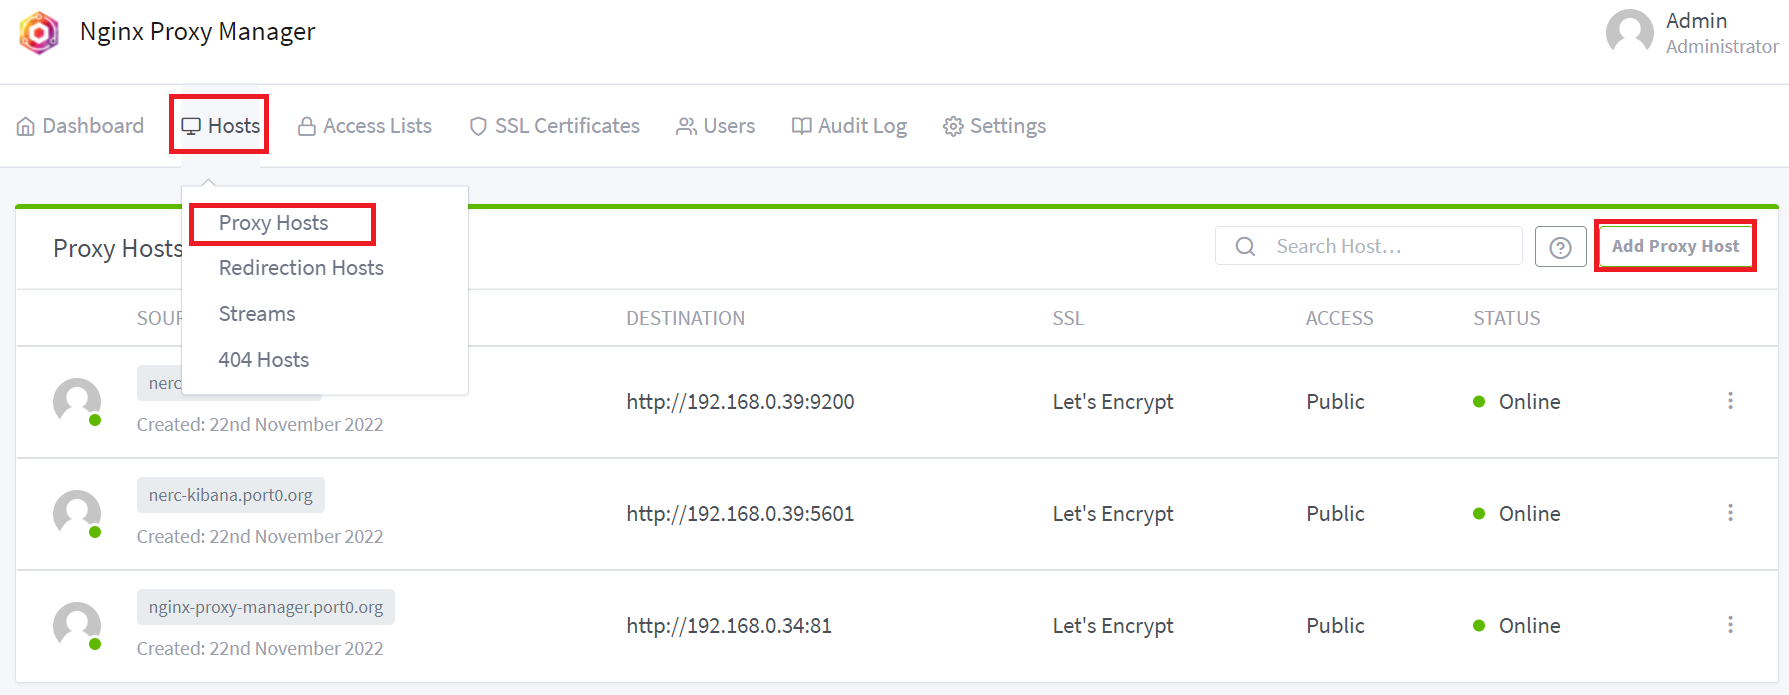
i. Click on Hosts >> Proxy Hosts, then click on "Add Proxy Host" button as shown below:
ii. On the popup box, enter your Domain Names (This need to be registed from your research institution or purchased on other third party vendor services and your have its administrative access)
Important Note
The Domain Name need to have an A Record pointing to the public floating IP of your NERC VM where you are hosting the Nginx Proxy Manager!
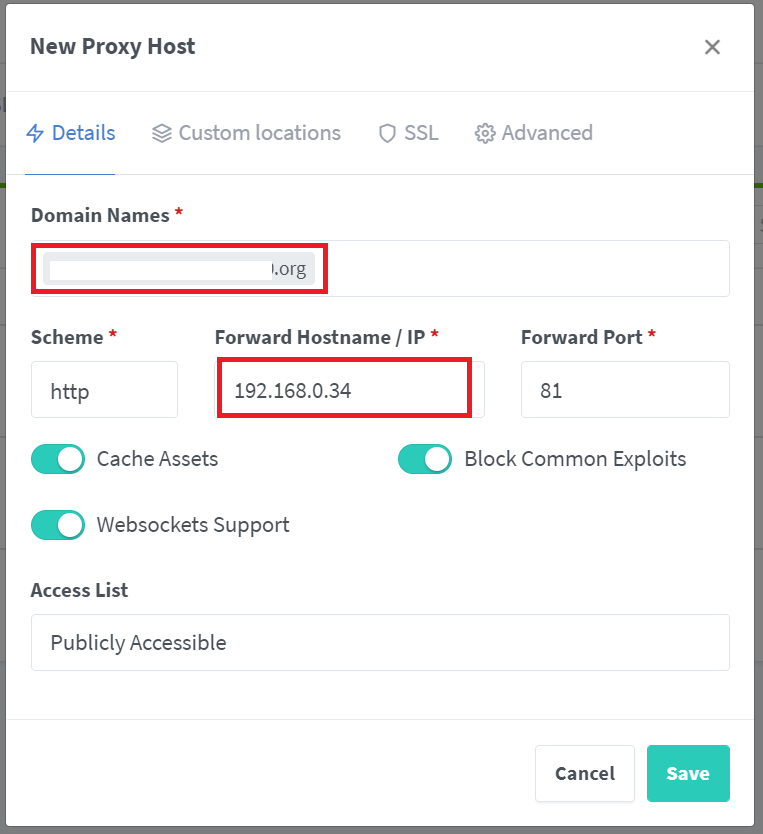
Please fill out the following information on this popup box:
-
Scheme: http
-
Forward Hostname/IP:
<The Private-IP of your NERC VM where you are hosting the web services> -
Forward Port:
<Port exposed on your VM to the public> -
Enable all toggles i.e. Cache Assets, Block Common Exploits, Websockets Support
-
Access List: Publicly Accessible
For your reference, you can review your selection should looks like below with your own Domain Name and other settings:
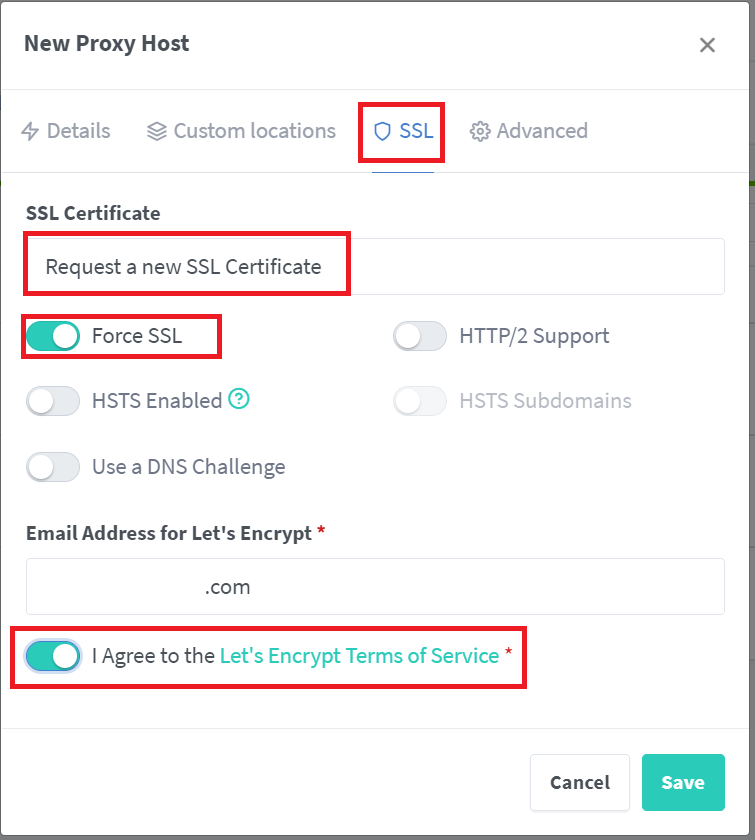
Also, select the SSL tab and then "Request a new SSL Certificate" with settings as shown below:
iii. Once Saved clicking the "Save" button. It should show you Status "Online" and when you click on the created Proxy Host link it will load the web services with https and domain name you defined i.e. https://<Your-Domain-Name>.
3. Using your local Research Computing (RC) department or academic institution's Central IT services
You need to contact and work with your Research Computing department or academic institution's Central IT services to create A record for your hostname that maps to the address of a Floating IP of your NERC virtual instance.
4. Using commercial DNS providers
Alternatively, you can purchase a fully registered domain name or host name from commercial hosting providers and then register DNS records for your virtual instance from commercial cloud servies i.e. AWS Route53, Azure DNS, CloudFlare, Google Cloud Platform, GoDaddy, etc.