How to launch an Instance
Prerequisites:
-
You followed the instruction in Create a Key Pair to set up a public ssh key.
-
Make sure you have added rules in the Security Groups to allow ssh using Port 22 access to the instance.
Using Horizon dashboard
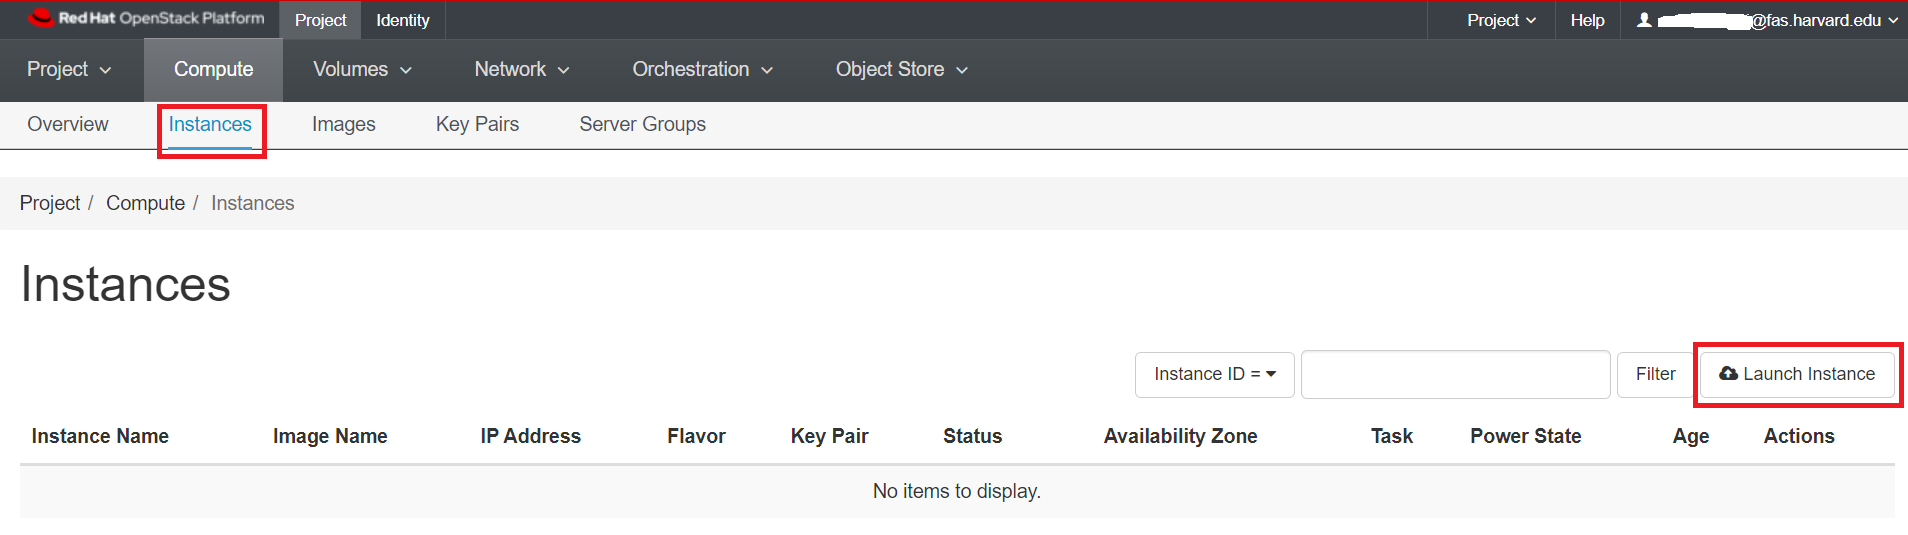
Once you're logged in to NERC's Horizon dashboard.
Navigate: Project -> Compute -> Instances.
Click on "Launch Instance" button:
In the Launch Instance dialog box, specify the following values:
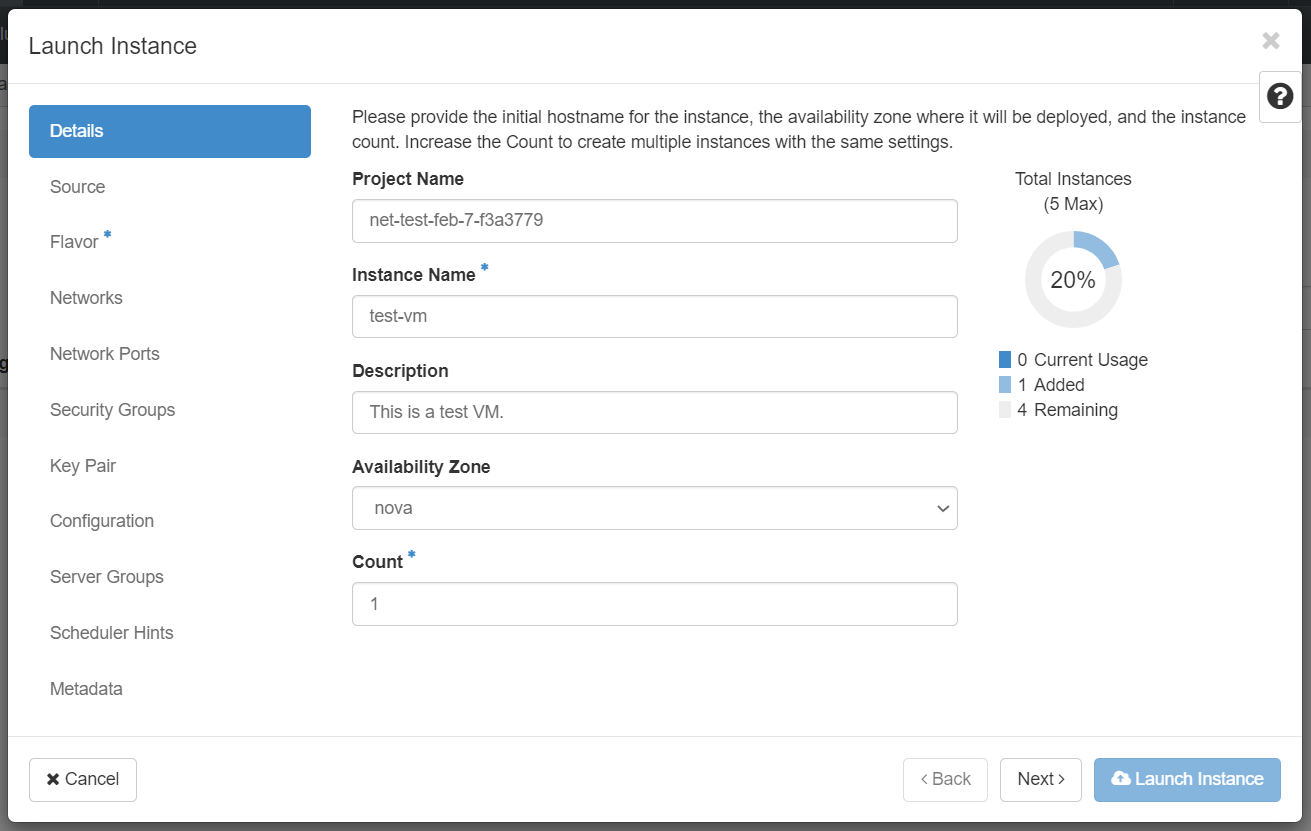
Details Tab
Instance Name: Give your instance a name that assign a name to the virtual machine.
Important Note
The instance name you assign here becomes the initial host name of the server. If the name is longer than 63 characters, the Compute service truncates it automatically to ensure dnsmasq works correctly.
Availability Zone: By default, this value is set to the availability zone given by the cloud provider i.e. nova.
Count: To launch multiple instances, enter a value greater than 1. The default is 1.
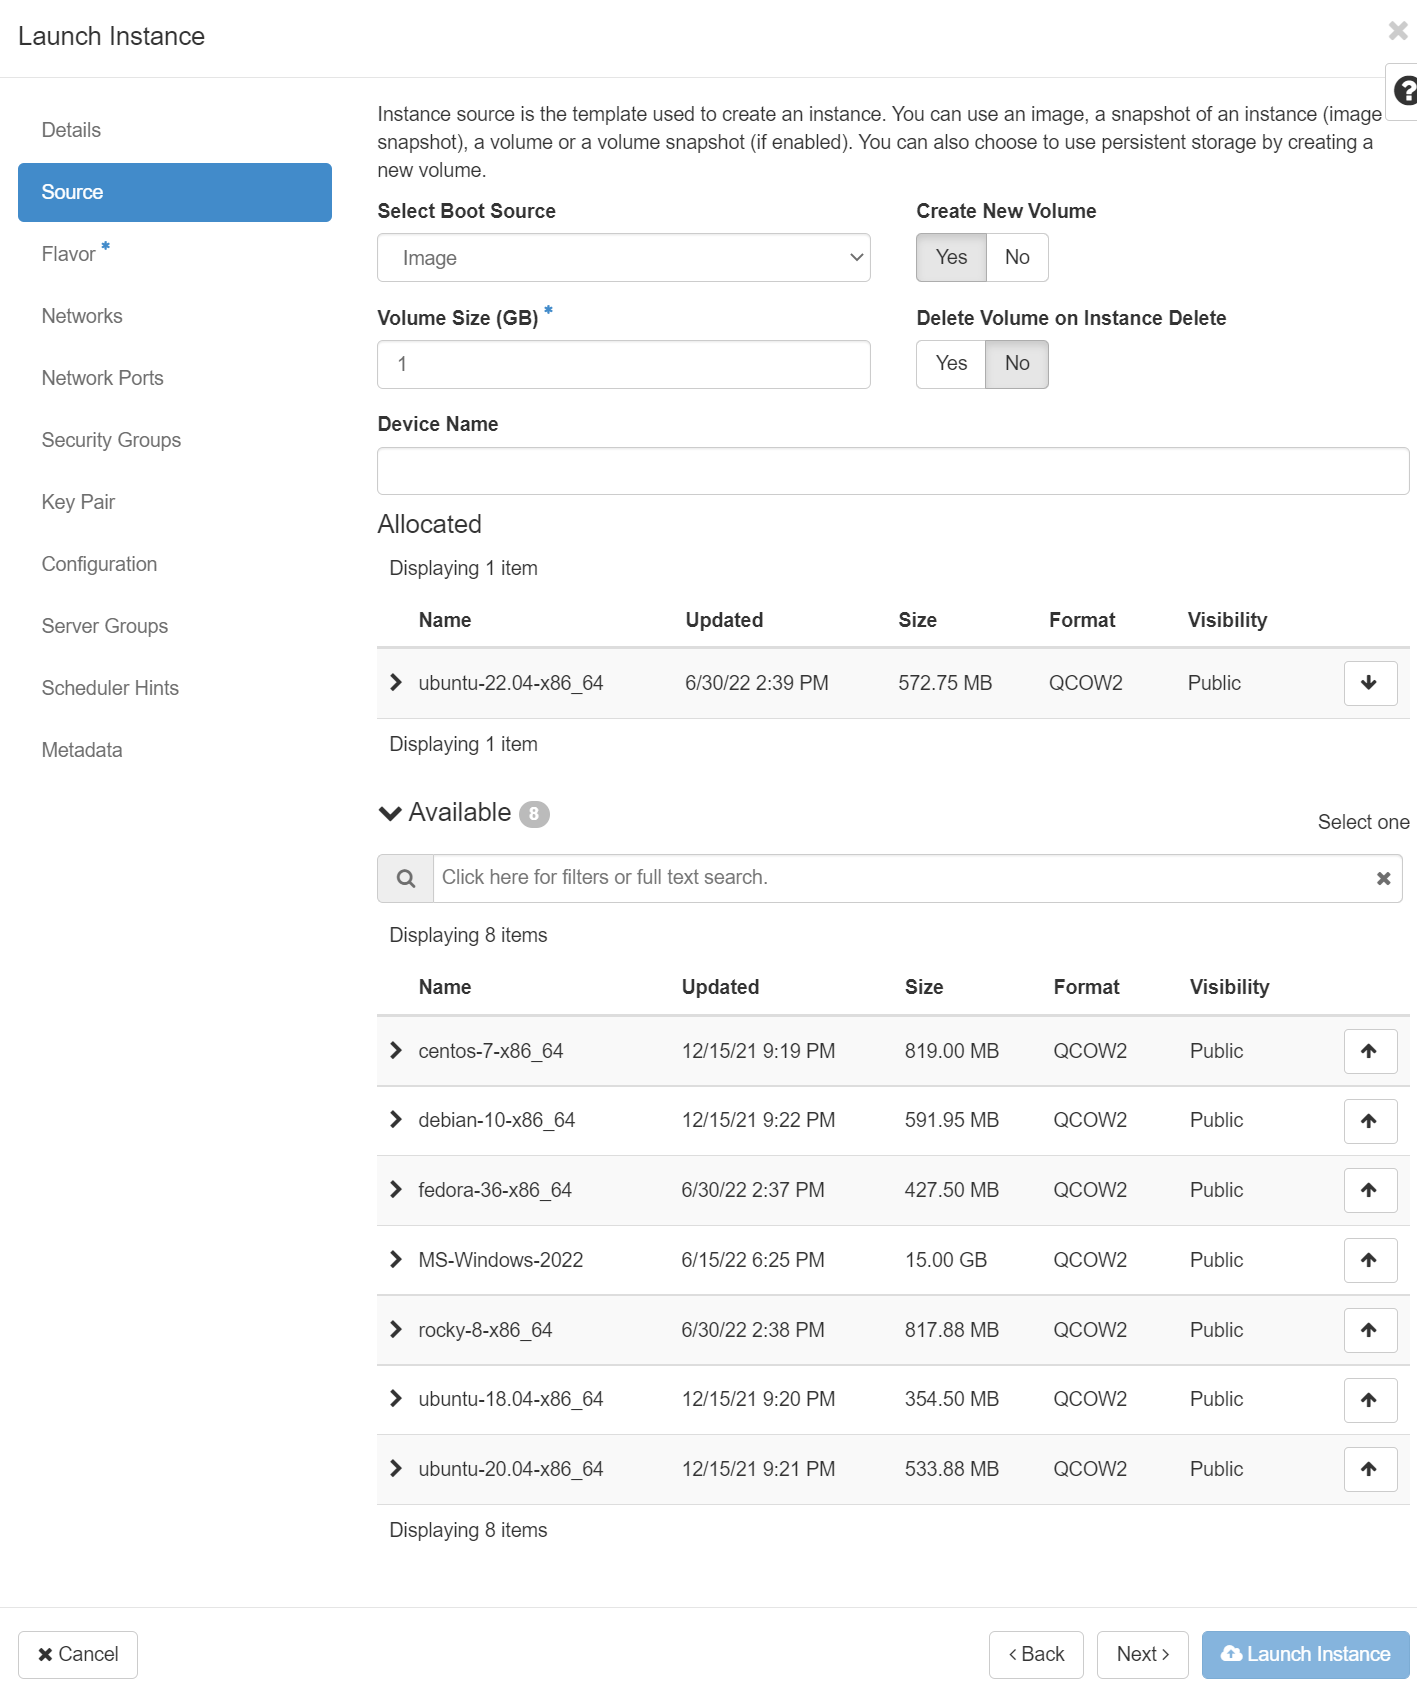
Source Tab
Double check that in the dropdown "Select Boot Source".
When you start a new instance, you can choose the Instance Boot Source from the following list:
-
boot from image
-
boot from instance snapshot
-
boot from volume
-
boot from volume snapshot
In its default configuration, when the instance is launched from an Image or an Instance Snapshot, the choice for utilizing persistent storage is configured by selecting the Yes option for "Create New Volume". Additionally, the "Delete Volume on Instance Delete" setting is pre-set to No, as indicated here:
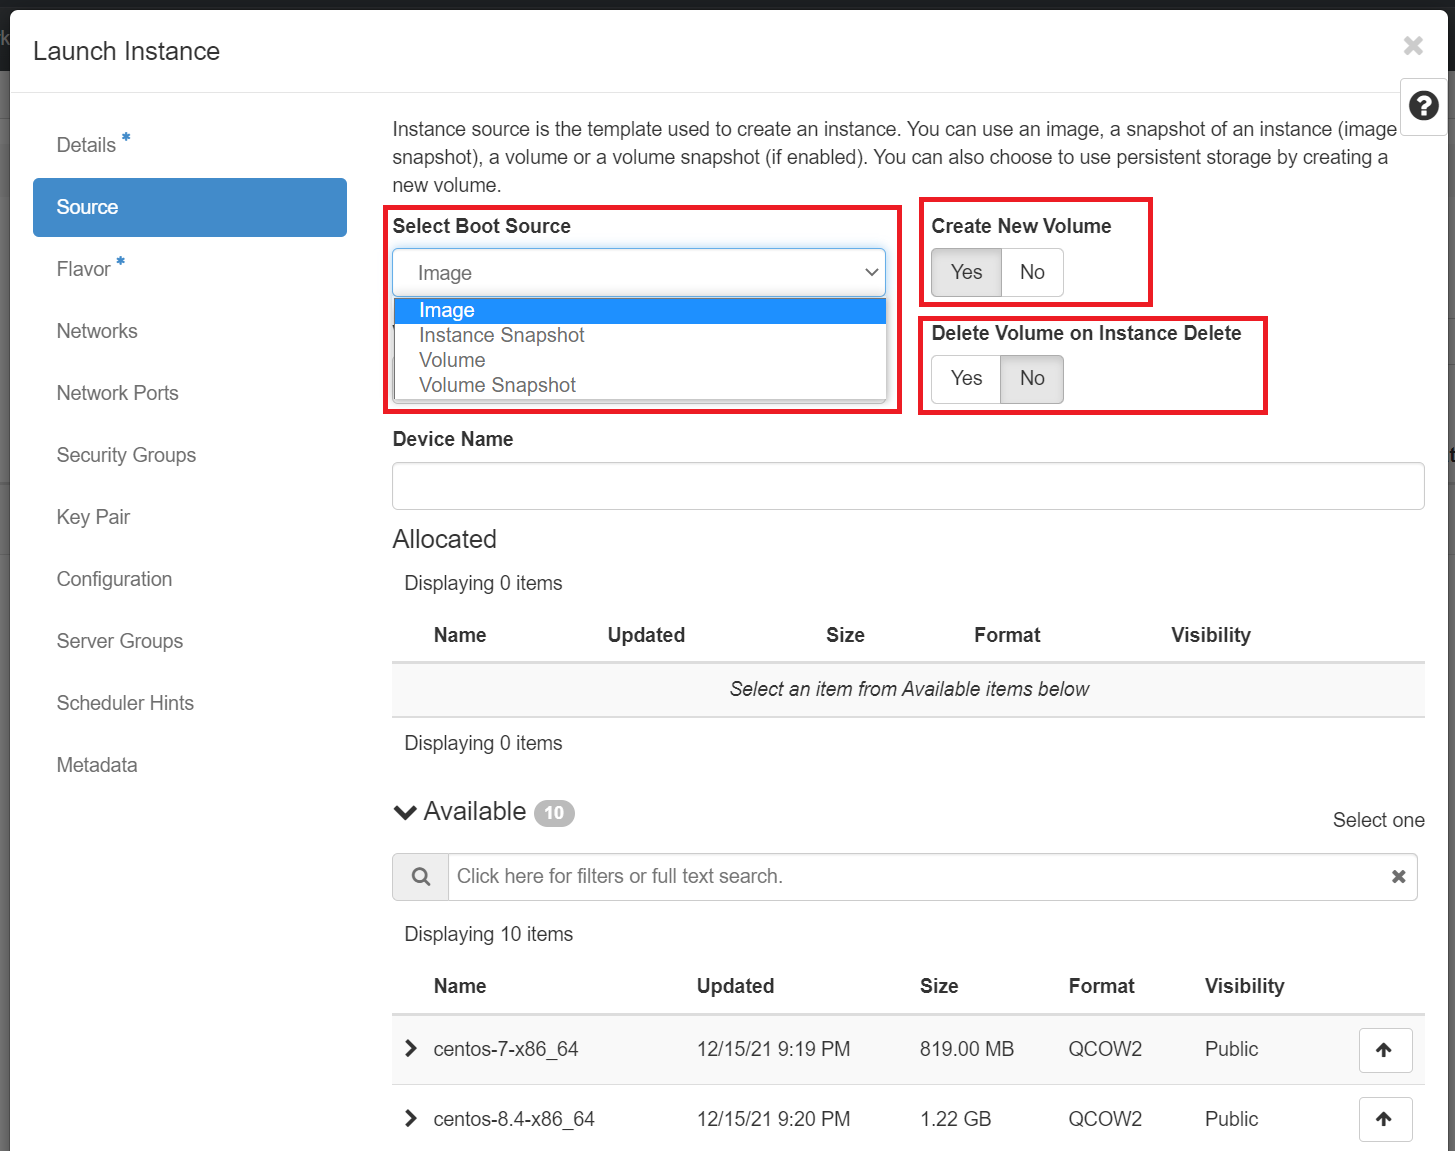
If you set the "Create New Volume" option to No, the instance will boot from either an image or a snapshot, with the instance only being attached to an ephemeral disk as described here. To mitigate potential data loss, we strongly recommend regularly taking a snapshot of such a running ephemeral instance, referred to as an "instance snapshot", especially if you want to safeguard or recover important states of your instance.
When deploying a non-ephemeral instance, which involves creating a new volume and selecting Yes for "Delete Volume on Instance Delete", deleting the instance will also remove the associated volume. Consequently, all data on that disk is permanently lost, which is undesirable when the data on attached volumes needs to persist even after the instance is deleted. Ideally, selecting "Yes" for this setting should be reserved for instances where persistent data storage is not required.
Very Important: How do you make your VM setup and data persistent?
For more in-depth information on making your VM setup and data persistent, you can explore the details here.
To start a VM, for the first time we will need a base image so, please make sure "Image" dropdown option is selected. In the example, we chose ubuntu-22.04-x86_64, you may choose any available images.
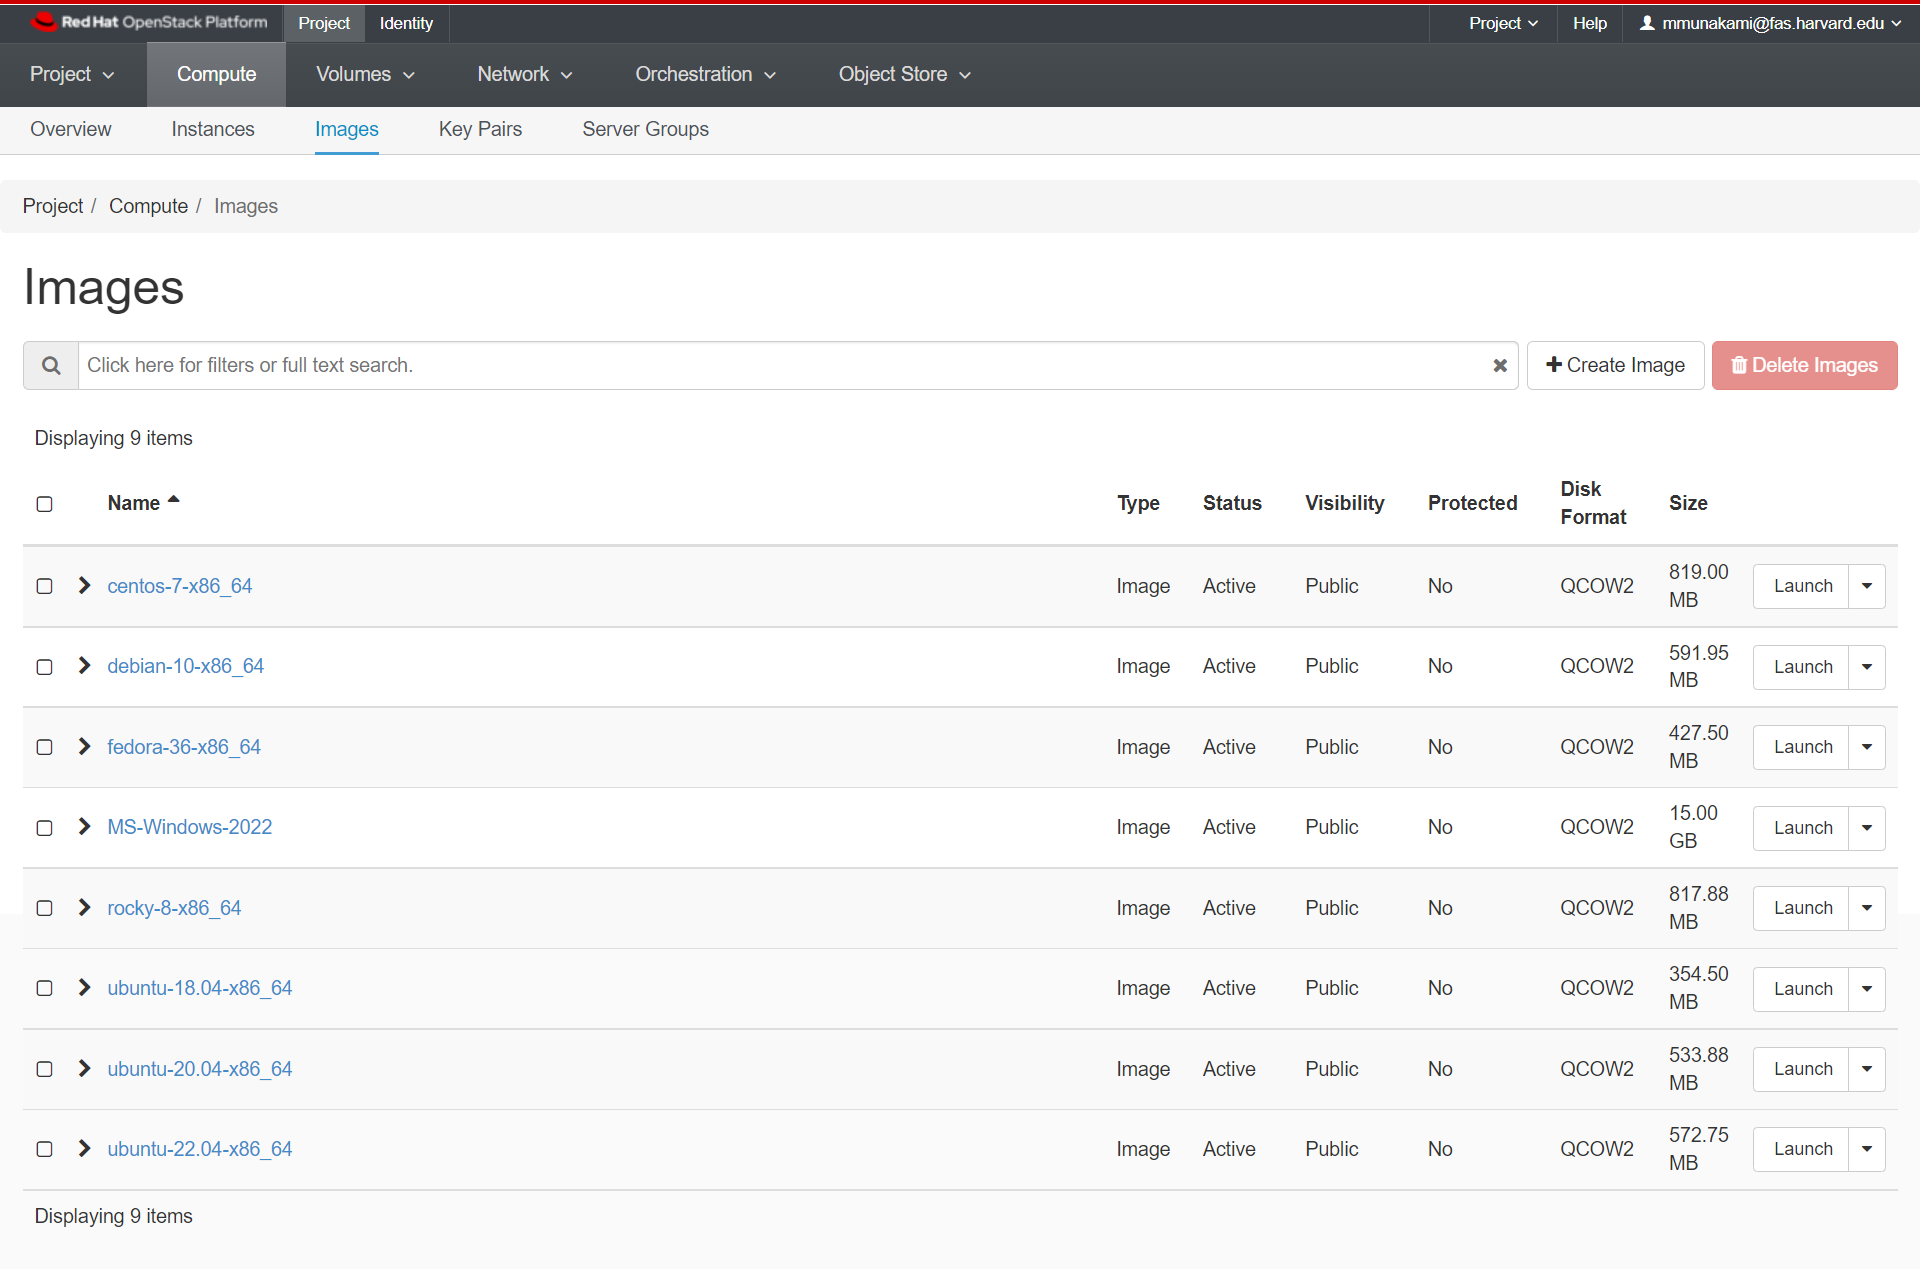
Bootable Images
NERC has made several Public bootable images available to the users as listed here. Customers can also upload their own custom images, as documented in this guide.
To view them, Navigate: Project -> Compute -> Images.
How to override the flavor's Default root disk volume size
If you don't specify custom value for the "Volume Size (GB)", that will be set to the root disk size of your selected Flavor. For more about the default root disk size you can refer to this documentation. We can override this value by entering your own custom value (in GiB) and that is available as a Volume that is attach to the instance to enable persistent storage.
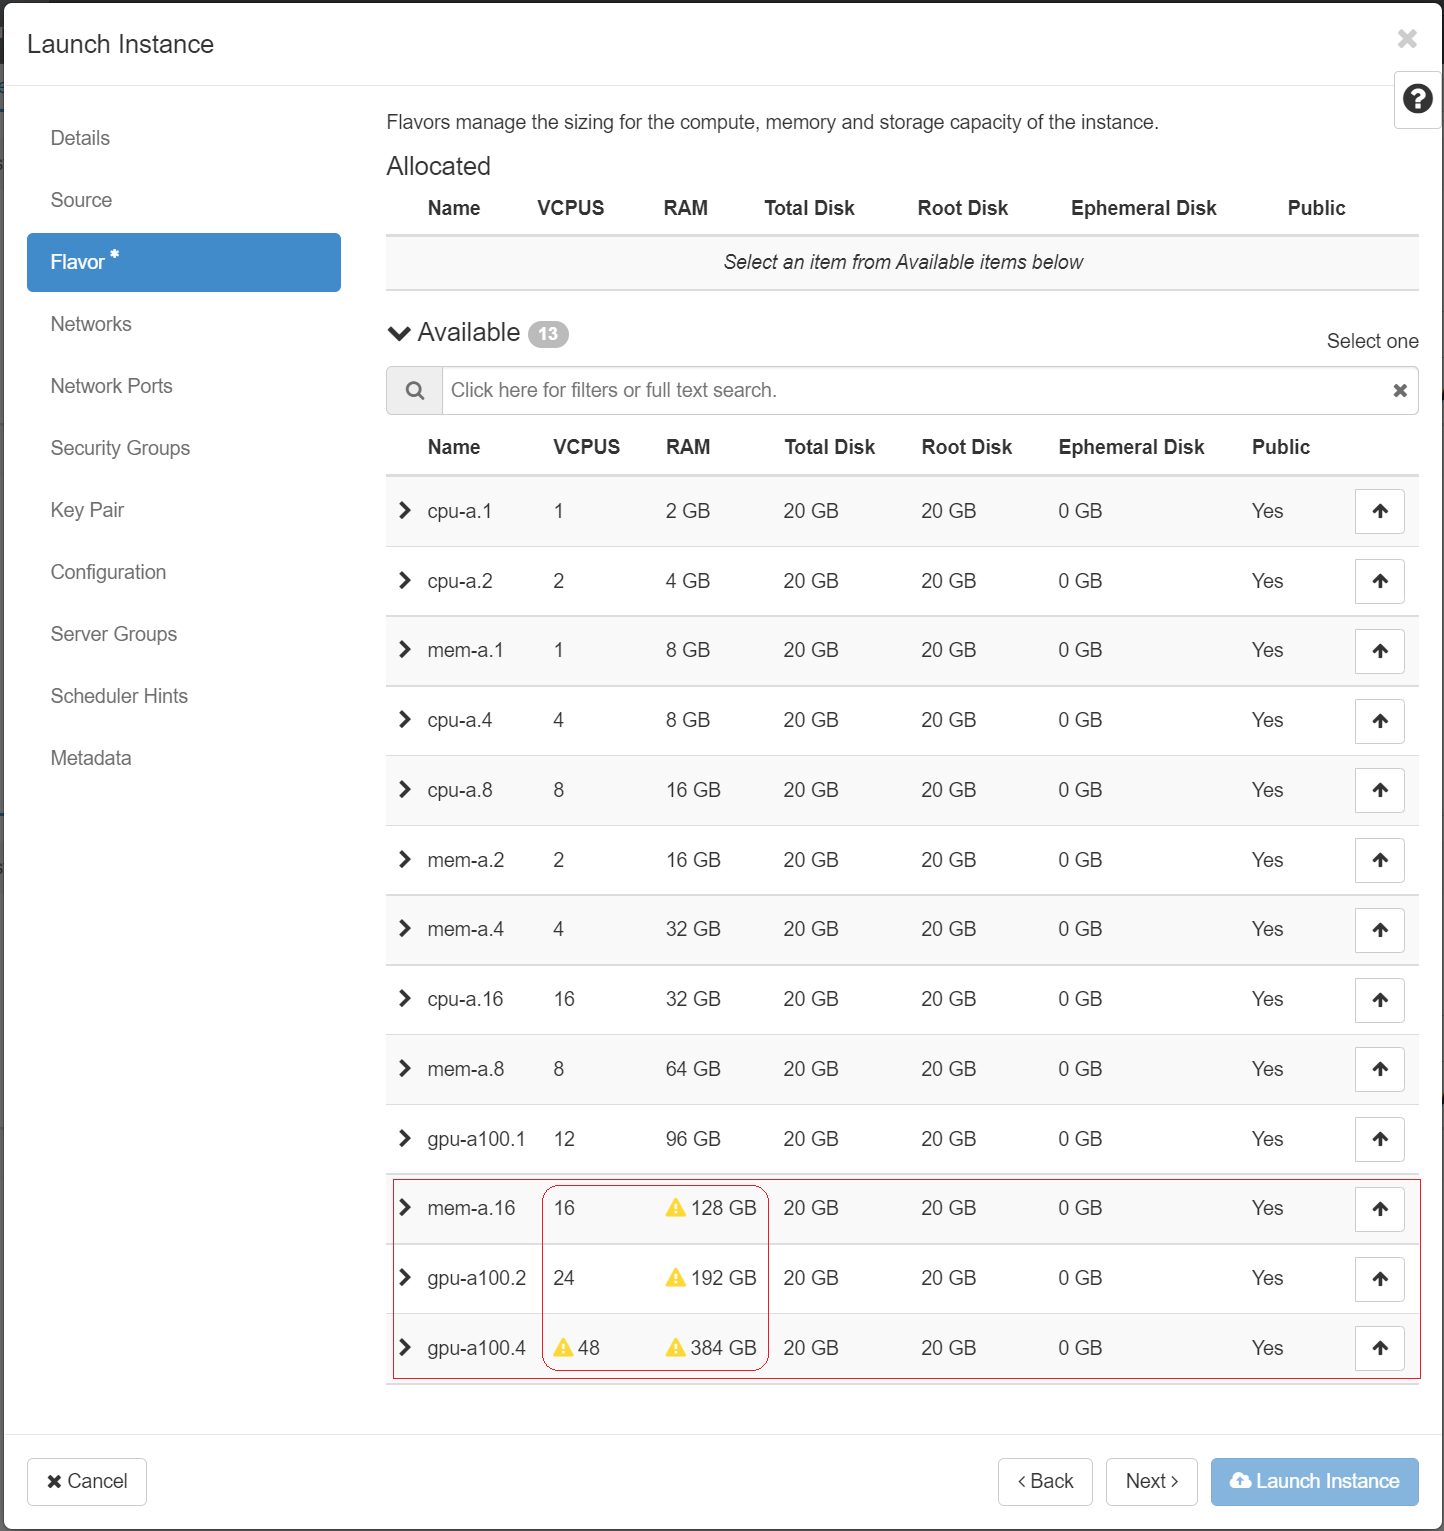
Flavor Tab
Specify the size of the instance to launch. Choose cpu-su.4 from the 'Flavor' tab by clicking on the "+" icon.
Important Note
on NERC OpenStack, flavors define the compute, memory, and storage capacity of nova computing instances. In other words, a flavor is an available hardware configuration for a server.
Some of the flavors will not be available for your use as per your resource Quota limits and will be shown as below:
NOTE: More details about available flavors can be found here and how to change request the current allocation quota attributes can be found here.
After choosing cpu-su.4, you should see it moved up to "Allocated".

Storage and Volume
-
System disks are the first disk based on the flavor disk space and are generally used to store the operating system created from an image when the virtual machine is booted.
-
Volumes are persistent virtualized block devices independent of any particular instance. Volumes may be attached to a single instance at a time, but may be detached or reattached to a different instance while retaining all data, much like a USB drive. The size of the volume can be selected when it is created within the storage quota limits for the particular resource allocation.
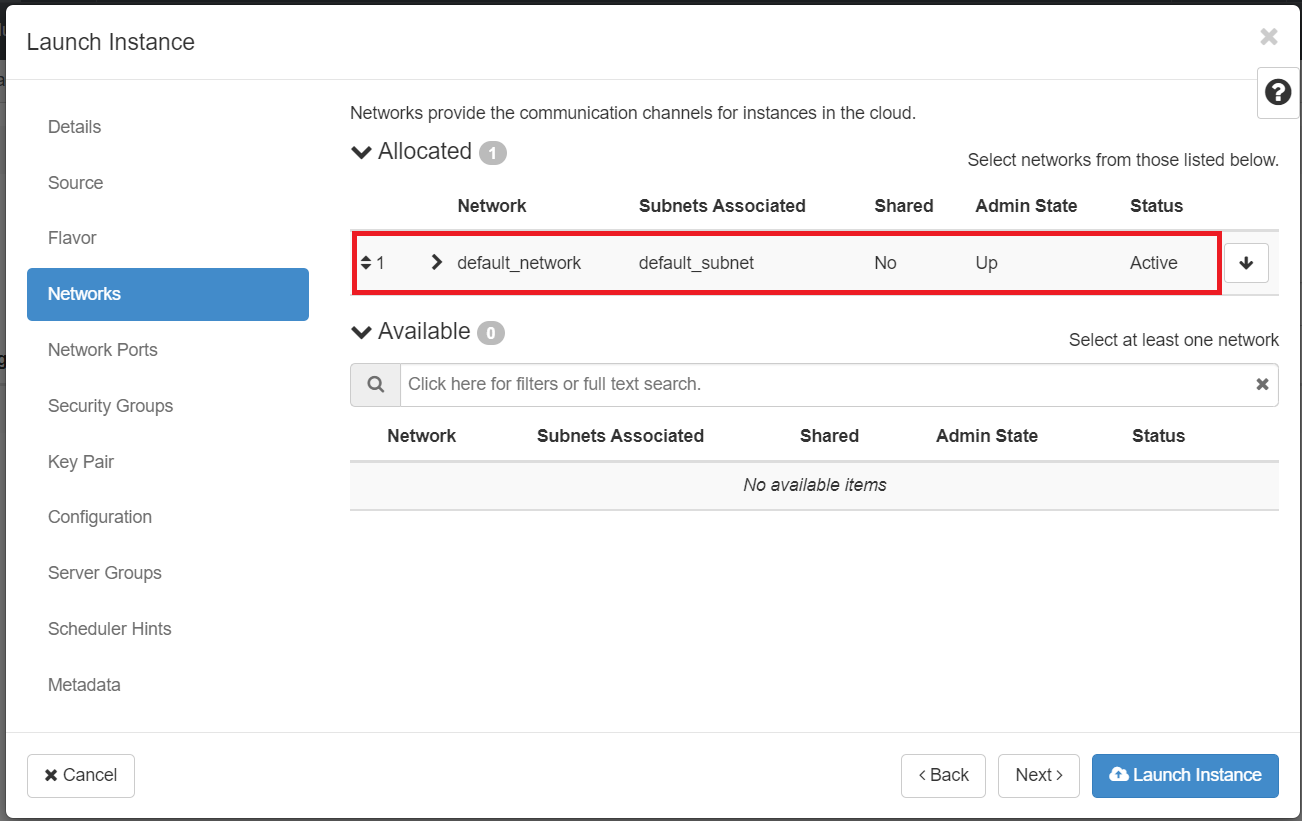
Networks Tab
Make sure the Default Network that is created by default is moved up to "Allocated". If not, you can click on the "+" icon in "Available".
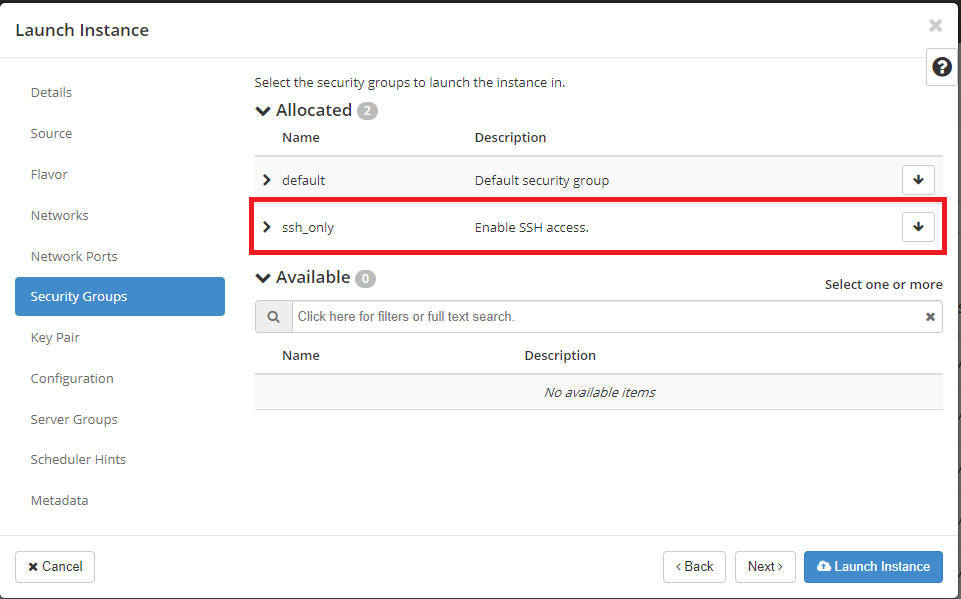
Security Groups Tab
Make sure to add the security group where you enabled SSH. To add an SSH security group first, see here.
How to update New Security Group(s) on any running VM?
If you want to attach/deattach any new Security Group(s) to/from a running VM after it has launched. First create all new Security Group(s) with all the rules required. Following this guide, you'll be able to attach created security group(s) with all the required rules to a running VM. You can modify the Rules setup for any Security Group(s) but that will affect all VMs using that security groups.
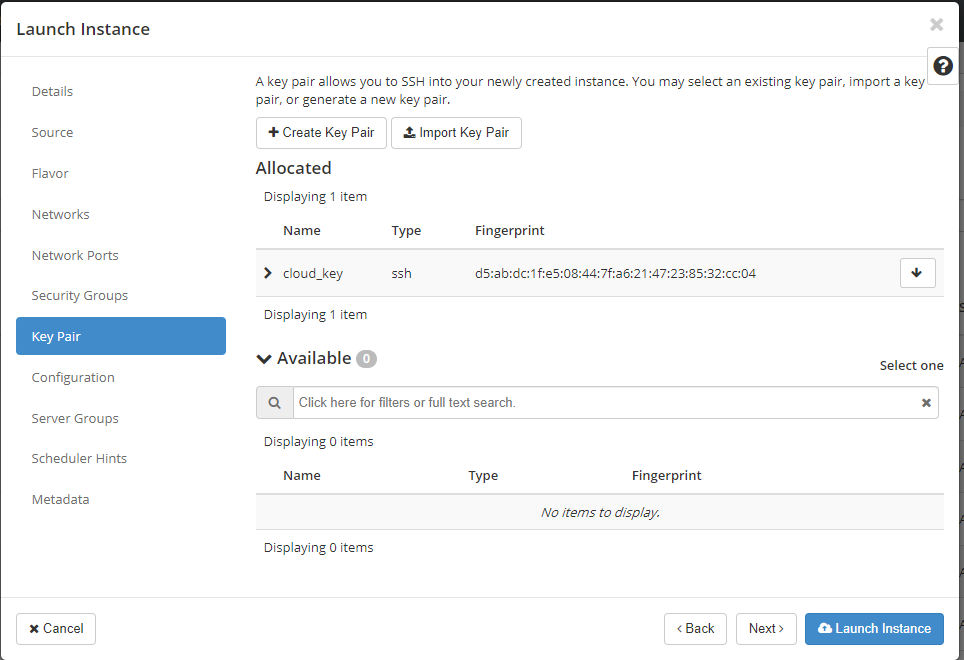
Key Pair Tab
Add the key pair you created for your local machine/laptop to use with this VM. To add a Key Pair first create and add them to your Project as described here.
Important Note
If you did not provide a key pair, security groups, or rules, users can access the instance only from inside the cloud through VNC. Even pinging the instance is not possible without an ICMP rule configured. We recommend limiting access as much as possible for best security practices.
Ignore other Tabs
Network Ports, Configuration, Server Groups, Schedular Hints, and Metadata: tab: Please ignore these tabs as these are not important and only for advance setup.
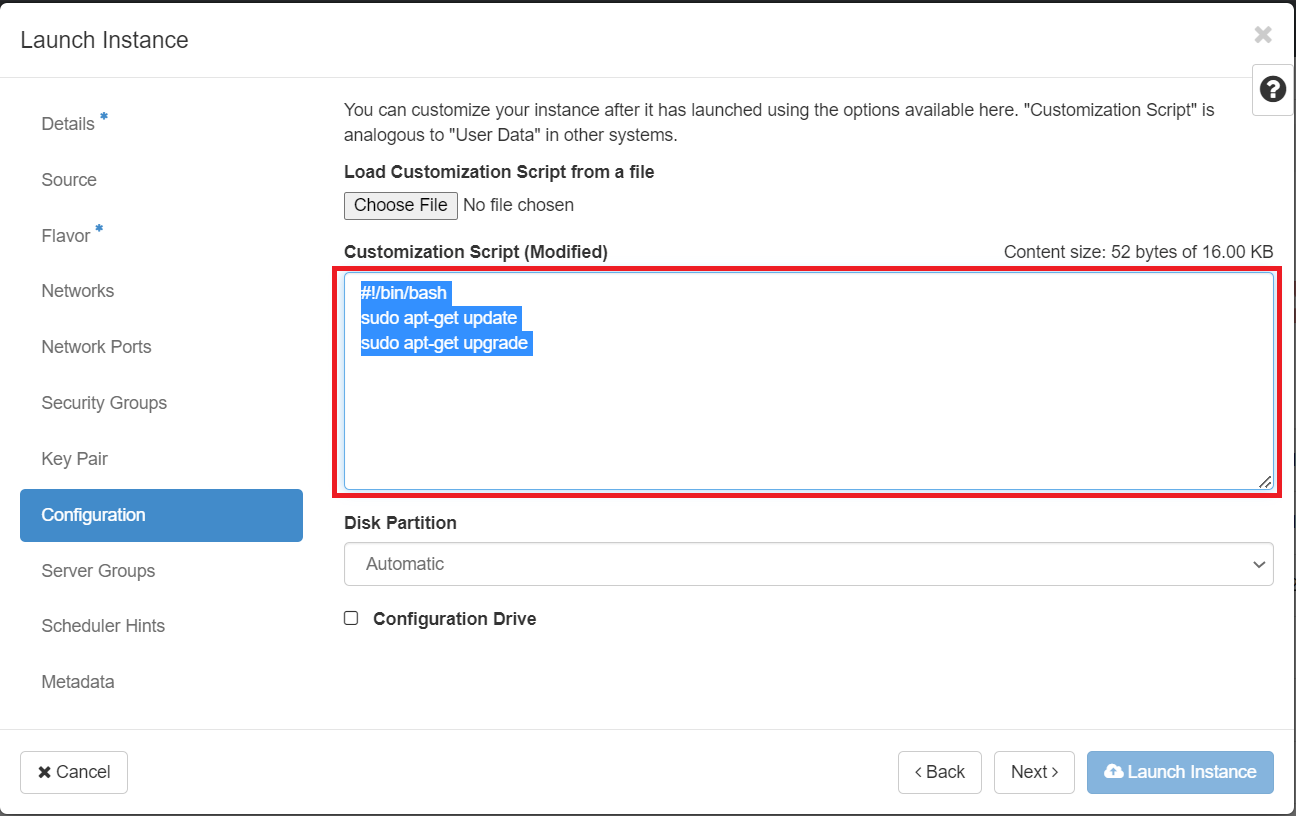
How to use 'Configuration' tab
If you want to specify a customization script that runs after your instance launches then you can write those custom script inside the "Customization Script" text area or load the script by uploading the script file.
For example:
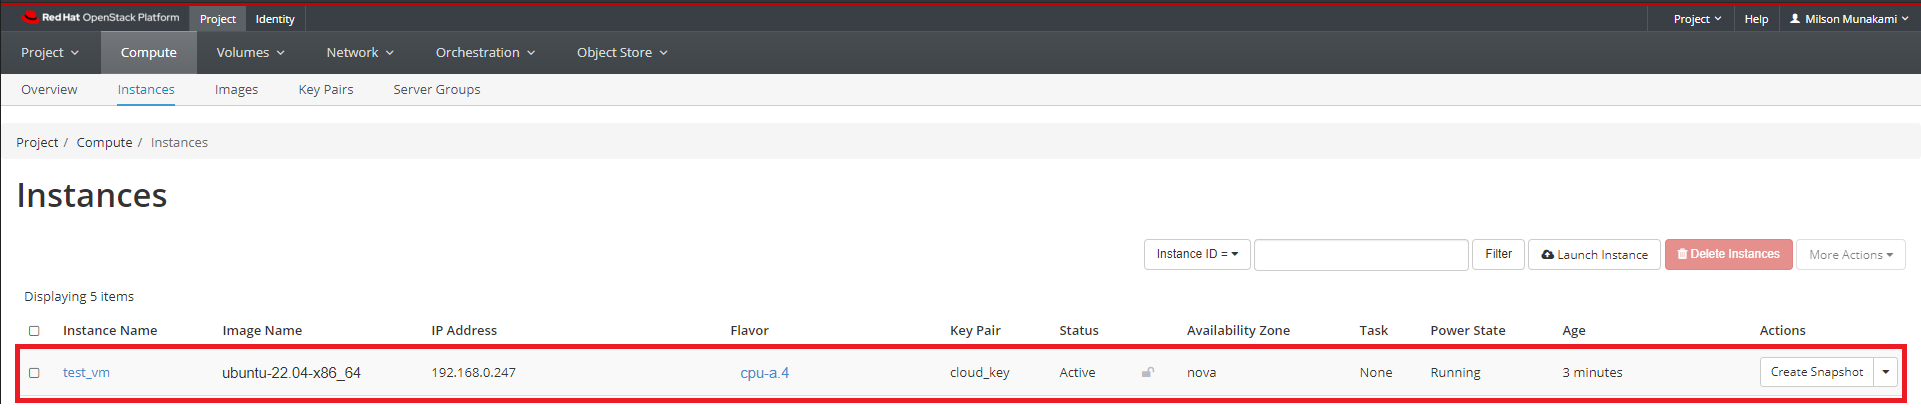
You are now ready to launch your VM - go ahead and click "Launch Instance". This will initiate an instance.
On a successful launch you would be redirected to Compute -> Instances tab and can see the VM spawning.
Once your VM is successfully running you will see the Power State changes from "No State" to "running".
Note
Here we explained about launching an instance using Image but you can also launch an instance from the "instance snapshot" or "volume" or "volume snapshot" option similar to the steps above. If you want to use OpenStack CLI to launch a VM you can read this or if you want to provision the NERC resources using Terraform you can read this.