Mount The Object Storage To An Instance
Pre-requisite
We are using following setting for this purpose to mount the object storage to an NERC OpenStack VM:
-
1 Linux machine,
ubuntu-22.04-x86_64or your choice of Ubuntu OS image,cpu-su.2flavor with 2vCPU, 8GB RAM, 20GB storage - also assign Floating IP to this VM. -
The NERC's Swift Endpoint URL:
https://stack.nerc.mghpcc.org:13808.Very Important: Endpoint for S3 API for the NERC Object Storage/ Swift
The default endpoint for S3 API for the NERC Object Storage/ Swift is
https://stack.nerc.mghpcc.org:13808. -
Setup and enable your S3 API credentials:
To access the API credentials, you must login through the OpenStack Dashboard and navigate to "Projects > API Access" where you can download the "Download OpenStack RC File" as well as the "EC2 Credentials".
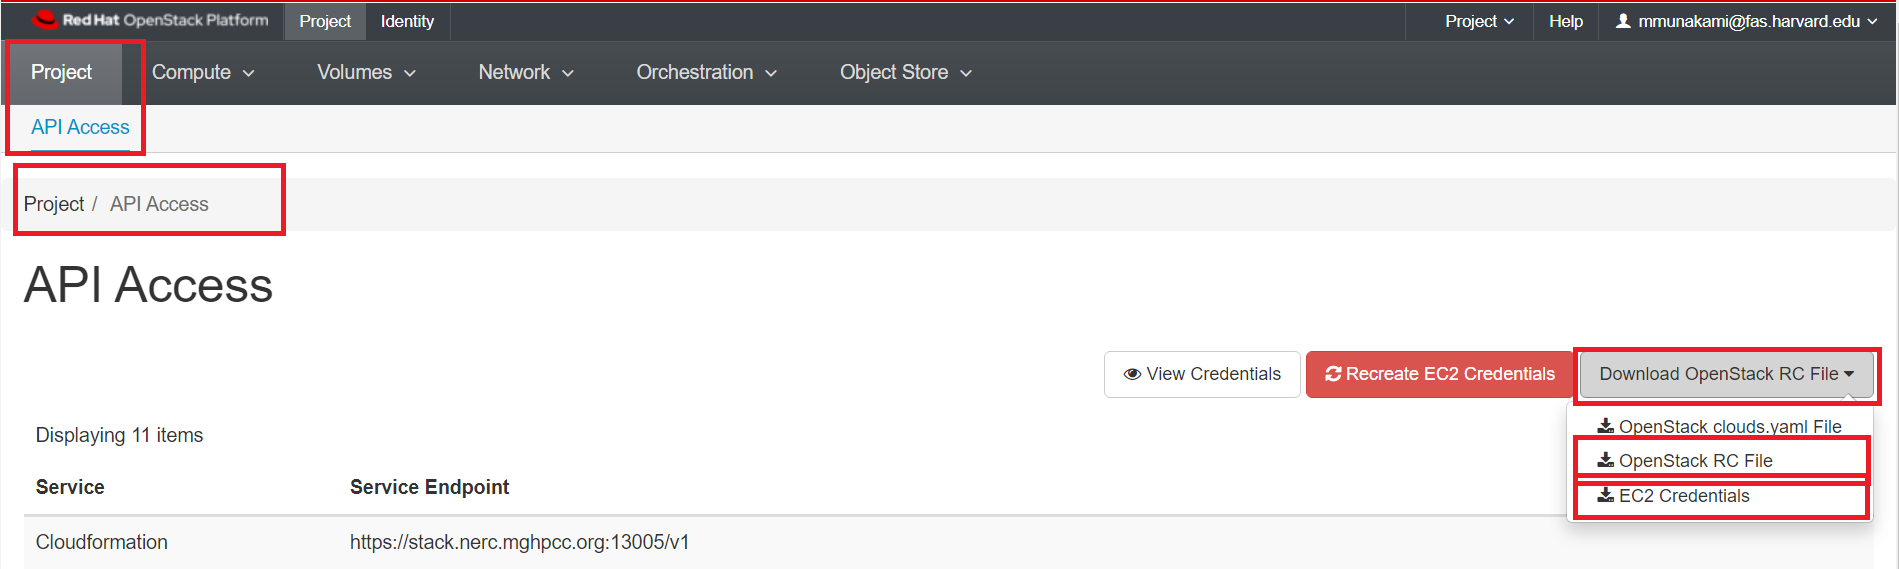
While clicking on "EC2 Credentials", this will download a file zip file including ec2rc.sh file that has content similar to shown below. The important parts are EC2_ACCESS_KEY and EC2_SECRET_KEY, keep them noted.
#!/bin/bash

NOVARC=$(readlink -f "${BASH_SOURCE:-${0}}" 2>/dev/null) || NOVARC=$(python -c 'import os,sys; print os.path.abspath(os.path.realpath(sys.argv[1]))' "${BASH_SOURCE:-${0}}")
NOVA_KEY_DIR=${NOVARC%/*}
export EC2_ACCESS_KEY=...
export EC2_SECRET_KEY=...
export EC2_URL=https://localhost/notimplemented
export EC2_USER_ID=42 # nova does not use user id, but bundling requires it
export EC2_PRIVATE_KEY=${NOVA_KEY_DIR}/pk.pem
export EC2_CERT=${NOVA_KEY_DIR}/cert.pem
export NOVA_CERT=${NOVA_KEY_DIR}/cacert.pem
export EUCALYPTUS_CERT=${NOVA_CERT} # euca-bundle-image seems to require this set

alias ec2-bundle-image="ec2-bundle-image --cert ${EC2_CERT} --privatekey ${EC2_PRIVATE_KEY} --user 42 --ec2cert ${NOVA_CERT}"
alias ec2-upload-bundle="ec2-upload-bundle -a ${EC2_ACCESS_KEY} -s ${EC2_SECRET_KEY} --url ${S3_URL} --ec2cert ${NOVA_CERT}"
Alternatively, you can obtain your EC2 access keys using the openstack client:
sudo apt install python3-openstackclient

openstack ec2 credentials list
+------------------+------------------+--------------+-----------+
| Access           | Secret           | Project ID   | User ID   |
+------------------+------------------+--------------+-----------+
| <EC2_ACCESS_KEY> | <EC2_SECRET_KEY> | <Project_ID> | <User_ID> |
+------------------+------------------+--------------+-----------+
OR, you can even create a new one by running:
openstack ec2 credentials create
-
Source the downloaded OpenStack RC File from Projects > API Access by using:
source *-openrc.shcommand. Sourcing the RC File will set the required environment variables. -
Allow Other User option by editing fuse config by editing
/etc/fuse.conffile and uncomment "user_allow_other" option.sudo nano /etc/fuse.conf
The output going to look like this:

A comparative analysis of Mountpoint for S3, Goofys, and S3FS.
When choosing between S3 clients that enable the utilization of an object store with applications expecting files, it's essential to consider the specific use case and whether the convenience and compatibility provided by FUSE clients match the project's requirements.
To delve into a comparative analysis of Mountpoint for S3, Goofys, and S3FS, please read this blog post.
1. Using Mountpoint for Amazon S3
Mountpoint for Amazon S3 is a high-throughput open-source file client designed to mount an Amazon S3 bucket as a local file system. Mountpoint is optimized for workloads that need high-throughput read and write access to data stored in S3 Object Storage through a file system interface.
Very Important Note
Mountpoint for Amazon S3 intentionally does not implement the full POSIX standard specification for file systems. Mountpoint supports file-based workloads that perform sequential and random reads, sequential (append only) writes, and that don't need full POSIX semantics.
Install Mountpoint
Access your virtual machine using SSH. Update the packages on your system and install wget to be able to download the mount-s3 binary directly to your VM:
sudo apt update && sudo apt upgrade
sudo apt install wget
Now, navigate to your home directory:
cd
-
Download the Mountpoint for Amazon S3 package using
wgetcommand:wget https://s3.amazonaws.com/mountpoint-s3-release/latest/x86_64/mount-s3.deb -
Install the package by entering the following command:
sudo apt-get install ./mount-s3.deb -
Verify that Mountpoint for Amazon S3 is successfully installed by entering the following command:
mount-s3 --versionYou should see output similar to the following:
mount-s3 1.6.0
Configuring and using Mountpoint
Make a folder to store your credentials:
mkdir ~/.aws/
Create file ~/.aws/credentials using your favorite text editor (for example nano or vim). Add the following contents to it which requires the EC2_ACCESS_KEY and EC2_SECRET_KEY keys that you noted from ec2rc.sh file (during the "Setup and enable your S3 API credentials" step):
[nerc]
aws_access_key_id=<EC2_ACCESS_KEY>
aws_secret_access_key=<EC2_SECRET_KEY>
Save the file and exit the text editor.
Create a local directory as a mount point
mkdir -p ~/bucket1
Mount the Container locally using Mountpoint
The object storage container i.e. "bucket1" will be mounted in the directory ~/bucket1
mount-s3 --profile "nerc" --endpoint-url "https://stack.nerc.mghpcc.org:13808" --allow-other --force-path-style --debug bucket1 ~/bucket1/
In this command,
-
mount-s3is the Mountpoint for Amazon S3 package as installed in/usr/bin/path we don't need to specify the full path. -
--profilecorresponds to the name given on the~/.aws/credentialsfile i.e.[nerc]. -
--endpoint-urlcorresponds to the Object Storage endpoint url for NERC Object Storage. You don't need to modify this url. -
--allow-other: Allows other users to access the mounted filesystem. This is particularly useful when multiple users need to access the mounted S3 bucket. Only allowed ifuser_allow_otheris set in/etc/fuse.conf. -
--force-path-style: Forces the use of path-style URLs when accessing the S3 bucket. This is necessary when working with certain S3-compatible storage services that do not support virtual-hosted-style URLs. -
--debug: Enables debug mode, providing additional information about the mounting process. -
bucket1is the name of the container which contains the NERC Object Storage resources. -
~/bucket1is the location of the folder in which you want to mount the Object Storage filesystem.
Important Note
Mountpoint automatically configures reasonable defaults for file system settings such as permissions and performance. However, if you require finer control over how the Mountpoint file system behaves, you can adjust these settings accordingly. For further details, please refer to this resource.
In order to test whether the mount was successful, navigate to the directory in which you mounted the NERC container repository, for example:
cd ~/bucket1
Use the ls command to list its content. You should see the output similar to this:
ls

README.md   image.png   test-file
The NERC Object Storage container repository has now been mounted using Mountpoint.
Very Important Information
Please note that any of these Mountpoints is not persistent if your VM is stopped or rebooted in the future. After each reboot, you will need to execute the mounting command as mentioned above again. To enable automatic mounting at system startup, please follow the steps as outlined here.
Automatically mounting an S3 bucket at boot
Mountpoint does not currently support automatically mounting a bucket at system boot time by configuring them in the /etc/fstab. If you would like your bucket/s to automatically mount when the machine is started you will need to either set up a Cron Job in crontab or using a service manager like systemd.
Using a Cron Job
You need to create a Cron job so that the script runs each time your VM reboots, remounting S3 Object Storage to your VM.
crontab -e
Add this command to the end of the file
@reboot sh /<Path_To_Directory>/script.sh
For example,
@reboot sh /home/ubuntu/script.sh
Create script.sh file paste the below code to it.
#!/bin/bash
mount-s3 [OPTIONS] <BUCKET_NAME> <DIRECTORY>
For example,
#!/bin/bash
mount-s3 --profile "nerc" --endpoint-url "https://stack.nerc.mghpcc.org:13808" --allow-other --force-path-style --debug bucket1 ~/bucket1/
Make the file executable by running the below command
chmod +x script.sh
Reboot your VM:
sudo reboot
Using a service manager like systemd by creating systemd unit file
Create directory in /root folder in which you will store the credentials:
sudo mkdir /root/.aws
Copy the credentials you created in your local directory to the .aws directory in the /root folder:
sudo cp ~/.aws/credentials /root/.aws/
Create systemd unit file i.e. mountpoint-s3.service
Create a systemd service unit file that is going to execute the above script and dynamically mount or unmount the container:
sudo nano /etc/systemd/system/mountpoint-s3.service
Edit the file to look like the below:
[Unit]
Description=Mountpoint for Amazon S3 mount
Documentation=https://docs.aws.amazon.com/AmazonS3/latest/userguide/mountpoint.html
#Wants=network.target
Wants=network-online.target
#Requires=network-online.target
AssertPathIsDirectory=/home/ubuntu/bucket1
After=network-online.target

[Service]
Type=forking
User=root
Group=root
ExecStart=/usr/bin/mount-s3 bucket1 /home/ubuntu/bucket1 \
      --profile "nerc" \
      --endpoint-url "https://stack.nerc.mghpcc.org:13808" \
      --allow-other \
      --force-path-style \
      --debug

ExecStop=/bin/fusermount -u /home/ubuntu/bucket1
Restart=always
RestartSec=10

[Install]
#WantedBy=remote-fs.target
WantedBy=default.target
Important Note
The network-online.target lines ensure that mounting is not attempted until there's a network connection available. The service is launched as soon as the network is up and running, it mounts the bucket and remains active.
Launch the service
Now reload systemd deamon:
sudo systemctl daemon-reload
Start your service
sudo systemctl start mountpoint-s3.service
To check the status of your service
sudo systemctl status mountpoint-s3.service
To enable your service on every reboot
sudo systemctl enable --now mountpoint-s3.service
Information
The service name is based on the file name i.e. /etc/systemd/system/mountpoint-s3.service so you can just use mountpoint-s3 instead of mountpoint-s3.service on all above systemctl commands.
To debug you can use:
sudo systemctl status mountpoint-s3.service -l --no-pager or, journalctl -u mountpoint-s3 --no-pager | tail -50
Verify, the service is running successfully in background as root user:
ps aux | grep mount-s3
The output should look similar to:
root 13585 0.0 0.0 1060504 11672 ? Sl 02:00 0:00 /usr/bin/mount-s3 bucket1 /home/ubuntu/bucket1 --profile nerc --endpoint-url https://stack.nerc.mghpcc.org:13808 --read-only --allow-other --force-path-style --debug
Stopping the service
Stopping the service causes the container to unmount from the mount point.
To disable your service on every reboot:
sudo systemctl disable --now mountpoint-s3.service
Confirm the Service is not in "Active" Status:
sudo systemctl status mountpoint-s3.service

○ mountpoint-s3.service - Mountpoint for Amazon S3 mount
    Loaded: loaded (/etc/systemd/system/mountpoint-s3.service; disabled; vendor p>
    Active: inactive (dead)
Unmount the local mount point:
If you have the local mounted directory "bucket1" already mounted, unmount it (replace ~/bucket1 with the location in which you have it mounted):
fusermount -u ~/bucket1
Or,
sudo umount -l ~/bucket1
Now reboot your VM:
sudo reboot
Further Reading
For further details, including instructions for downloading and installing Mountpoint on various Linux operating systems, please refer to this resource.
2. Using Goofys
Install goofys
Access your virtual machine using SSH. Update the packages on your system and install wget to be able to download the goofys binary directly to your VM:
sudo apt update && sudo apt upgrade
sudo apt install wget
Now, navigate to your home directory:
cd
Use wget to download the goofys binary:
wget https://github.com/kahing/goofys/releases/latest/download/goofys
Make the goofys binary executable:
chmod +x goofys
Copy the goofys binary to somewhere in your path
sudo cp goofys /usr/bin/
To update goofys in the future
In order to update the newer version of goofys binary, you need to follow:
-
make sure that the data in the NERC Object Storage container is not actively used by any applications on your VM.
-
remove the
goofysbinary from ubuntu's home directory as well as from/usr/bin/. -
execute the above commands (those starting with wget and chmod) from your home directory again and copy it to your path i.e.
/usr/bin/. -
reboot your VM.
Provide credentials to configure goofys
Make a folder to store your credentials:
mkdir ~/.aws/
Create file ~/.aws/credentials using your favorite text editor (for example nano or vim). Add the following contents to it which requires the EC2_ACCESS_KEY and EC2_SECRET_KEY keys that you noted from ec2rc.sh file (during the "Setup and enable your S3 API credentials" step):
[nerc]
aws_access_key_id=<EC2_ACCESS_KEY>
aws_secret_access_key=<EC2_SECRET_KEY>
Save the file and exit the text editor.
Create a local directory as a mount folder
mkdir -p ~/bucket1
Mount the Container locally using goofys
The object storage container i.e. "bucket1" will be mounted in the directory ~/bucket1
goofys -o allow_other --region RegionOne --profile "nerc" --endpoint "https://stack.nerc.mghpcc.org:13808" bucket1 ~/bucket1
In this command,
-
goofysis the goofys binary as we already copied this in/usr/bin/path we don't need to specify the full path. -
-ostands for goofys options, and is handled differently. -
allow_otherAllows goofys with optionallow_otheronly allowed ifuser_allow_otheris set in/etc/fuse.conf. -
--profilecorresponds to the name given on the~/.aws/credentialsfile i.e.[nerc]. -
--endpointcorresponds to the Object Storage endpoint url for NERC Object Storage. You don't need to modify this url. -
bucket1is the name of the container which contains the NERC Object Storage resources. -
~/bucket1is the location of the folder in which you want to mount the Object Storage filesystem.
In order to test whether the mount was successful, navigate to the directory in which you mounted the NERC container repository, for example:
cd ~/bucket1
Use the ls command to list its content. You should see the output similar to this:
ls

README.md   image.png   test-file
The NERC Object Storage container repository has now been mounted using goofys.
Very Important Information
Please note that any of these mounted buckets is not persistent if your VM is stopped or rebooted in the future. After each reboot, you will need to execute the mounting command as mentioned above again. To enable automatic mounting at system startup, please follow the steps as outlined here.
Mounting on system startup
Mounts can be set to occur automatically during system initialization so that mounted file systems will persist even after the VM reboot.
Create directory in /root folder in which you will store the credentials:
sudo mkdir /root/.aws
Copy the credentials you created in your local directory to the .aws directory in the /root folder:
sudo cp ~/.aws/credentials /root/.aws/
Configure mounting of the bucket1 container
Open the file /etc/fstab using your favorite command line text editor for editing. You will need sudo privileges for that. For example, if you want to use nano, execute this command:
sudo nano /etc/fstab
Proceed with one of the methods below depending on whether you wish to have the "bucket1" repository automatically mounted at system startup:
Method 1: Mount the repository automatically on system startup
Add the following line to the /etc/fstab file:
/usr/bin/goofys#bucket1 /home/ubuntu/bucket1 fuse _netdev,allow_other,--dir-mode=0777,--file-mode=0666,--region=RegionOne,--profile=nerc,--endpoint=https://stack.nerc.mghpcc.org:13808 0 0
Method 2: Do NOT mount the repository automatically on system startup
Add the following line to the /etc/fstab file:
/usr/bin/goofys#bucket1 /home/ubuntu/bucket1 fuse noauto,_netdev,allow_other,--dir-mode=0777,--file-mode=0666,--region=RegionOne,--profile=nerc,--endpoint=https://stack.nerc.mghpcc.org:13808 0 0
The difference between this code and the code mentioned in Method 1 is the addition of the option noauto.
Content of /etc/fstab
In the /etc/fstab content as added above:
grep goofys /etc/fstab
The output should look similar to:
/usr/bin/goofys#bucket1 /home/ubuntu/bucket1 fuse _netdev,allow_other,--dir-mode=0777,--file-mode=0666,--region=RegionOne,--profile=nerc,--endpoint=https://stack.nerc.mghpcc.org:13808 0 0
-
/usr/bin/goofyswith the location of yourgoofysbinary. -
/home/ubuntu/bucket1is the location in which you wish to mountbucket1container from your NERC Object Storage. -
--profile=nercis the name you mentioned on the~/.aws/credentialsfile i.e.[nerc].
Once you have added that line to your /etc/fstab file, reboot the VM. After the system has restarted, check whether the NERC Object Storage repository i.e. bucket1 is mounted in the directory specified by you i.e. in /home/ubuntu/bucket1.
Important Information
If you just want to test your mounting command written in /etc/fstab without "Rebooting" the VM you can also do that by running sudo mount -a. If there's no error, your mount is working and will persist after reboot.
And if you want to stop automatic mounting of the container from the NERC Object Storage repository i.e. bucket1, remove the line you added in the /etc/fstab file. You can also comment it out by adding # character in front of that line. After that, reboot the VM. Optionally, you can also remove the goofys binary and the credentials file located at ~/.aws/credentials if you no longer want to use goofys.
3. Using S3FS
Install S3FS
Access your virtual machine using SSH. Update the packages on your system and install s3fs:
sudo apt update && sudo apt upgrade
sudo apt install s3fs
For RedHat/Rocky/AlmaLinux
The RedHat/Rocky/AlmaLinux repositiories do not have s3fs. Therefore, you will need to compile it yourself.
First, using your local computer, visit the following website (it contains the releases of s3fs): https://github.com/s3fs-fuse/s3fs-fuse/releases/latest.
Then, in the section with the most recent release find the part Assets. From there, find the link to the zip version of the Source code.

Right click on one of the Source Code i.e. "v1.94.zip" and select the "Copy link address". You will need this link to use later as a parameter for the wget command to download it to your virtual machine.
Access your VM on the NERC OpenStack using the web console or SSH.
Update your packages:
sudo dnf update -y
Install the prerequisites including fuse, the C++ compiler and make:
sudo dnf config-manager --set-enabled crb

sudo dnf install automake fuse fuse-devel gcc-c++ git libcurl-devel libxml2-devel make openssl-devel wget unzip

# OR, sudo dnf --enablerepo=crb install automake fuse fuse-devel gcc-c++ git libcurl-devel libxml2-devel make openssl-devel wget unzip
Now, use wget to download the source code. Replace https://github.com/s3fs-fuse/s3fs-fuse/archive/refs/tags/v1.94.zip with the link to the source code you found previously:
wget https://github.com/s3fs-fuse/s3fs-fuse/archive/refs/tags/v1.94.zip
Use the ls command to verify that the zip archive has been downloaded:
ls
Unzip the archive (replace v1.94.zip with the name of the archive you downloaded):
unzip v1.94.zip
Use the ls command to find the name of the folder you just extracted:
ls
Now, navigate to that folder (replace s3fs-fuse-1.94 with the name of the folder you just extracted):
cd s3fs-fuse-1.94
Perform the compilation by executing the following commands in order:
./autogen.sh
./configure
make
sudo make install
s3fs should now be installed in /usr/local/bin/s3fs.
Create a file which will store the S3 Credentials
Store your S3 credentials in a file ${HOME}/.passwd-s3fs and set "owner-only" permissions. Run the following command to create a pair of EC2_ACCESS_KEY and EC2_SECRET_KEY keys that you noted from ec2rc.sh file (above) to store them in the file.
echo EC2_ACCESS_KEY:EC2_SECRET_KEY > ${HOME}/.passwd-s3fs
Change the permissions of this file to 600 to set "owner-only" permissions:
chmod 600 ${HOME}/.passwd-s3fs
Create a Container in the NERC Project's Object storage
We create it using the OpenStack Swift client:
sudo apt install python3-swiftclient
Let's call the Container "bucket1"
swift post bucket1
More about Swift Interface
You can read more about using Swift Interface for NERC Object Storage here.
Create a local directory as a mount point in your VM
mkdir -p ~/bucket1
Mount the Container locally using s3fs
The object storage container i.e. "bucket1" will be mounted in the directory ~/bucket1
s3fs bucket1 ~/bucket1 -o passwd_file=~/.passwd-s3fs -o url=https://stack.nerc.mghpcc.org:13808 -o use_path_request_style -o umask=0002
Unmount the local mount point
If you have the local mounted directory "bucket1" already mounted, unmount it (replace ~/bucket1 with the location in which you have it mounted):
sudo umount -l ~/bucket1
Configure mounting of the bucket1 repository
Open the file /etc/fstab using your favorite command line text editor for editing. You will need sudo privileges for that. For example, if you want to use nano, execute this command:
sudo nano /etc/fstab
Proceed with one of the methods below depending on whether you wish to have the "bucket1" repository automatically mounted at system startup:
Method 1: Mount the repository automatically on startup
Add the following line to the /etc/fstab file:
/usr/bin/s3fs#bucket1 /home/ubuntu/bucket1 fuse passwd_file=/home/ubuntu/.passwd-s3fs,_netdev,allow_other,use_path_request_style,uid=0,umask=0222,mp_umask=0222,gid=0,url=https://stack.nerc.mghpcc.org:13808 0 0
Method 2: Do NOT mount the repository automatically on startup
Add the following line to the /etc/fstab file:
/usr/bin/s3fs#bucket1 /home/ubuntu/bucket1 fuse noauto,passwd_file=/home/ubuntu/.passwd-s3fs,_netdev,allow_other,use_path_request_style,uid=0,umask=0222,mp_umask=0222,gid=0,url=https://stack.nerc.mghpcc.org:13808 0 0
The difference between this code and the code mentioned in Method 1 is the addition of the option noauto.
Content of /etc/fstab
In the /etc/fstab content as added above:
-
/usr/bin/s3fsis the location of yours3fsbinary. If you installed it usingapton Debian or Ubuntu, you do not have to change anything here. If you are using a self-compiled version ofs3fscreated on RedHat/Rocky/AlmaLinux as explained above, that location is/usr/local/bin/s3fs. -
/home/ubuntu/.passwd-s3fsis the location of the file which contains the key pair used for mounting the "bucket1" repository as we named it in previous step.
4. Using Rclone
Installing Rclone
Install rclone as described here or for our Ubuntu based VM we can just SSH into the VM and then run the following command using default ubuntu user:
curl -sSL https://rclone.org/install.sh | sudo bash
Configuring Rclone
If you run rclone config file you will see where the default location is for you.
rclone config file
Configuration file doesn't exist, but rclone will use this path:
/home/ubuntu/.config/rclone/rclone.conf
So create the config file as mentioned above path: /home/ubuntu/.config/rclone/rclone.conf and add the following entry with the name [nerc]:
[nerc]
type = s3
env_auth = false
provider = Other
endpoint = https://stack.nerc.mghpcc.org:13808
acl = public-read
access_key_id = <YOUR_EC2_ACCESS_KEY_FROM_ec2rc_FILE>
secret_access_key = <YOUR_EC2_SECRET_KEY_FROM_ec2rc_FILE>
location_constraint =
server_side_encryption =
More about the config for AWS S3 compatible API can be seen here.
Important Information
Mind that if set env_auth = true then it will take variables from environment, so you shouldn't insert it in this case.
Listing the Containers and Contents of a Container
Once your Object Storage has been configured in Rclone, you can then use the Rclone interface to List all the Containers with the "lsd" command
rclone lsd "nerc:"
Or,
rclone lsd "nerc:" --config=rclone.conf
For e.g.,
rclone lsd "nerc:" --config=rclone.conf
      -1 2024-04-23 20:21:43        -1 bucket1
To list the files and folders available within a container i.e. "bucket1" in this case, within a container we can use the "ls" command:
rclone ls "nerc:bucket1/"
  653 README.md
    0 image.png
   12 test-file
Create a mount point directory
mkdir -p bucket1
Mount the container with Rclone
Start the mount like this, where home/ubuntu/bucket1 is an empty existing directory:
rclone -vv --vfs-cache-mode full mount nerc:bucket1 /home/ubuntu/bucket1 --allow-other --allow-non-empty
On Linux, you can run mount in either foreground or background (aka daemon) mode. Mount runs in foreground mode by default. Use the --daemon flag to force background mode i.e.
rclone mount remote:path/to/files /path/to/local/mount --daemon
When running in background mode the user will have to stop the mount manually:
fusermount -u /path/to/local/mount
Or,
sudo umount -l /path/to/local/mount
Now we have the mount running and we have background mode also enabled. Lets say there is a scenario where we want the mount to be persistent after a server/machine reboot. There are few ways to do it:
Create systemd unit file i.e. rclone-mount.service
Create a systemd service unit file that is going to execute the above script and dynamically mount or unmount the container:
sudo nano /etc/systemd/system/rclone-mount.service
Edit the file to look like the below:
[Unit]
Description=rclone mount
Documentation=http://rclone.org/docs/
AssertPathIsDirectory=/home/ubuntu/bucket1
After=network-online.target

[Service]
Type=simple
User=root
Group=root
ExecStart=/usr/bin/rclone mount \
      --config=home/ubuntu/.config/rclone/rclone.conf \
      --vfs-cache-mode full \
      nerc:bucket1 /home/ubuntu/bucket1 \
              --allow-other \
              --allow-non-empty

ExecStop=/bin/fusermount -u /home/ubuntu/bucket1
Restart=always
RestartSec=10

[Install]
WantedBy=default.target
The service is launched as soon as the network is up and running, it mounts the bucket and remains active. Stopping the service causes the container to unmount from the mount point.
Launch the service using a service manager
Now reload systemd deamon:
sudo systemctl daemon-reload
Start your service
sudo systemctl start rclone-mount.service
To check the status of your service
sudo systemctl status rclone-mount.service
To enable your service on every reboot
sudo systemctl enable --now rclone-mount.service
Information
The service name is based on the file name i.e. /etc/systemd/system/rclone-mount.service so you can just use rclone-mount instead of rclone-mount.service on all above systemctl commands.
To debug you can use:
sudo systemctl status rclone-mount.service -l --no-pager or, journalctl -u rclone-mount --no-pager | tail -50
Verify, if the container is mounted successfully:
df -hT | grep rclone
The output should look similar to:
nerc:bucket1 fuse.rclone 1.0P 0 1.0P 0% /home/ubuntu/bucket1
5. Using JuiceFS
Preparation
A JuiceFS file system consists of two parts:
-
Object Storage: Used for data storage.
-
Metadata Engine: A database used for storing metadata. In this case, we will use a durable Redis in-memory database service that provides extremely fast performance.
Installation of the JuiceFS client
Access your virtual machine using SSH. Update the packages on your system and install the JuiceFS client:
sudo apt update && sudo apt upgrade
# default installation path is /usr/local/bin
curl -sSL https://d.juicefs.com/install | sh -
Verify the JuiceFS client is running in background:
ps aux | grep juicefs
The output should look similar to:
ubuntu 16275 0.0 0.0 7008 2212 pts/0 S+ 18:44 0:00 grep --color=auto juicefs
Installing and Configuring Redis database
Install Redis by running:
sudo apt install redis-server
This will download and install Redis and its dependencies. Following this, there is one important configuration change to make in the Redis configuration file, which was generated automatically during the installation.
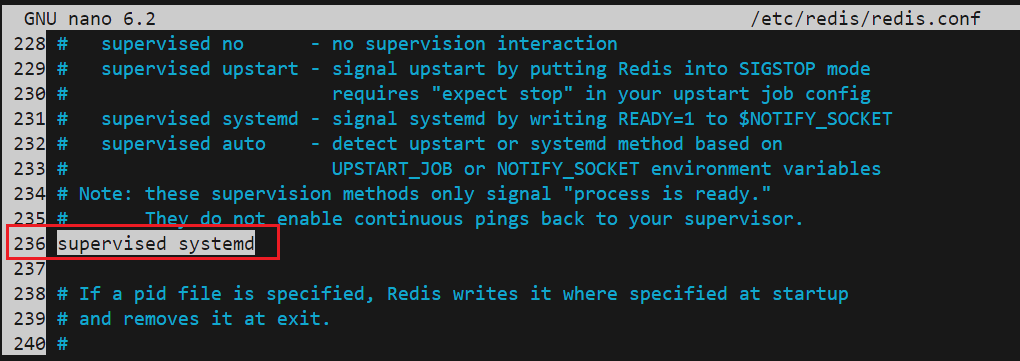
You can check the line number where to find supervised by running:
sudo cat /etc/redis/redis.conf -n | grep supervised

228  #   supervised no      - no supervision interaction
229  #   supervised upstart - signal upstart by putting Redis into SIGSTOP mode
231  #   supervised systemd - signal systemd by writing READY=1 to $NOTIFY_SOCKET
232  #   supervised auto    - detect upstart or systemd method based on
236  supervised no
Open this file with your preferred text editor:
sudo nano /etc/redis/redis.conf -l
Inside the config file, find the supervised directive. This directive allows you to declare an init system to manage Redis as a service, providing you with more control over its operation. The supervised directive is set to no by default. Since you are running Ubuntu, which uses the systemd init system, change this to systemd as shown here:
- Binding to localhost:
By default, Redis is only accessible from localhost. We need to verify that by locating this line by running:
sudo cat /etc/redis/redis.conf -n | grep bind

...
68  bind 127.0.0.1 ::1
...
and make sure it is uncommented (remove the # if it exists) by editing this file with your preferred text editor.
So save and close it when you are finished. If you used nano to edit the file, do so by pressing CTRL + X, Y, then ENTER.
Then, restart the Redis service to reflect the changes you made to the configuration file:
sudo systemctl restart redis.service
With that, you've installed and configured Redis and it's running on your machine. Before you begin using it, you should first check whether Redis is functioning correctly.
Start by checking that the Redis service is running:
sudo systemctl status redis
If it is running without any errors, this command will show "active (running)" Status.
To test that Redis is functioning correctly, connect to the server using redis-cli, Redis's command-line client:
redis-cli
In the prompt that follows, test connectivity with the ping command:
ping
Output:
PONG
Also, check that binding to localhost is working fine by running the following netstat command:
sudo netstat -lnp | grep redis

tcp        0      0 127.0.0.1:6379          0.0.0.0:*               LISTEN      16967/redis-server
tcp6       0      0 ::1:6379                :::*                    LISTEN      16967/redis-server
Important Note
The netstat command may not be available on your system by default. If this is the case, you can install it (along with a number of other handy networking tools) with the following command: sudo apt install net-tools.
Configuring a Redis Password
Configuring a Redis password enables one of its two built-in security features - the auth command, which requires clients to authenticate to access the database. The password is configured directly in Redis's configuration file, /etc/redis/redis.conf.
First, we need to locate the line where the requirepass directive is mentioned:
sudo cat /etc/redis/redis.conf -n | grep requirepass

...
790  # requirepass foobared
...
Then open the Redis's config file i.e. /etc/redis/redis.conf again with your preferred editor:
sudo nano /etc/redis/redis.conf -l
Uncomment it by removing the #, and change foobared to a secure password.
How to generate random password?
You can use openssl to generate random password by running the following command locally:
openssl rand 12 | openssl base64 -A
<your_redis_password>
After saving and closing it when you are finished. You need to restart the Redis service to reflect the changes you made to the configuration file by running:
sudo systemctl restart redis.service
To test that the password works, open up the Redis client:
redis-cli
The following shows a sequence of commands used to test whether the Redis password works. The first command tries to set a key to a value before authentication:
127.0.0.1:6379> set key1 10
That won't work because you didn't authenticate, so Redis returns an error:
Output:
(error) NOAUTH Authentication required.
The next command authenticates with the password specified in the Redis configuration file:
127.0.0.1:6379> auth <your_redis_password>
Redis acknowledges:
Output:
OK
After that, running the previous command again will succeed:
127.0.0.1:6379> set key1 10
Output:
OK
get key1 queries Redis for the value of the new key.
127.0.0.1:6379> get key1
Output:
"10"
After confirming that you're able to run commands in the Redis client after authenticating, you can exit redis-cli:
127.0.0.1:6379> quit
Setting authorizing S3 access using juicefs config
You can store the S3 credentials using juicefs config that allows us to add the Access Key and Secret Key for the file system by running:
juicefs config \
--access-key=<EC2_ACCESS_KEY> \
--secret-key=<EC2_SECRET_KEY> \
redis://default:<your_redis_password>@127.0.0.1:6379/1
Formatting file system
sudo juicefs format --storage s3 --bucket https://stack.nerc.mghpcc.org:13808/<your_container> redis://default:<your_redis_password>@127.0.0.1:6379/1 myjfs
Mounting file system manually
Create a local directory as a mount point folder
mkdir -p ~/bucket1
Mount the Container locally using juicefs
The formatted file system "myjfs" will be mounted in the directory ~/bucket1 by running the following command:
juicefs mount redis://default:<your_redis_password>@127.0.0.1:6379/1 ~/bucket1
Mount JuiceFS at Boot Time
After JuiceFS has been successfully formatted, follow this guide to set up auto-mount on boot.
We can specify the --update-fstab option on the mount command that will automatically help you set up mount at boot:
sudo juicefs mount --update-fstab --max-uploads=50 --writeback --cache-size 204800 <META-URL> <MOUNTPOINT>
Make sure /etc/fstab contains an entry for the mount point by running:
grep <MOUNTPOINT> /etc/fstab
The output should look similar to:
<META-URL> <MOUNTPOINT> juicefs _netdev,max-uploads=50,writeback,cache-size=204800 0 0

ls -l /sbin/mount.juicefs
lrwxrwxrwx 1 root root 22 Apr 24 20:25 /sbin/mount.juicefs -> /usr/local/bin/juicefs
For example,
sudo juicefs mount --update-fstab --max-uploads=50 --writeback --cache-size 204800 redis://default:<your_redis_password>@127.0.0.1:6379/1 ~/bucket1
Make sure /etc/fstab contains an entry for the mount point by running:
grep juicefs /etc/fstab
The output should look similar to:
redis://default:<your_redis_password>@127.0.0.1:6379/1 /home/ubuntu/bucket1 juicefs _netdev,cache-size=204800,max-uploads=50,writeback 0 0
Confirm that /sbin/mount.juicefs is correctly symlinked to the JuiceFS binary:
ls -l /sbin/mount.juicefs
lrwxrwxrwx 1 root root 22 Apr 24 20:25 /sbin/mount.juicefs -> /usr/local/bin/juicefs
Automating Mounting with systemd service unit file
If you're using JuiceFS and need to apply settings like database access password, S3 access key, and secret key, which are hidden from the command line using environment variables for security reason, it may not be easy to configure them in the /etc/fstab file. In such cases, you can utilize systemd to mount your JuiceFS instance.
Here's how you can set up your systemd configuration file:
Create a systemd service unit file that is going to execute the above script and dynamically mount or unmount the container:
sudo nano /etc/systemd/system/juicefs-mount.service
Edit the file to look like the below:
[Unit]
Description=JuiceFS mount
Documentation=https://juicefs.com/docs/
AssertPathIsDirectory=/home/ubuntu/bucket1
After=network-online.target

[Service]
Type=simple
User=root
Group=root
ExecStart=/usr/local/bin/juicefs mount \
"redis://default:<your_redis_password>@127.0.0.1:6379/1" \
/home/ubuntu/bucket1 \
--no-usage-report \
--writeback \
--cache-size 102400 \
--cache-dir /home/juicefs_cache \
--buffer-size 2048 \
--open-cache 0 \
--attr-cache 1 \
--entry-cache 1 \
--dir-entry-cache 1 \
--cache-partial-only false \
--free-space-ratio 0.1 \
--max-uploads 20 \
--max-deletes 10 \
--backup-meta 0 \
--log /var/log/juicefs.log \
--get-timeout 300 \
--put-timeout 900 \
--io-retries 90 \
--prefetch 1

ExecStop=/usr/local/bin/juicefs umount /home/ubuntu/bucket1
Restart=always
RestartSec=10

[Install]
WantedBy=default.target
Important Information
Feel free to modify the options and environments according to your needs. Please make sure you change <your_redis_password> to your own Redis password that was setup by following this step.
The service is launched as soon as the network is up and running, it mounts the bucket and remains active. Stopping the service causes the container to unmount from the mount point.
Launch the service as daemon
Now reload systemd deamon:
sudo systemctl daemon-reload
Start your service
sudo systemctl start juicefs-mount.service
To check the status of your service
sudo systemctl status juicefs-mount.service
To enable your service on every reboot
sudo systemctl enable --now juicefs-mount.service
Information
The service name is based on the file name i.e. /etc/systemd/system/juicefs-mount.service so you can just use juicefs-mount instead of juicefs-mount.service on all above systemctl commands.
To debug you can use:
sudo systemctl status juicefs-mount.service -l --no-pager or, journalctl -u juicefs-mount --no-pager | tail -50
Verify, if the container is mounted successfully:
df -hT | grep juicefs
The output should look similar to:
JuiceFS:myjfs fuse.juicefs 1.0P 4.0K 1.0P 1% /home/ubuntu/bucket1
Data Synchronization
juicefs sync is a powerful data migration tool, which can copy data across all supported storages including object storage, JuiceFS itself, and local file systems, you can freely copy data between any of these systems.
Command Syntax
To synchronize data from SRC i.e. the source data address or path to DST i.e. the destination address or path;, capable for both directories and files.
juicefs sync [command options] SRC DST
More Information
[command options] are synchronization options. See command reference for more details.
Address format:
[NAME://][ACCESS_KEY:SECRET_KEY[:TOKEN]@]BUCKET[.ENDPOINT][/PREFIX]

# MinIO only supports path style
minio://[ACCESS_KEY:SECRET_KEY[:TOKEN]@]ENDPOINT/BUCKET[/PREFIX]
Synchronize between Object Storage and JuiceFS
The following command synchronizes movies container on Object Storage Container to your local JuiceFS File System i.e ~/jfs:
# create local folder
mkdir -p ~/jfs
# mount JuiceFS
juicefs mount -d redis://default:<your_redis_password>@127.0.0.1:6379/1 ~/jfs
# synchronize
juicefs sync --force-update s3://<EC2_ACCESS_KEY>:<EC2_SECRET_KEY>@movies.stack.nerc.mghpcc.org:13808/ ~/jfs/
The following command synchronizes images directory from your local JuiceFS File System i.e ~/jfs to Object Storage Container i.e. movies container:
# mount JuiceFS
juicefs mount -d redis://default:<your_redis_password>@127.0.0.1:6379/1 ~/jfs
# create local folder and add some file to this folder
mkdir -p ~/jfs/images/
cp "test.image" ~/jfs/images/
# synchronization
juicefs sync --force-update ~/jfs/images/ s3://<EC2_ACCESS_KEY>:<EC2_SECRET_KEY>@movies.stack.nerc.mghpcc.org:13808/images/
How to destroy a file system
After JuiceFS has been successfully formatted, follow this guide to clean up.
JuiceFS client provides the destroy command to completely destroy a file system, which will result in:
-
Deletion of all metadata entries of this file system
-
Deletion of all data blocks of this file system
Use this command in the following format:
juicefs destroy <METADATA URL> <UUID>
Here,
<METADATA URL>: The URL address of the metadata engine
<UUID>: The UUID of the file system
Find the UUID of existing mount file system
You can run either juicefs config redis://default:<your_redis_password>@127.0.0.1:6379/1 or juicefs status redis://default:<your_redis_password>@127.0.0.1:6379/1 to get detailed information about mounted file system i.e. "myjfs" that is setup by following this step. The output looks like shown here:
{
...
"Name": "myjfs",
"UUID": "<UUID>",
...
}
Destroy a file system
Please note the "UUID" that you will need to run juicefs destroy command as shown below:
juicefs destroy redis://default:<your_redis_password>@127.0.0.1:6379/1 <UUID> --force
When destroying a file system, the client will issue a confirmation prompt. Please make sure to check the file system information carefully and enter y after confirming it is correct.
Danger
The destroy operation will cause all the data in the database and the object storage associated with the file system to be deleted. Please make sure to back up the important data before operating!