Setup K3s cluster Using k3d
One of the most popular and second method of creating k3s cluster is by using k3d. By the name itself it suggests, K3s-in-docker, is a wrapper around K3s – Lightweight Kubernetes that runs it in docker. Please refer to this link to get brief insights of this wonderful tool. It provides a seamless experience working with K3s cluster management with some straight forward commands. k3d is efficient enough to create and manage K3s single node and well as K3s High Availability clusters just with few commands.
Note
For using k3d you must have docker installed in your system
Install Docker
-
Install container runtime - docker
-
Configure the Docker daemon, in particular to use systemd for the management of the container's cgroups
Install kubectl
-
Install kubectl binary
kubectl: the command line util to talk to your cluster.
snap install kubectl --classicThis outputs:
kubectl 1.26.1 from Canonical✓ installed -
Now verify the kubectl version:
kubectl version -o yaml
Installing k3d
k3d Installation
The below command will install the k3d, in your system using the installation script.
OR,
To verify the installation, please run the following command:
After the successful installation, you are ready to create your cluster using k3d and run K3s in docker within seconds.
Getting Started
Now let's directly jump into creating our K3s cluster using k3d.
-
Create k3d Cluster:
k3d cluster create k3d-demo-clusterThis single command spawns a K3s cluster with two containers: A Kubernetes control-plane node(server) and a load balancer(serverlb) in front of it. It puts both of them in a dedicated Docker network and exposes the Kubernetes API on a randomly chosen free port on the Docker host. It also creates a named Docker volume in the background as a preparation for image imports.
You can also look for advance syntax for cluster creation:
k3d cluster create mycluster --api-port 127.0.0.1:6445 --servers 3 \
    --agents 2 --volume '/home/me/mycode:/code@agent[*]' --port '8080:80@loadbalancer'
Here, the above single command spawns a K3s cluster with six containers:
-
load balancer
-
3 servers (control-plane nodes)
-
2 agents (formerly worker nodes)
With the
--api-port 127.0.0.1:6445, you tell k3d to map the Kubernetes API Port (6443 internally) to127.0.0.1/localhost's port 6445. That means that you will have this connection string in your Kubeconfig:server: https://127.0.0.1:6445to connect to this cluster.This port will be mapped from the load balancer to your host system. From there, requests will be proxied to your server nodes, effectively simulating a production setup, where server nodes also can go down and you would want to failover to another server.
The
--volume /home/me/mycode:/code@agent[*]bind mounts your local directory/home/me/mycodeto the path/codeinside all ([*]of your agent nodes). Replace * with an index (here: 0 or 1) to only mount it into one of them.The specification telling k3d which nodes it should mount the volume to is called "node filter" and it's also used for other flags, like the
--portflag for port mappings.That said,
--port '8080:80@loadbalancer'maps your local host's port 8080 to port 80 on the load balancer (serverlb), which can be used to forward HTTP ingress traffic to your cluster. For example, you can now deploy a web app into the cluster (Deployment), which is exposed (Service) externally via an Ingress such asmyapp.k3d.localhost.Then (provided that everything is set up to resolve that domain to your localhost IP), you can point your browser to
http://myapp.k3d.localhost:8080to access your app. Traffic then flows from your host through the Docker bridge interface to the load balancer. From there, it's proxied to the cluster, where it passes via Ingress and Service to your application Pod.Note
You have to have some mechanism set up to route to resolve
myapp.k3d.localhostto your local host IP (127.0.0.1). The most common way is using entries of the form127.0.0.1myapp.k3d.localhostin your/etc/hostsfile (C:\Windows\System32\drivers\etc\hostson Windows). However, this does not allow for wildcard entries (*.localhost), so it may become a bit cumbersome after a while, so you may want to have a look at tools likednsmasq(MacOS/UNIX) orAcrylic(Windows) to ease the burden. -
-
Getting the cluster's kubeconfig: Get the new cluster's connection details merged into your default kubeconfig (usually specified using the
KUBECONFIGenvironment variable or the default path$HOME/.kube/config) and directly switch to the new context:k3d kubeconfig merge k3d-demo-cluster --kubeconfig-switch-contextThis outputs:
/root/.k3d/kubeconfig-k3d-demo-cluster.yaml -
Checking the nodes running on k3d cluster:
k3d node list
You can see here two nodes. The (very) smart implementation here is that while the cluster is running on its node k3d-k3s-default-server-0, there is another "node" that acts as the load balancer i.e. k3d-k3d-demo-cluster-serverlb.
-
Firing Kubectl commands that allows you to run commands against Kubernetes:
i. The below command will list the nodes available in our cluster:
kubectl get nodes -o wideOR,
kubectl get nodes --output wideThe output will look like:

ii. To look at what's inside the K3s cluster (pods, services, deployments, etc.):
kubectl get all --all-namespacesThe output will look like:
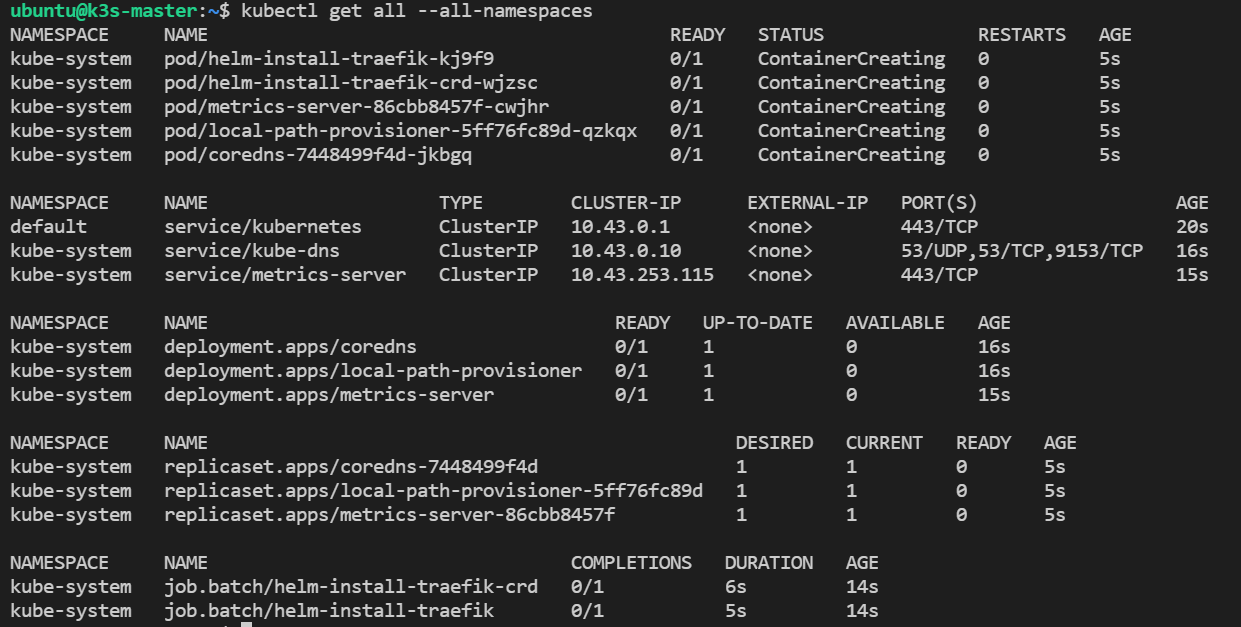
We can see that, in addition to the Kubernetes service, K3s deploys DNS, metrics and ingress (traefik) services when you use the defaults.
iii. List the active k3d clusters:
k3d cluster list
iv. Check the cluster connectivity:
kubectl cluster-info
To further debug and diagnose cluster problems, use 'kubectl cluster-info dump'.
-
Check the active containers:
docker ps
Now as you can observe, the cluster is up and running and we can play around with the cluster, you can create and deploy your applications over the cluster.
Deleting Cluster
k3d cluster delete k3d-demo-cluster

INFO[0000] Deleting cluster 'k3d-demo-cluster'
INFO[0000] Deleted k3d-k3d-demo-cluster-serverlb
INFO[0001] Deleted k3d-k3d-demo-cluster-server-0
INFO[0001] Deleting cluster network 'k3d-k3d-demo-cluster'
INFO[0001] Deleting image volume 'k3d-k3d-demo-cluster-images'
INFO[0001] Removing cluster details from default kubeconfig...
INFO[0001] Removing standalone kubeconfig file (if there is one)...
INFO[0001] Successfully deleted cluster k3d-demo-cluster!
You can also create a k3d High Availability cluster and add as many nodes you want within seconds.