K3s with High Availability setup
First, Kubernetes HA has two possible setups: embedded or external database (DB). We'll use the external DB in this HA K3s cluster setup. For which MySQL is the external DB as shown here: 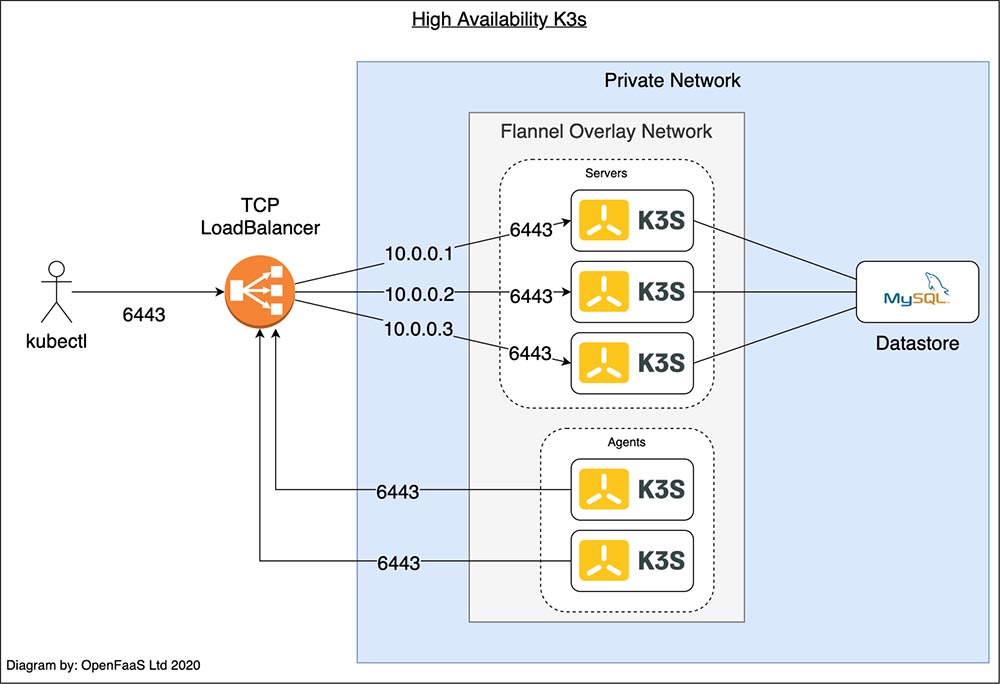
In the diagram above, both the user running kubectl and each of the two agents connect to the TCP Load Balancer. The Load Balancer uses a list of private IP addresses to balance the traffic between the three servers. If one of the servers crashes, it is be removed from the list of IP addresses.
The servers use the SQL data store to synchronize the cluster's state.
Requirements
i. Managed TCP Load Balancer
ii. Managed MySQL service
iii. Three VMs to run as K3s servers
iv. Two VMs to run as K3s agents
There are some strongly recommended Kubernetes HA best practices and also there is Automated HA master deployment doc.
Managed TCP Load Balancer
Create a load balancer using nginx: The nginx.conf located at etc/nginx/nginx.conf contains upstream that is pointing to the 3 K3s Servers on port 6443 as shown below:
events {}
...

stream {
  upstream k3s_servers {
    server <k3s_server1-Internal-IP>:6443;
    server <k3s_server2-Internal-IP>:6443;
    server <k3s_server3-Internal-IP>:6443;
  }

  server {
    listen 6443;
    proxy_pass k3s_servers;
  }
}
Managed MySQL service
Create a MySQL database server with a new database and create a new mysql user and password with granted permission to read/write the new database. In this example, you can create:
database name: <YOUR_DB_NAME> database user: <YOUR_DB_USER_NAME> database password: <YOUR_DB_USER_PASSWORD>
Three VMs to run as K3s servers
Create 3 K3s Master VMs and perform the following steps on each of them:
i. Export the datastore endpoint:
export K3S_DATASTORE_ENDPOINT='mysql://<YOUR_DB_USER_NAME>:<YOUR_DB_USER_PASSWORD>@tcp(<MySQL-Server-Internal-IP>:3306)/<YOUR_DB_NAME>'
ii. Install the K3s with setting not to deploy any pods on this server (opposite of affinity) unless critical addons and tls-san set <Loadbalancer-Internal-IP> as alternative name for that tls certificate.
curl -sfL https://get.k3s.io | sh -s - server \
    --node-taint CriticalAddonsOnly=true:NoExecute \
    --tls-san <Loadbalancer-Internal-IP_or_Hostname>
-
Verify all master nodes are visible to one another:
-
Generate token from one of the K3s Master VMs: You need to extract a token from the master that will be used to join the nodes to the control plane by running following command on one of the K3s master node:
You will then obtain a token that looks like:
Two VMs to run as K3s agents
Set the K3S_URL to point to the Loadbalancer's internal IP and set the K3S_TOKEN from the clipboard on both of the agent nodes:
curl -sfL https://get.k3s.io | K3S_URL=https://<Loadbalancer-Internal-IP_or_Hostname>:6443
    K3S_TOKEN=<Token_From_Master> sh -
Once both Agents are running, if you run the following command on Master Server, you can see all nodes:
Simulate a failure
To simulate a failure, stop the K3s service on one or more of the K3s servers manually, then run the kubectl get nodes command:
The third server will take over at this point.
-
To restart servers manually:
On your local development machine to access Kubernetes Cluster Remotely (Optional)
Important Requirement
Your local development machine must have installed kubectl.
-
Copy kubernetes config to your local machine: Copy the
kubeconfigfile's content located at the K3s master node at/etc/rancher/k3s/k3s.yamlto your local machine's~/.kube/configfile. Before saving, please change the cluster server path from 127.0.0.1 to<Loadbalancer-Internal-IP>. This will allow your local machine to see the cluster nodes:
Kubernetes Dashboard
The Kubernetes Dashboard is a GUI tool to help you work more efficiently with K8s cluster. This is only accessible from within the cluster (at least not without some serious tweaking).
check releases for the command to use for Installation:
kubectl apply -f https://raw.githubusercontent.com/kubernetes/dashboard/v2.3.1/aio/deploy/recommended.yaml
-
Dashboard RBAC Configuration:
dashboard.admin-user.ymldashboard.admin-user-role.yml -
Deploy the
admin-userconfiguration:Important Note
If you're doing this from your local development machine, remove
sudo k3sand just usekubectl) -
Get bearer token
-
Start dashboard locally:
Then you can sign in at this URL using your token we got in the previous step:
Deploying Nginx using deployment
-
Create a deployment
nginx.yaml: -
Copy and paste the following content in
nginx.yaml: -
Verify the nginx pod is in Running state:
OR,
OR,
-
Scale the pods to available agents:
-
View all deployment status:
-
Delete the nginx deployment and pod:
OR,