K3s
Features
-
Lightweight certified K8s distro
-
Built for production operations
-
40MB binary, 250MB memeory consumption
-
Single process w/ integrated K8s master, Kubelet, and containerd
-
Supports not only
etcdto hold the cluster state, but alsoSQLite(for single-node, simpler setups) or external DBs likeMySQLandPostgreSQL -
Open source project
Components and architecure
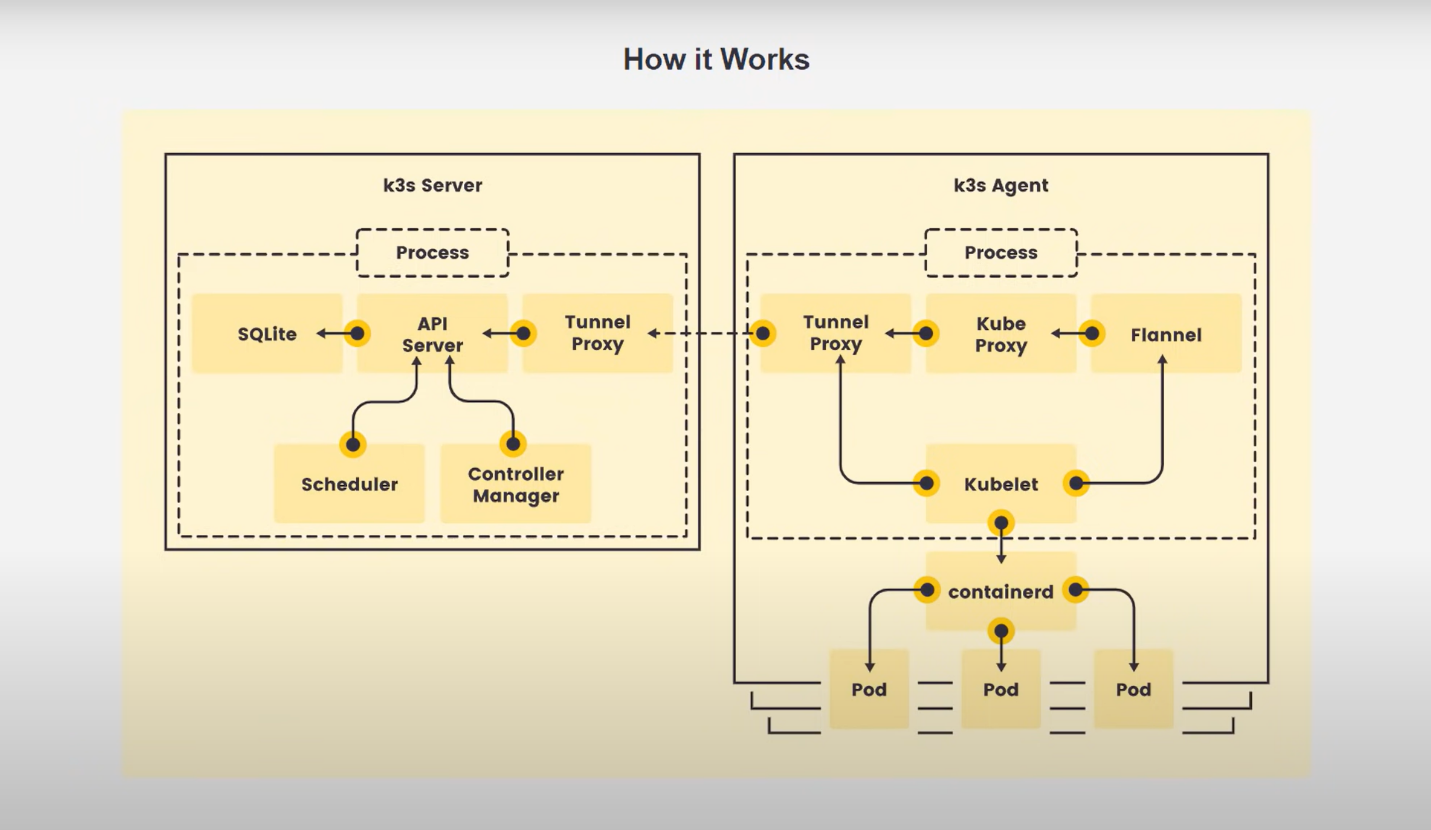
-
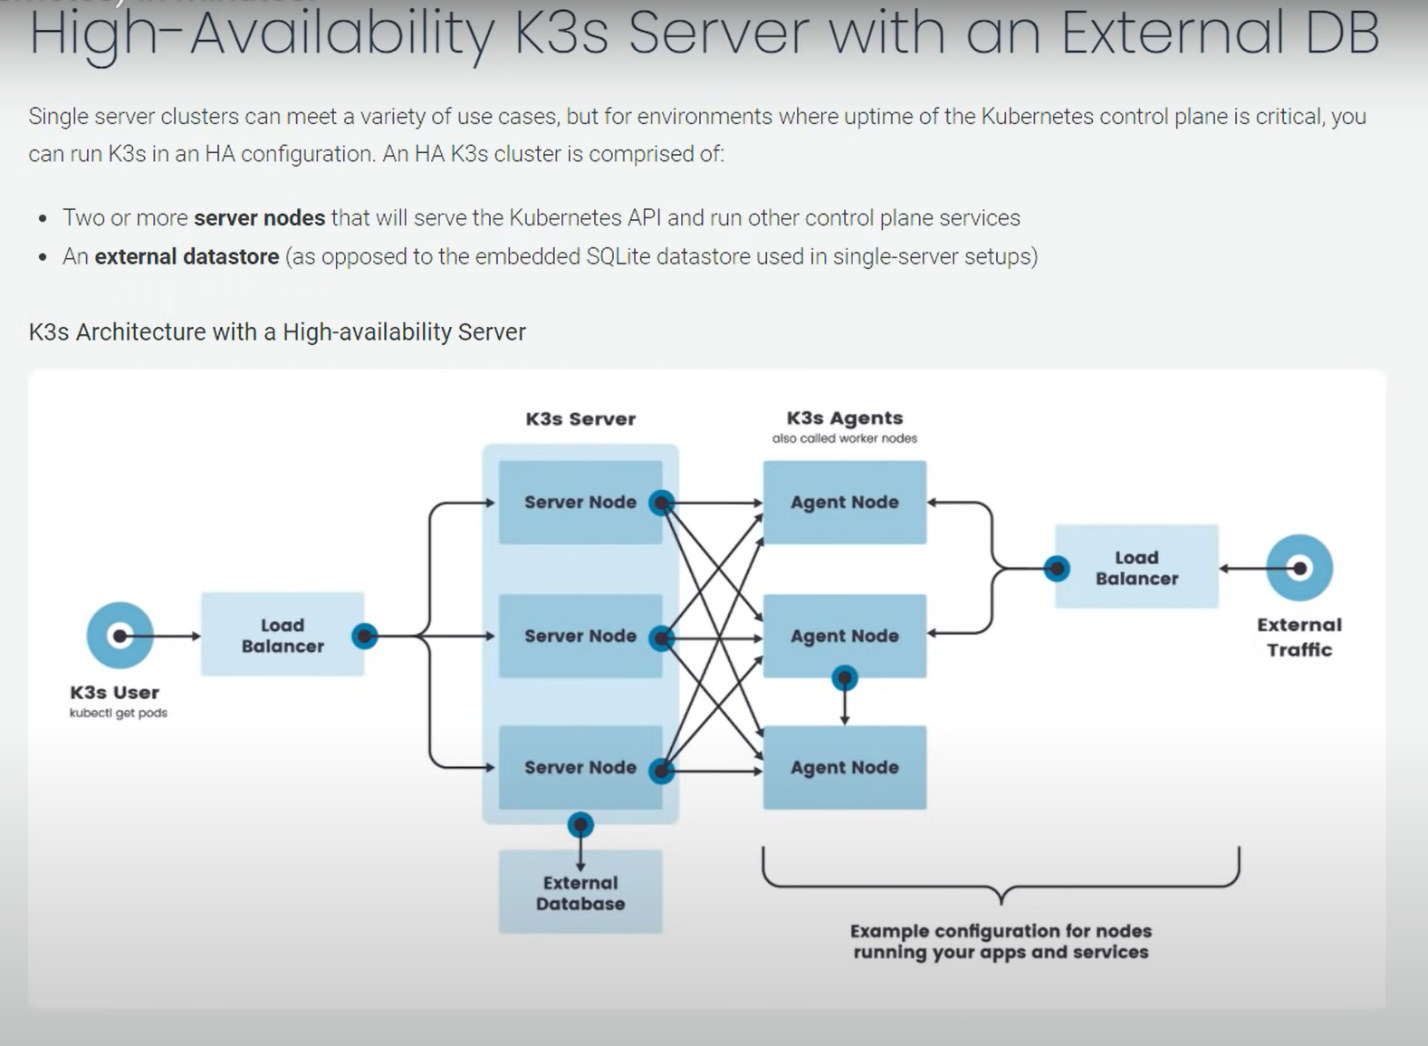
High-Availability K3s Server with an External DB:
 or,
or, 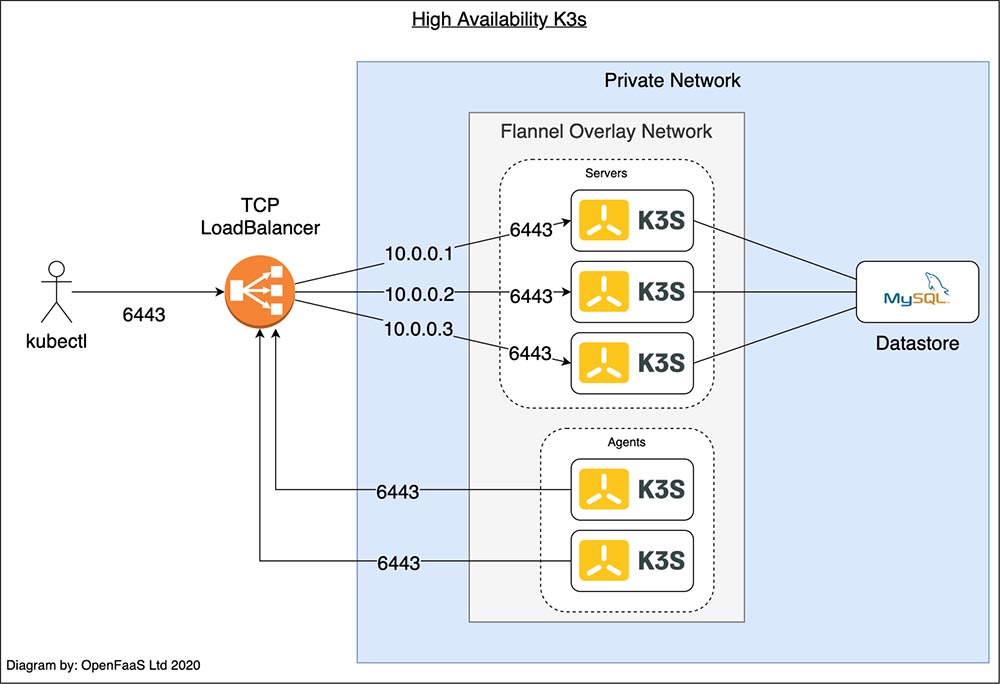
For this kind of high availability k3s setup read this.
Pre-requisite
We will need 1 control-plane(master) and 2 worker nodes to create a single control-plane kubernetes cluster using k3s. We are using following setting for this purpose:
-
1 Linux machine for master,
ubuntu-22.04-x86_64or your choice of Ubuntu OS image,cpu-su.2flavor with 2vCPU, 8GB RAM, 20GB storage - also assign Floating IP to the master node. -
2 Linux machines for worker,
ubuntu-22.04-x86_64or your choice of Ubuntu OS image,cpu-su.1flavor with 1vCPU, 4GB RAM, 20GB storage. -
ssh access to all machines: Read more here on how to set up SSH on your remote VMs.
Networking
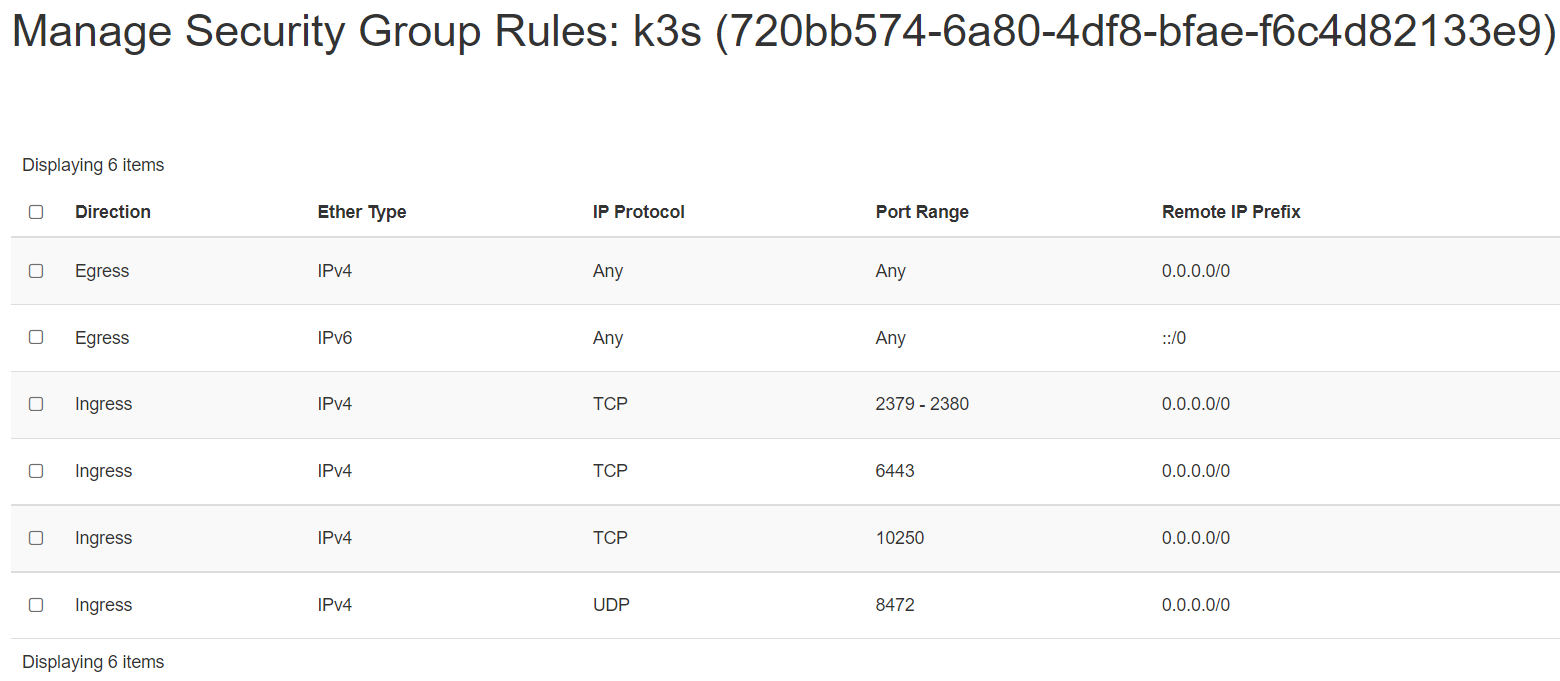
The K3s server needs port 6443 to be accessible by all nodes.
The nodes need to be able to reach other nodes over UDP port 8472 when Flannel VXLAN overlay networking is used. The node should not listen on any other port. K3s uses reverse tunneling such that the nodes make outbound connections to the server and all kubelet traffic runs through that tunnel. However, if you do not use Flannel and provide your own custom CNI, then port 8472 is not needed by K3s.
If you wish to utilize the metrics server, you will need to open port 10250 on each node.
If you plan on achieving high availability with embedded etcd, server nodes must be accessible to each other on ports 2379 and 2380.
-
Create 1 security group with appropriate Inbound Rules for K3s Server Nodes that will be used by all 3 nodes:
Important Note
The VXLAN overlay networking port on nodes should not be exposed to the world as it opens up your cluster network to be accessed by anyone. Run your nodes behind a firewall/security group that disables access to port 8472.
-
setup Unique hostname to each machine using the following command:
For example:
In this step, you will setup the following nodes:
-
k3s-master
-
k3s-worker1
-
k3s-worker2
The below steps will be performed on all the above mentioned nodes:
-
SSH into all the 3 machines
-
Switch as root:
sudo su -
Update the repositories and packages:
-
Install
curlandapt-transport-https
Install Docker
-
Install container runtime - docker
-
Configure the Docker daemon, in particular to use systemd for the management of the container's cgroups
Configure K3s to bootstrap the cluster on master node
Run the below command on the master node i.e. k3s-master that you want to setup as control plane.
-
SSH into k3s-master machine
-
Switch to root user:
sudo su -
Execute the below command to initialize the cluster:
curl -sfL https://get.k3s.io | sh -s - --kubelet-arg 'cgroup-driver=systemd' \
--node-taint CriticalAddonsOnly=true:NoExecute --docker
OR, If you don't want to setup the K3s cluster without using docker as the container runtime, then just run without supplying the
--dockerargument.
After running this installation:
-
The K3s service will be configured to automatically restart after node reboots or if the process crashes or is killed
-
Additional utilities will be installed, including
kubectl,crictl,ctr,k3s-killall.sh, andk3s-uninstall.sh -
A kubeconfig file will be written to
/etc/rancher/k3s/k3s.yamland thekubectlinstalled by K3s will automatically use it.
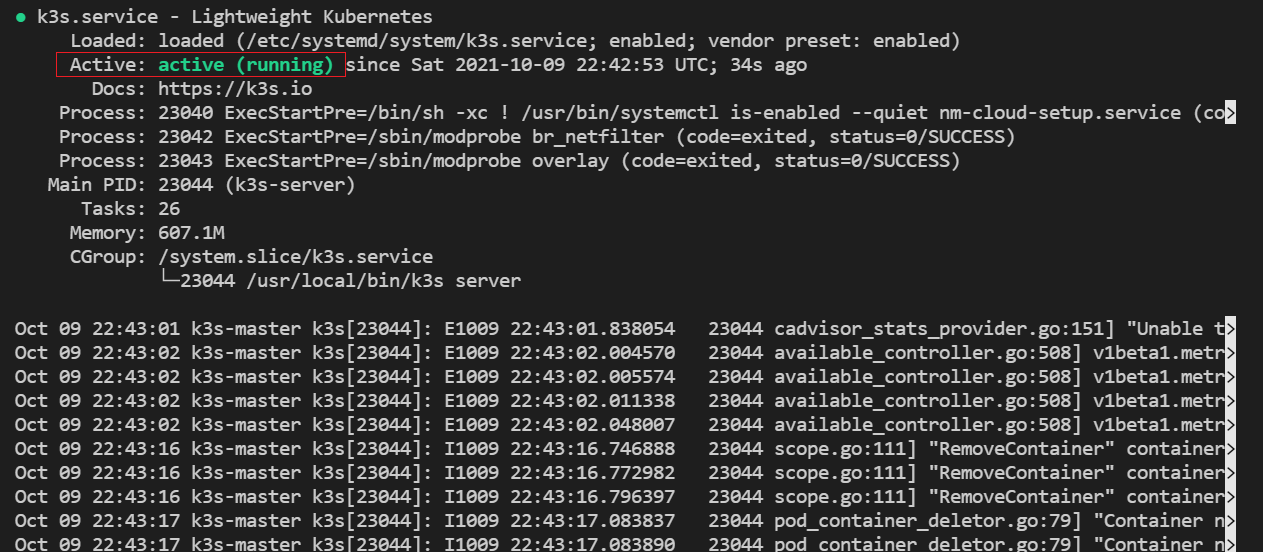
To check if the service installed successfully, you can use:
The output looks like:
OR,
Note
If you want to taint the node i.e. not to deploy pods on this node after installation then run: kubectl taint nodes <master_node_name> k3s-controlplane=true:NoExecute i.e. kubectl taint nodes k3s-master k3s-controlplane=true:NoExecute
You can check if the master node is working by:
k3s kubectl get nodes

NAME         STATUS   ROLES                  AGE   VERSION
k3s-master   Ready    control-plane,master   37s   v1.21.5+k3s2
kubectl cluster-info

Kubernetes control plane is running at https://127.0.0.1:6443
CoreDNS is running at https://127.0.0.1:6443/api/v1/namespaces/kube-system/services/kube-dns:dns/proxy
Metrics-server is running at https://127.0.0.1:6443/api/v1/namespaces/kube-system/services/https:metrics-server:/proxy

To further debug and diagnose cluster problems, use 'kubectl cluster-info dump'.
kubectl get namespaces

NAME              STATUS   AGE
default           Active   27m
kube-system       Active   27m
kube-public       Active   27m
kube-node-lease   Active   27m
kubectl get endpoints -n kube-system

NAME                    ENDPOINTS                                  AGE
kube-dns                10.42.0.4:53,10.42.0.4:53,10.42.0.4:9153   27m
metrics-server          10.42.0.3:443                              27m
rancher.io-local-path   <none>                                     27m
kubectl get pods -n kube-system

NAME                                      READY   STATUS    RESTARTS   AGE
helm-install-traefik-crd-ql7j2            0/1     Pending   0          32m
helm-install-traefik-mr65j                0/1     Pending   0          32m
coredns-7448499f4d-x57z7                  1/1     Running   0          32m
metrics-server-86cbb8457f-cg2fs           1/1     Running   0          32m
local-path-provisioner-5ff76fc89d-kdfcl   1/1     Running   0          32m
You need to extract a token from the master that will be used to join the nodes to the master.
On the master node:
You will then obtain a token that looks like:
Configure K3s on worker nodes to join the cluster
Run the below command on both of the worker nodes i.e. k3s-worker1 and k3s-worker2 that you want to join the cluster.
-
SSH into k3s-worker1 and k3s-worker1 machine
-
Switch to root user:
sudo su -
Execute the below command to join the cluster using the token obtained from the master node:
To install K3s on worker nodes and add them to the cluster, run the installation script with the
K3S_URLandK3S_TOKENenvironment variables. Here is an example showing how to join a worker node:curl -sfL https://get.k3s.io | K3S_URL=https://<Master-Internal-IP>:6443 \ K3S_TOKEN=<Join_Token> sh -Where
<Master-Internal-IP>is the Internal IP of the master node and<Join_Token>is the token obtained from the master node.For example:
curl -sfL https://get.k3s.io | K3S_URL=https://192.168.0.154:6443 \
K3S_TOKEN=K1019827f88b77cc5e1dce04d692d445c1015a578dafdc56aca829b2f
501df9359a::server:1bf0d61c85c6dac6d5a0081da55f44ba sh -
You can verify if the
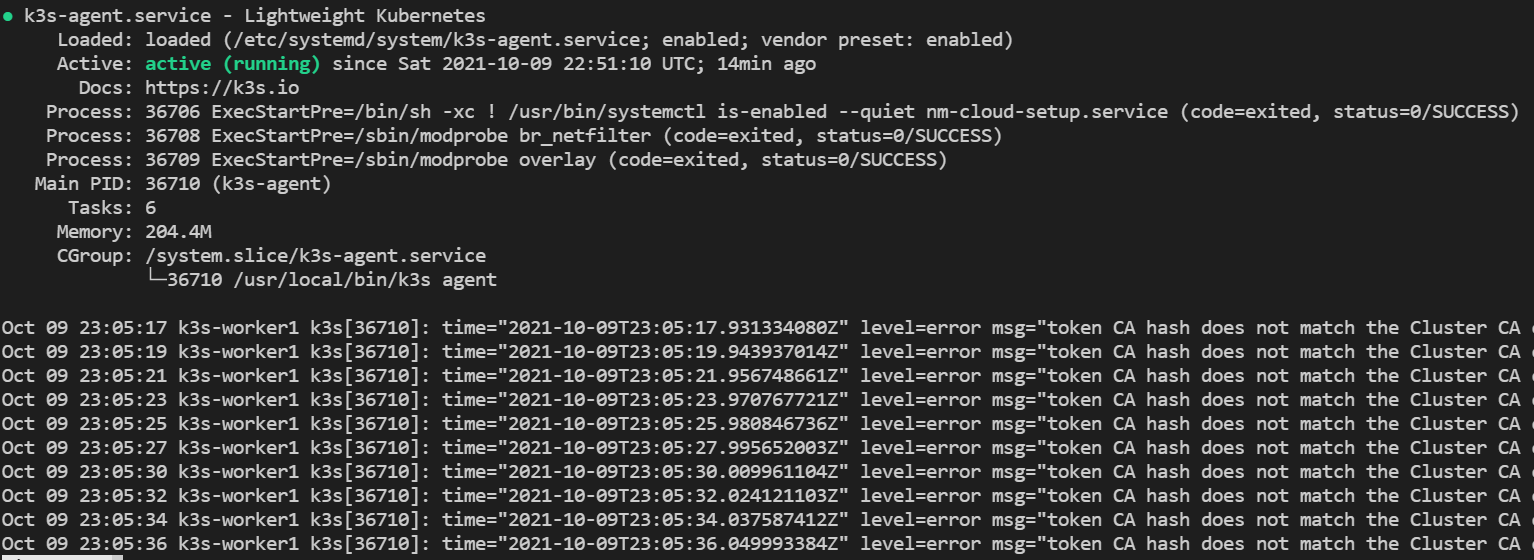
k3s-agenton both of the worker nodes is running by:The output looks like:
To verify that our nodes have successfully been added to the cluster, run the following command on master node:
OR,
Your output should look like:
k3s kubectl get nodes

NAME          STATUS   ROLES                  AGE     VERSION
k3s-worker1   Ready    <none>                 5m16s   v1.21.5+k3s2
k3s-worker2   Ready    <none>                 5m5s    v1.21.5+k3s2
k3s-master    Ready    control-plane,master   9m33s   v1.21.5+k3s2
This shows that we have successfully setup our K3s cluster ready to deploy applications to it.
Deploying Nginx using deployment
-
Create a deployment
nginx.yamlon master nodeThe nginx.yaml looks like this:
-
Verify the nginx pod is in Running state:
-
Scale the pods to available agents:
-
View all deployment status:
-
Delete the nginx deployment and pod:
OR,
Note
Instead of apply manually any new deployment yaml, you can just copy the yaml file to the /var/lib/rancher/k3s/server/manifests/ folder i.e.
sudo cp nginx.yaml /var/lib/rancher/k3s/server/manifests/.. This will automatically deploy the newly copied deployment on your cluster.
Deploy Addons to K3s
K3s is a lightweight kubernetes tool that doesn't come packaged with all the tools but you can install them separately.
-
Install Helm Commandline tool on K3s:
i. Download the latest version of Helm commandline tool using
wgetfrom this page.ii. Unpack it:
iii. Find the helm binary in the unpacked directory, and move it to its desired destination
OR,
Using Snap:
OR,
Using Apt (Debian/Ubuntu):
-
Verify the
Helminstallation: -
Add the helm chart repository to allow installation of applications using helm:
Deploy A Sample Nginx Application using Helm
Nginx can be used as a web proxy to expose ingress web traffic routes in and out of the cluster.
-
You can install "nginx web-proxy" using Helm:
export KUBECONFIG=/etc/rancher/k3s/k3s.yaml helm repo add ingress-nginx https://kubernetes.github.io/ingress-nginx helm repo list helm repo update helm install stable ingress-nginx/ingress-nginx --namespace kube-system \ --set defaultBackend.enabled=false --set controller.publishService.enabled=true -
We can test if the application has been installed by:
-
We have successfully deployed nginx web-proxy on k3s. Go to browser, visit
http://<Master-Floating-IP>i.e. http://128.31.25.246 to check the nginx default page.
Upgrade K3s Using the Installation Script
To upgrade K3s from an older version you can re-run the installation script using the same flags, for example:
This will upgrade to a newer version in the stable channel by default.
If you want to upgrade to a newer version in a specific channel (such as latest) you can specify the channel:
If you want to upgrade to a specific version you can run the following command:
From non root user's terminal to install the latest version, you do not need to pass INSTALL_K3S_VERSION that by default loads the Latest version.
Note
For more about on "How to use flags and environment variables" read this.
Restarting K3s
Restarting K3s is supported by the installation script for systemd and OpenRC.
Using systemd:
To restart servers manually:
To restart agents manually:
Using OpenRC:
To restart servers manually:
To restart agents manually:
Uninstalling
If you installed K3s with the help of the install.sh script, an uninstall script is generated during installation. The script is created on your master node at /usr/bin/k3s-uninstall.sh or as k3s-agent-uninstall.sh on your worker nodes.
To remove K3s on the worker nodes, execute:
To remove k3s on the master node, execute: