Using Your Data Science Project (DSP)
You can access your current projects by navigating to the "Data Science Projects" menu item on the left-hand side, as highlighted in the figure below:
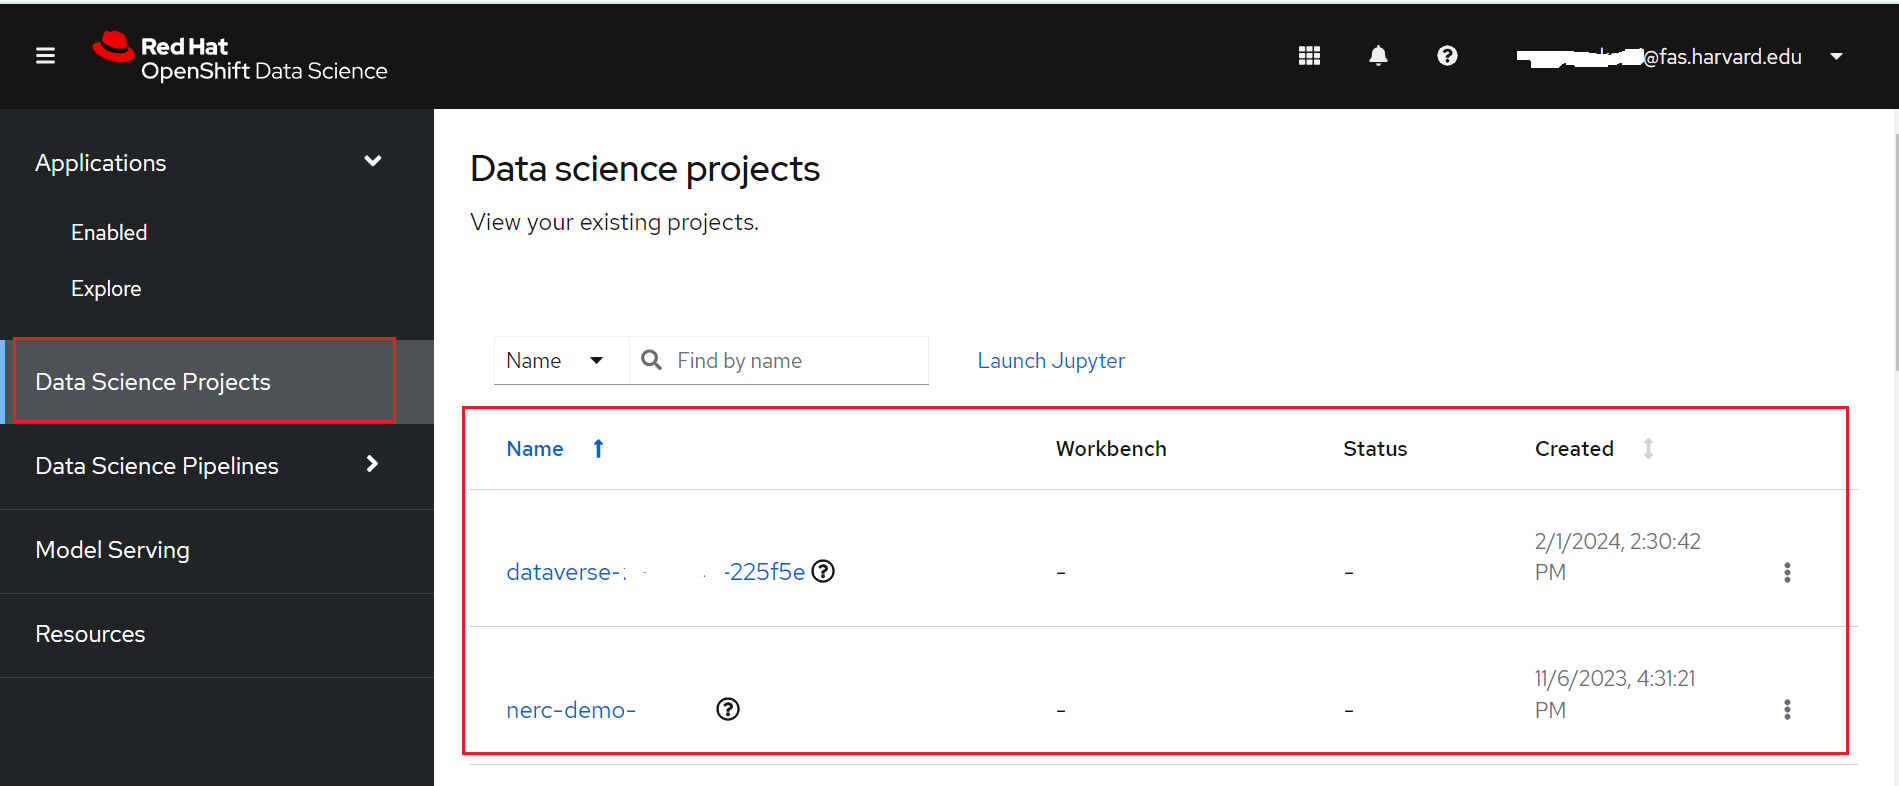
If you have any existing projects, they will be displayed here. These projects correspond to your NERC-OCP (OpenShift) resource allocations.
Why we need Data Science Project (DSP)?
To implement a data science workflow, you must use a data science project. Projects allow you and your team to organize and collaborate on resources within separated namespaces. From a project you can create multiple workbenches, each with their own Jupyter notebook environment, and each with their own data connections and cluster storage. In addition, the workbenches can share models and data with pipelines and model servers.
Selecting your data science project
Here, you can click on specific projects corresponding to the appropriate allocation where you want to work. This brings you to your selected data science project's details page, as shown below:
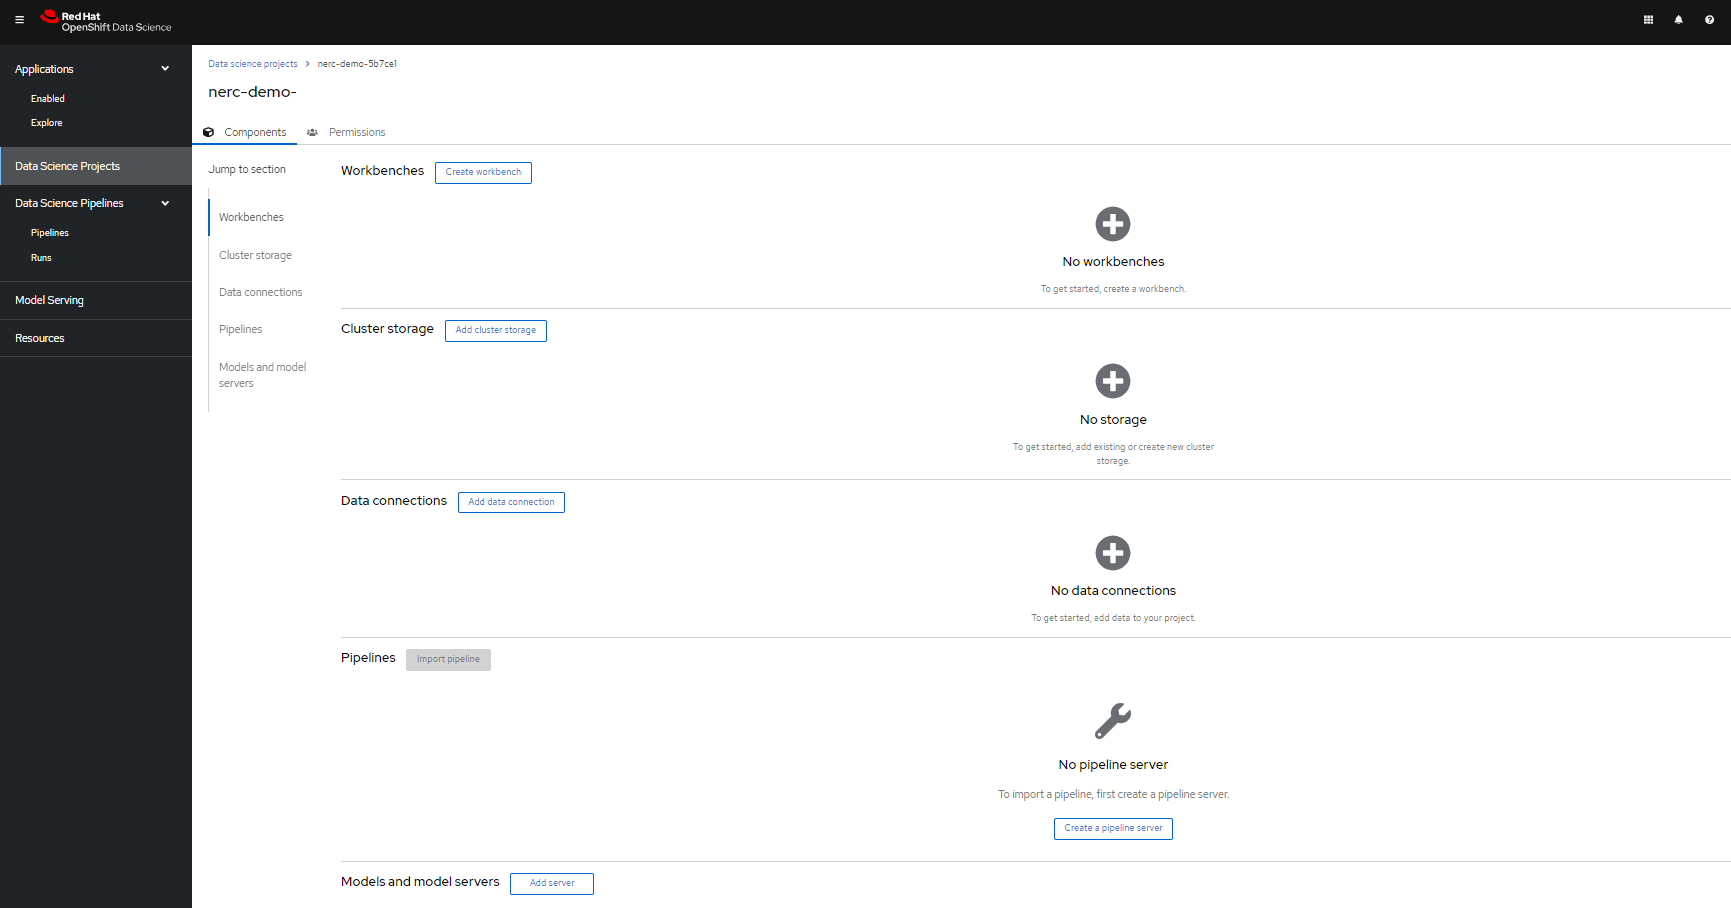
Within the data science project, you can add the following configuration options:
-
Workbenches: are instances of your development and experimentation environment. They typically contain IDEs, such as JupyterLab, RStudio, and Visual Studio Code.
-
Pipelines: A list of created and configured data science pipeline servers within the project.
Pipelines allow you to run multiple steps in a data science workflow, where each step can be represented by an individual Jupyter notebook.
For example, a typical workflow might begin with data cleaning, followed by model training and prediction generation. Pipelines connect these notebooks together and ensure that each step runs automatically in the correct sequence.
-
Models: A list of models and model servers used within your project. Models enable you to serve trained models for real-time inference. You can configure multiple model servers per data science project. Once a model is built, you can use it by sending input data—typically through an API—and receiving predictions or results in response.
Models are generally stored as files in storage systems such as an S3 bucket or similar data store, which are accessed through configured connections.
More information about Model Serving in NERC RHOAI can be found here.
-
Cluster storage: Storage for your project in your OpenShift cluster. Cluster storage uses a Persistent Volume Claim (PVC) to store your Jupyter notebooks and associated data, ensuring that your work remains saved and accessible even if the notebook server restarts.
-
Connections: A list of data sources that your project uses, such as an S3 object bucket. Connections allow you to link your project to external storage systems and services. Typically, models are saved using S3-compatible storage through a connection, but connections can also serve other purposes, such as:
i. OCI-compliant registries – Integrate with container registries.
ii. S3-compatible object storage – Save models, datasets, and other files.
iii. URIs – Connect to various external data sources.
-
Permissions: define which users and groups can access the project.
As you can see in the project's details figure, our selected data science project currently has no workbenches, pipelines, models, storage, connections, and permissions.
Populate the data science project with a Workbench
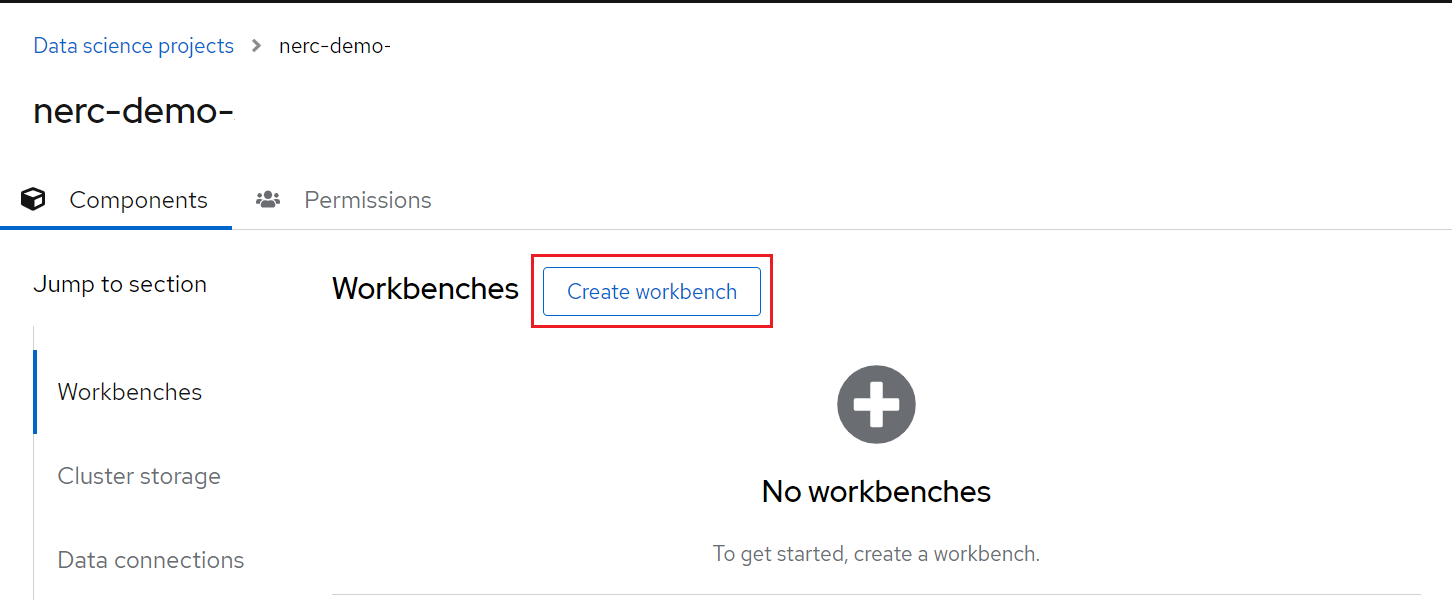
Add a workbench by clicking the Create workbench button, as shown below:
What are Workbenches?
Workbenches are development environments. They can be based on JupyterLab, but also on other types of IDEs, like VS Code or RStudio. You can create as many workbenches as you want, and they can run concurrently.
On the Create workbench page, complete the following information.
Note: Not all fields are required.
-
Name
-
Description
-
Notebook image (Image selection)
-
Deployment size (Container size, Accelerator and Number of accelerators)
-
Environment variables
-
Cluster storage name
-
Cluster storage description
-
Persistent storage size
-
Connections
How to specify CPUs, Memory, and GPUs for your JupyterLab workbench?
You have the option to select different container sizes to define compute resources, including CPUs and memory. Each container size comes with pre-configured CPU and memory resources.
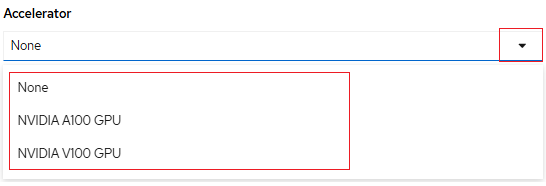
Optionally, you can specify the desired Accelerator and Number of accelerators (GPUs), depending on the nature of your data analysis and machine learning code requirements. However, this number should not exceed the GPU quota specified by the value of the "OpenShift Request on GPU Quota" attribute that has been approved for this "NERC-OCP (OpenShift)" resource allocation on NERC's ColdFront, as described here.
The different options for GPU accelerator are "None", "NVIDIA A100 GPU", "NVIDIA H100 GPU", and "NVIDIA V100 GPU" as shown below:
If you need to increase this quota value, you can request a change as explained here.
Once you have entered the information for your workbench, click Create.
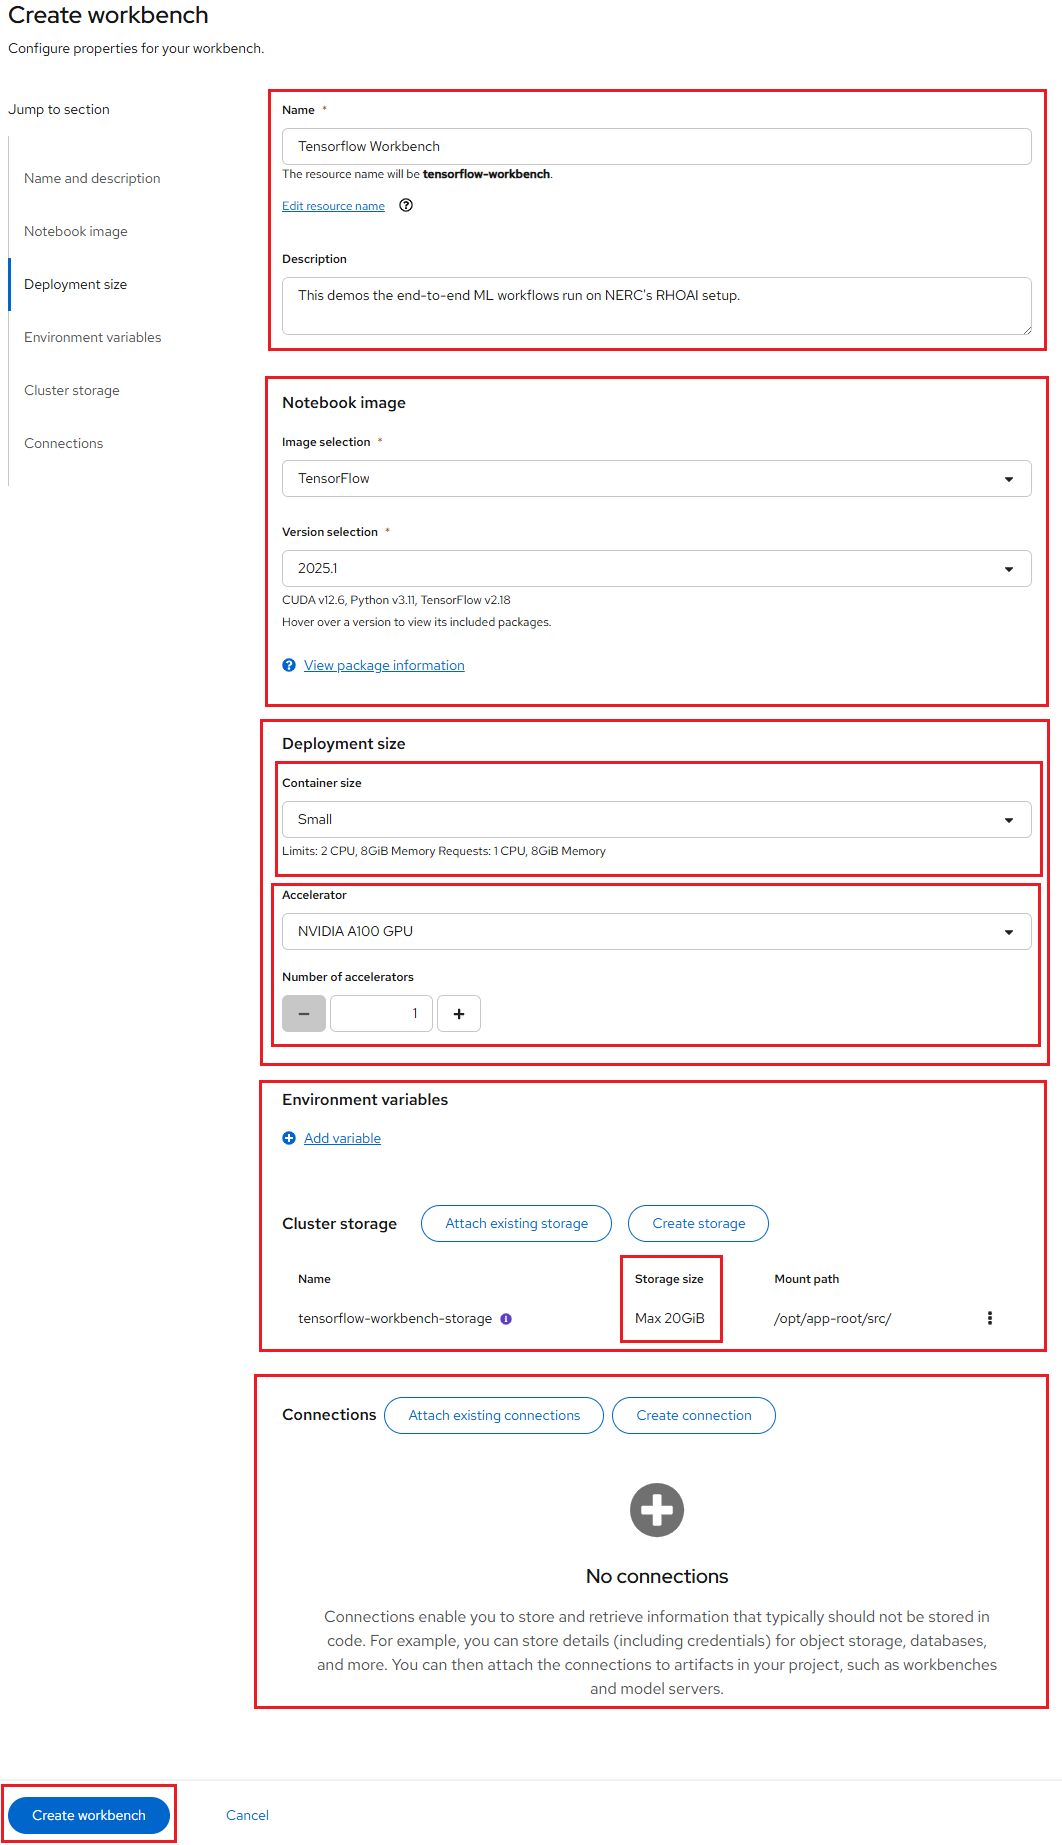
For our example project, let's name it "Tensorflow Workbench". We'll select the Jupyter | TensorFlow | CUDA | Python 3.12 image, choose a
of Small, Accelerator of NVIDIA A100 GPU, Number of accelerators as 1 and allocate a Cluster storage space of 20GB (Selected By Default).
After creating the workbench, you will return to your project page. It shows the status of the workbench as shown below:

When your workbench is ready and the status changes to Running, click the open icon ( ) next to your workbench's name, or click the workbench name directly to access your environment.
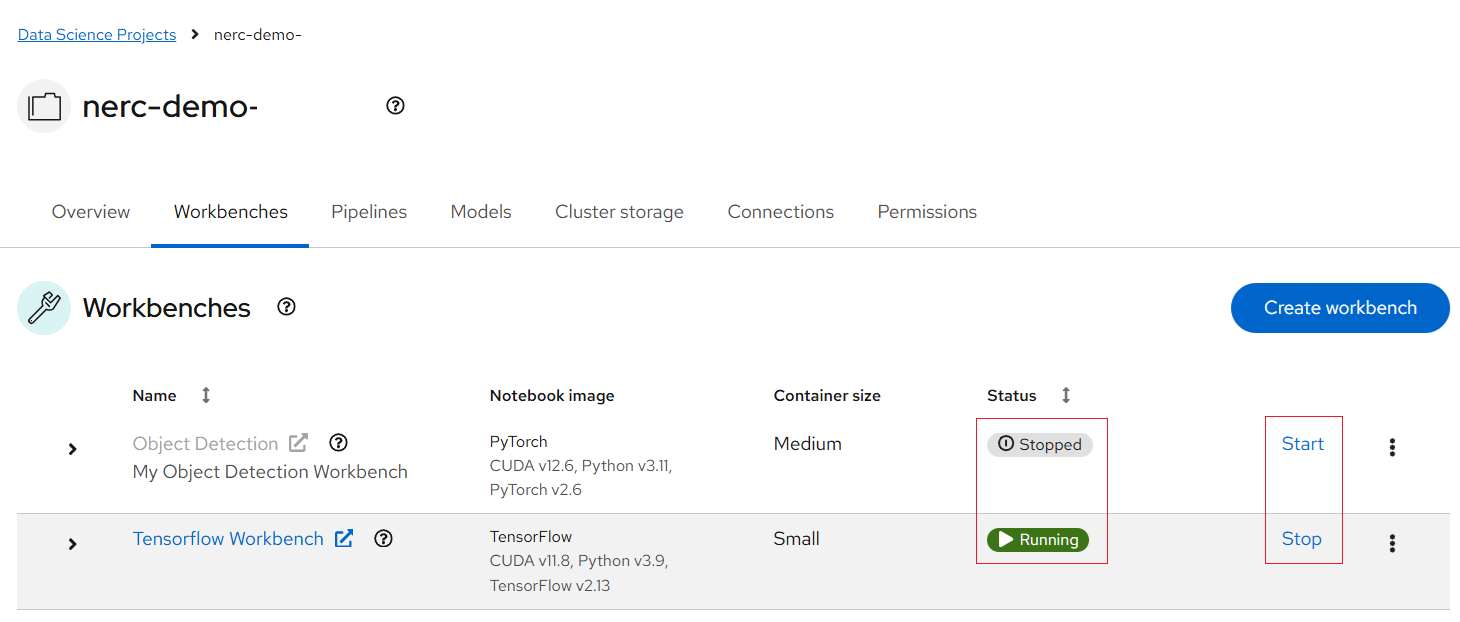
How can I start or stop a Workbench?
If the workbench status is Stopped, click the Start button in the Status column. The status will change from Stopped to Starting while the workbench server is initializing, and then to Running once it has successfully started.
Notice that under the status indicator the workbench is Running. However, if any issues arise, such as an "exceeded quota" error, a red exclamation mark will appear under the Status indicator, as shown in the example below:

You can hover over that icon to view details. Upon closer inspection of the error message and the "Event log", you will receive details about the issue, enabling you to resolve it accordingly.
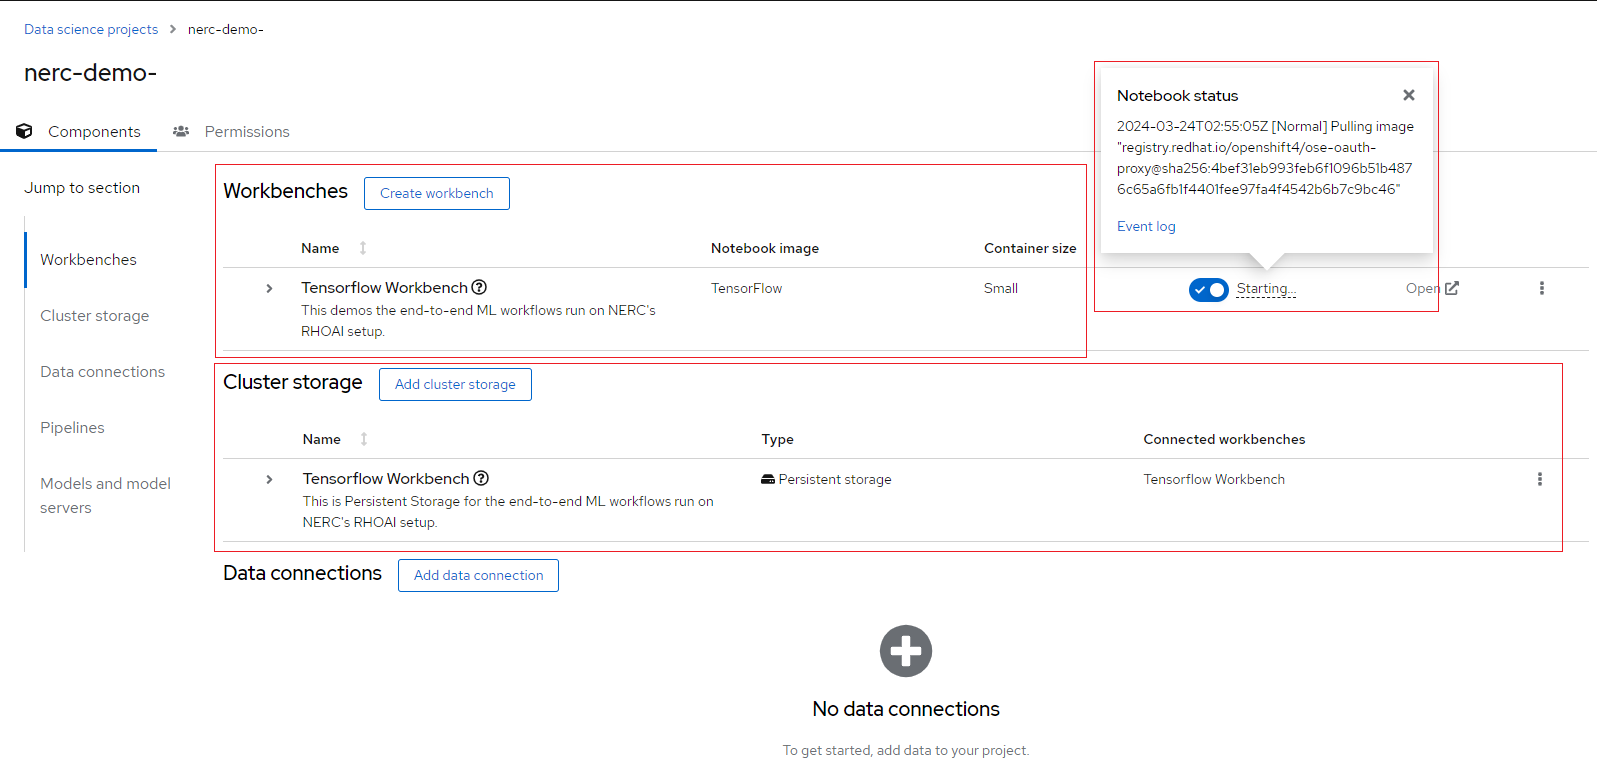
Any cluster storage that you associated with the workbench during the creation process appears on the "Cluster storage" tab for the project. Also, you can review the attached cluster storage by expanding the workbench as shown above.
More About Cluster Storage
Cluster storage consists of Persistent Volume Claims (PVCs), which are persistent storage spaces available for storing your notebooks and data. You can create PVCs directly from here and mount them in your workbenches as needed. It's worth noting that a default cluster storage (PVC) is automatically created with the same name as your workbench to save your work.
Note: Once persistent storage is created, you can only increase its size by editing it. Adjusting the storage size will restart the workbench, making it temporarily unavailable, with the downtime typically depending on the size increase.
Launching a Workbench Using Your Existing Storage
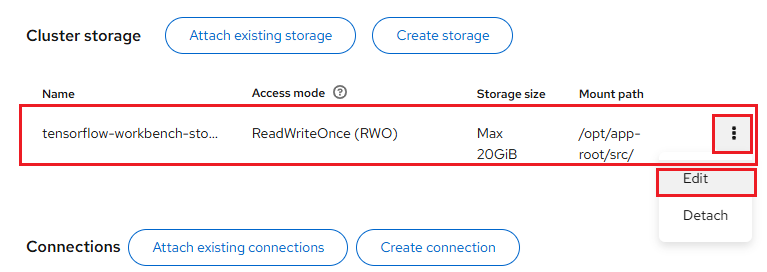
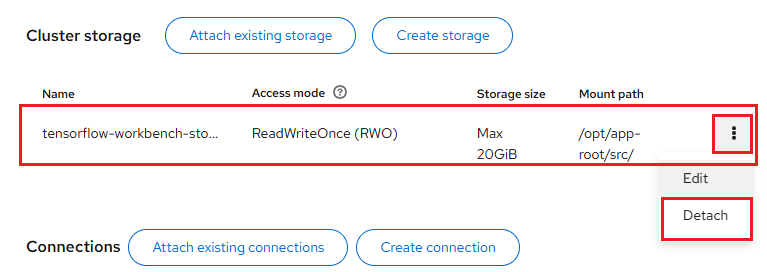
If you want to use previously created persistent storage that isn't attached to any existing workbench cluster, first detach the storage configured for the new workbench, as shown below:
Once detached, click the Attach existing storage button. A popup will appear allowing you to select from the available storage options, as shown below:
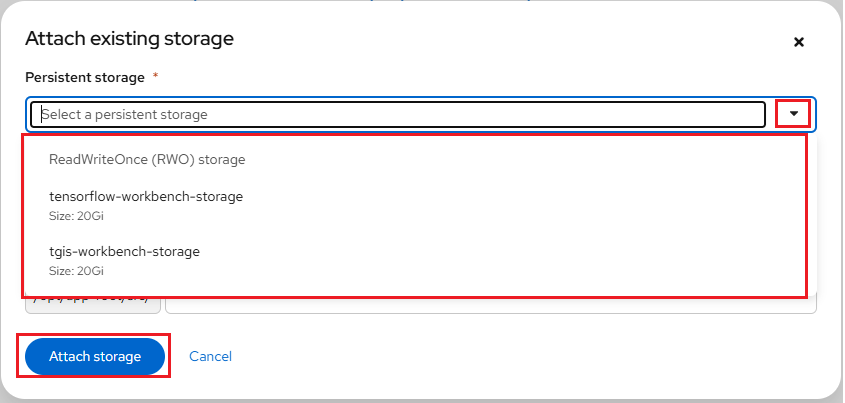
After selecting the appropriate storage from the available options, click the Attach storage button.
Once the workbench is successfully created and in Running status, it will include all previously stored data and code mapped to the newly created workbench.
Note
If your data science work requires changes to your workbench image, container size, or identifying information, you can update your project's workbench settings accordingly. For workloads involving large datasets, you can enhance performance by assigning accelerators to your workbench.
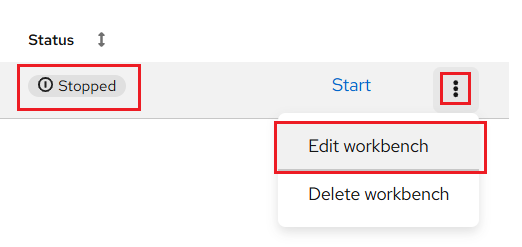
Before clicking the action menu (⋮) at the end of the selected workbench row, make sure to change the workbench status from Running to Stopped by clicking the Stop button. Updating the workbench will cause it to restart, so ensure that you save all your current work to avoid losing any unsaved data before stopping your workbench.
How to Solve the Deleted Workbench Image Issue?
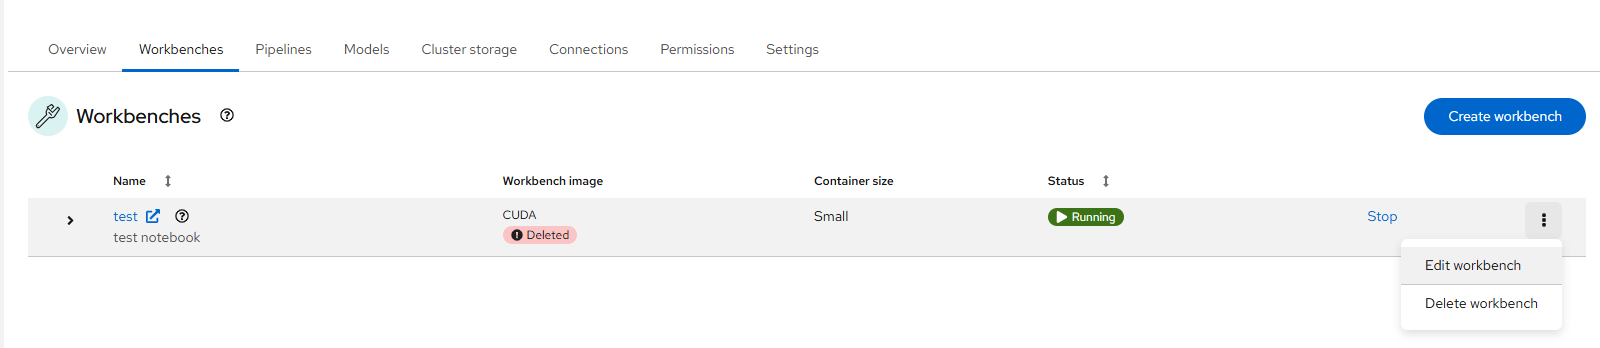
While navigating to your previously set up workbenches in your RHOAI project's Workbenches section, you may encounter a deleted image error message, as shown below:

The recommended approach is to Edit Workbench. You can select the appropriate image and version (if available) from the available options.
Before clicking the action menu (⋮) at the end of the selected workbench row, make sure to change the workbench status from Running to Stopped by clicking the Stop button. Updating the workbench will cause it to restart, so ensure that you save all your current work to avoid losing any unsaved data before stopping your workbench.
Select the equivalent image and applicable version (if available) from the drop-down list under the Workbench Image section, as shown below:
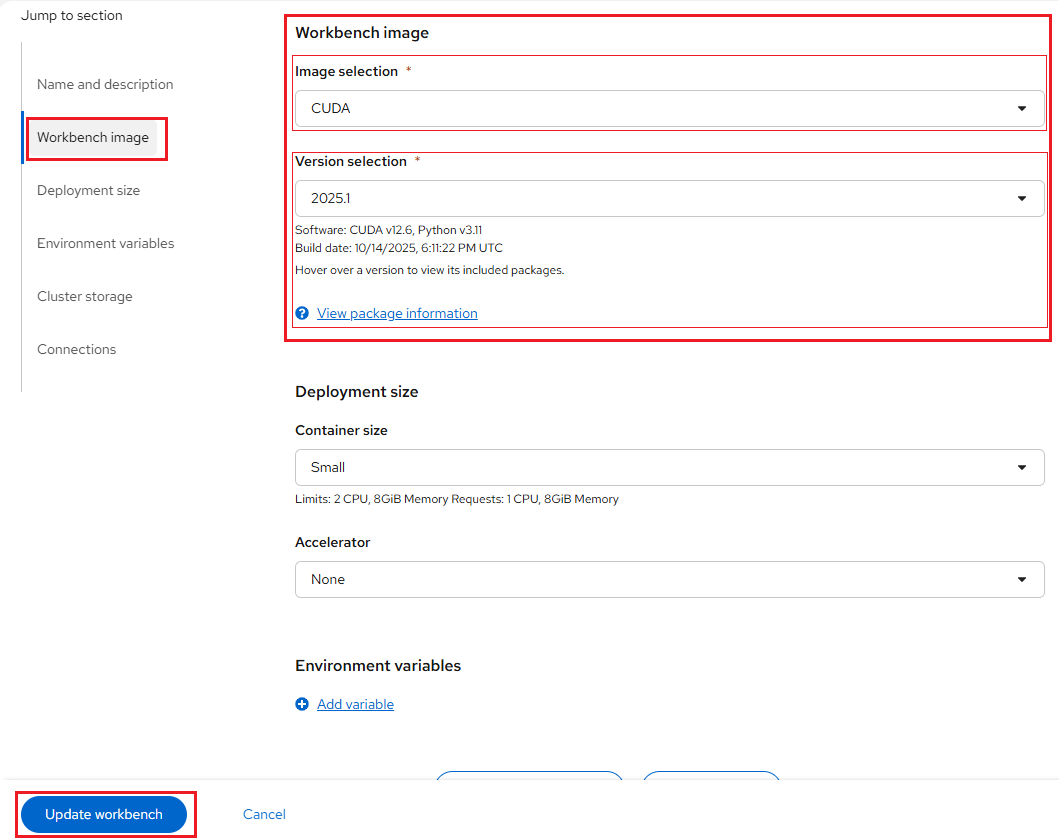
Click the Update Workbench button.
It may take some time for the changes to reflect and for the dashboard to return to the Workbenches page. Once the update is complete, click the Start button to restart the workbench.
Once the workbench status changes from Stopped to Running, you can click on its name link and access your workbench without any issues.