SSH to the VM
Shell, or SSH, is used to administering and managing Linux workloads. Before trying to access instances from the outside world, you need to make sure you have followed these steps:
-
You followed the instruction in Create a Key Pair to set up a public ssh key.
-
Your public ssh-key has selected (in "Key Pair" tab) while launching the instance.
-
Assign a Floating IP to the instance in order to access it from outside world.
-
Make sure you have added rules in the Security Groups to allow ssh using Port 22 access to the instance.
How to update New Security Group(s) on any running VM?
If you want to attach/deattach any new Security Group(s) to/from a running VM after it has launched. First create all new Security Group(s) with all the rules required. Following this guide, you'll be able to attach created security group(s) with all the required rules to a running VM.
Make a note of the Floating IP you have associated to your instance.
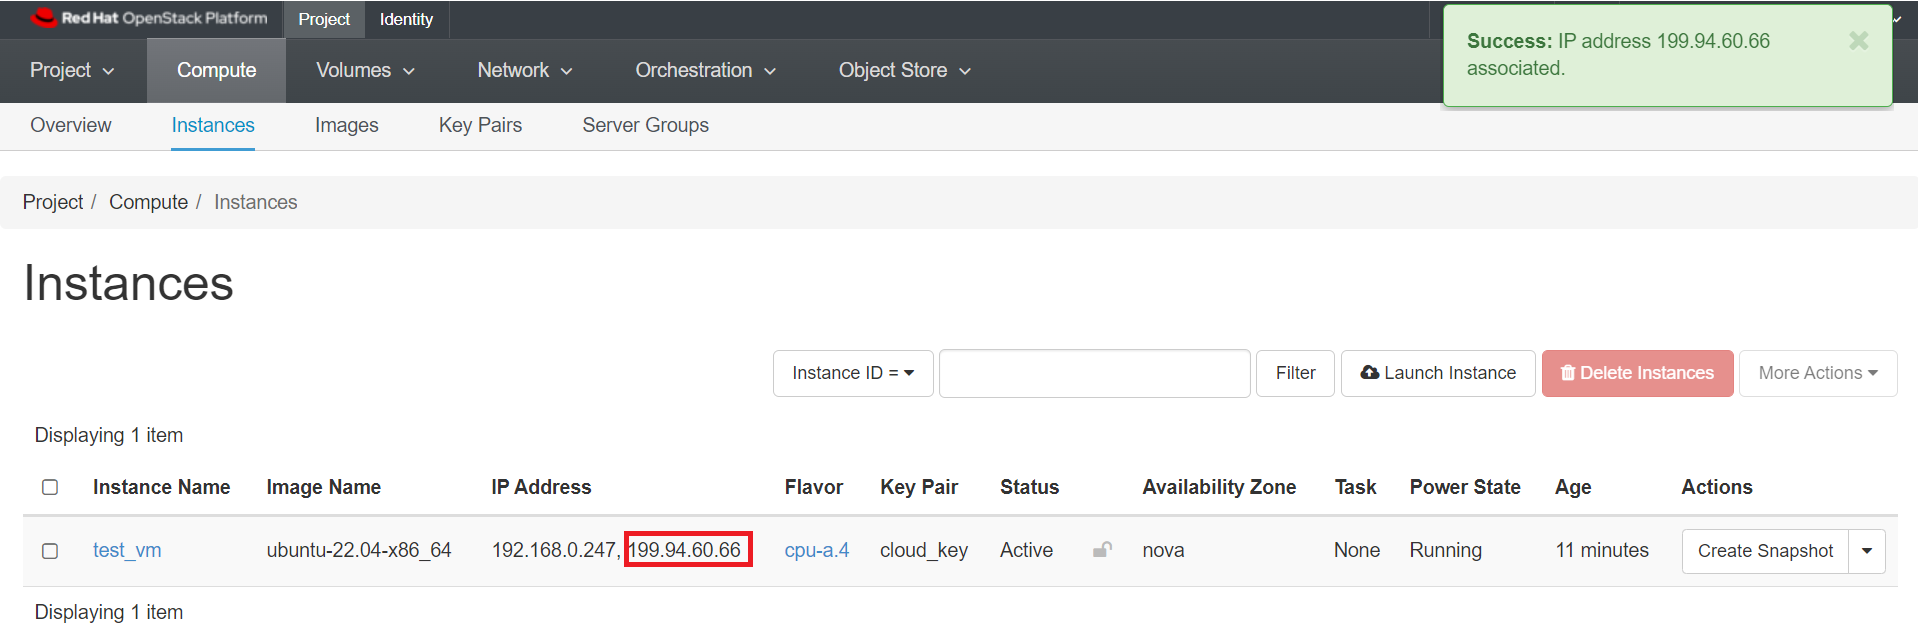
In our example, the IP is 199.94.60.66.
Default usernames for all the base images are:
-
all Ubuntu images: ubuntu
-
all AlmaLinux images: almalinux
-
all Rocky Linux images: rocky
-
all Fedora images: fedora
-
all Debian images: debian
-
all RHEL images: cloud-user
Removed Centos Images
If you still have VMs running with deleted CentOS images, you need to use the following default username for your CentOS images: centos.
- all CentOS images: centos
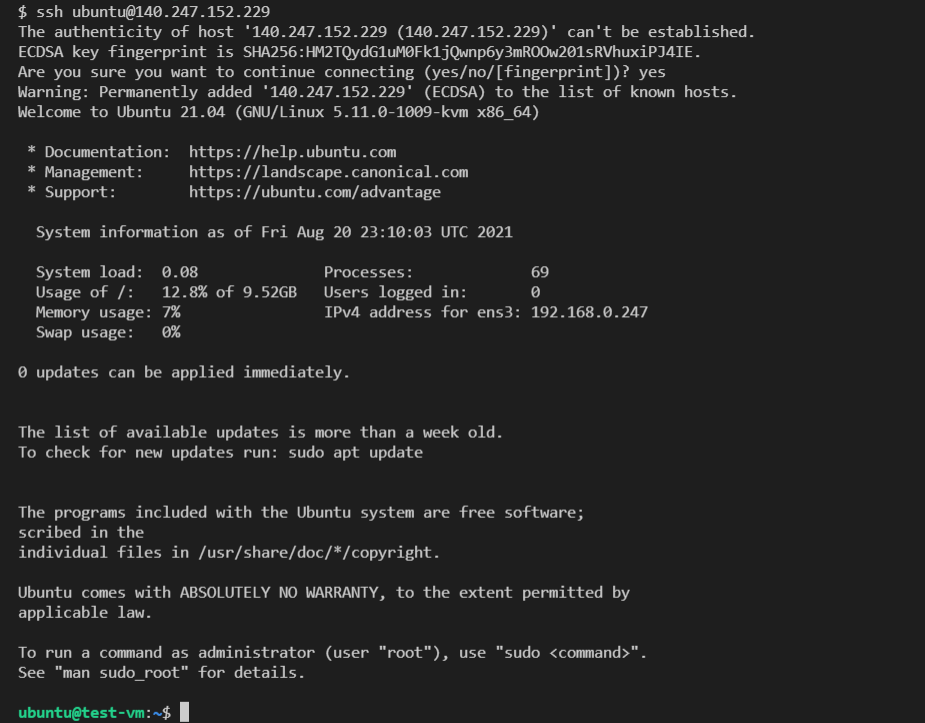
Our example VM was launched with the ubuntu-22.04-x86_64 base image, the user we need is 'ubuntu'.
Open a Terminal window and type:
ssh ubuntu@199.94.60.66
Since you have never connected to this VM before, you will be asked if you are sure you want to connect. Type yes.
Important Note
If you haven't added your key to ssh-agent, you may need to specify the private key file, like this: ssh -i ~/.ssh/cloud.key ubuntu@199.94.60.66
To add your private key to the ssh-agent you can follow the following steps:
-
eval "$(ssh-agent -s)"Output:
Agent pid 59566 -
ssh-add ~/.ssh/cloud.keyIf your private key is password protected, you'll be prompted to enter the passphrase.
-
Verify that the key has been added by running
ssh-add -l.
SSH to the VM using SSH Config
Alternatively, You can also configure the setting for the remote instances in your SSH configuration file (typically found in ~/.ssh/config). The SSH configuration file might include entry for your newly launched VM like this:
Host ExampleHostLabel
    HostName 199.94.60.66
    User ubuntu
    IdentityFile ~/.ssh/cloud.key
Here, the Host value can be any label you want. The HostName value is the Floating IP you have associated to your instance that you want to access, the User value specifies the default account username based on your base OS image used for the VM and IdentityFile specify the path to your Private Key on your local machine. With this configuration defined, you can connect to the account by simply using the Host value set as "ExampleHostLabel". You do not have to type the username, hostname, and private key each time.
So, you can SSH into your host VM by running:
ssh ExampleHostLabel
Setting a password
When the VMs are launched, a strong, randomly-generated password is created for the default user, and then discarded.
Once you connect to your VM, you will want to set a password in case you ever need to log in via the console in the web dashboard.
For example, if your network connections aren't working correctly.
Setting a password is necessary to use Remote Desktop Protocol (RDP)
Remote Desktop Protocol(RDP) is widely used for Windows remote connections, but you can also access and interact with the graphical user interface of a remote Linux server by using a tool like xrdp, an open-source implementation of the RDP server. You can use xrdp to remotely access the Linux desktop. To do so, you need to utilize the RDP client. Moreover, xrdp delivers a login to the remote machines employing Microsoft RDP. This is why a user with the password is necessary to access the VM. You can refer to this guide on how to install and configure a RDP server using xrdp on a Ubuntu server and access it using a RDP client from your local machine.
Since you are not using it to log in over SSH or to sudo, it doesn't really matter how hard it is to type, and we recommend using a randomly-generated password.
Create a random password like this:
ubuntu@test-vm:~$ cat /dev/urandom | base64 | dd count=14 bs=1
T1W16HCyfZf8V514+0 records in
14+0 records out
14 bytes copied, 0.00110367 s, 12.7 kB/s
The 'count' parameter controls the number of characters.
The first [count] characters of the output are your randomly generated output, followed immediately by "[count]+0", so in the above example the password is: T1W16HCyfZf8V5.
Set the password for ubuntu using the command:
ubuntu@test-vm:~$ sudo passwd ubuntu
New password:
Retype new password:
... password updated successfully
Store the password in a secure place. Don't send it over email, post it on your wall on a sticky note, etc.
Adding other people's SSH keys to the instance
You were able to log in using your own SSH key.
Right now Openstack only permits one key to be added at launch, so you need to add your teammates keys manually.
Get your teammates' public keys. If they used ssh-keygen to create their key, this will be in a file called
If they created a key via the dashboard, or imported the key created with ssh-keygen, their public key is viewable from the Key Pairs tab.
Click on the key pair name. The public key starts with 'ssh-rsa' and looks something like this:
ssh-rsa AAAAB3NzaC1yc2EAAAADAQABAAABAQDL6O5qNZHfgFwf4vnnib2XBub7ZU6khy6z6JQl3XRJg6I6gZ
+Ss6tNjz0Xgax5My0bizORcka/TJ33S36XZfzUKGsZqyEl/ax1Xnl3MfE/rgq415wKljg4
+QvDznF0OFqXjDIgL938N8G4mq/
cKKtRSMdksAvNsAreO0W7GZi24G1giap4yuG4XghAXcYxDnOSzpyP2HgqgjsPdQue919IYvgH8shr
+sPa48uC5sGU5PkTb0Pk/ef1Y5pLBQZYchyMakQvxjj7hHZaT/
Lw0wIvGpPQay84plkjR2IDNb51tiEy5x163YDtrrP7RM2LJwXm+1vI8MzYmFRrXiqUyznd
test_user@demo
Create a file called something like 'teammates.txt' and paste in your team's public keys, one per line.
Hang onto this file to save yourself from having to do all the copy/pasting every time you launch a new VM.
Copy the file to the vm:
[you@your-laptop ~]$ scp teammates.txt ubuntu@199.94.60.66:~
If the copy works, you will see the output:
teammates.txt 100% 0 0KB/s 00:00
Append the file's contents to authorized_keys:
[cloud-user@test-vm ~] #cat teammates.txt >> ~/.ssh/authorized_keys
Now your teammates should also be able to log in.
Important Note
Make sure to use >> instead of > to avoid overwriting your own key.
Adding users to the instance
You may decide that each teammate should have their own user on the VM instead of everyone logging in to the default user.
Once you log into the VM, you can create another user like this.
Note
The 'sudo_group' is different for different OS - in CentOS and Red Hat, the group is called 'wheel', while in Ubuntu, the group is called 'sudo'.
sudo su
# useradd -m <username>
# passwd <username>
# usermod -aG <sudo_group> <username>    <-- skip this step for users who
# should not have root access
# su username
cd ~
mkdir .ssh
chmod 700 .ssh
cd .ssh
vi authorized_keys   <-- paste the public key for that user in this file
chmod 600 authorized_keys
How To Enable Remote Desktop Protocol Using xrdp on Ubuntu
Log in to the server with Sudo access
In order to install the xrdp, you need to login to the server with sudo access to it.
ssh username@your_server_ip
For example:
ssh ubuntu@199.94.60.66
Installing a Desktop Environment
After connecting to your server using SSH update the list of available packages using the following command:
sudo apt update
Next, install the xfce and xfce-goodies packages on your server:
sudo apt install xfce4 xfce4-goodies -y
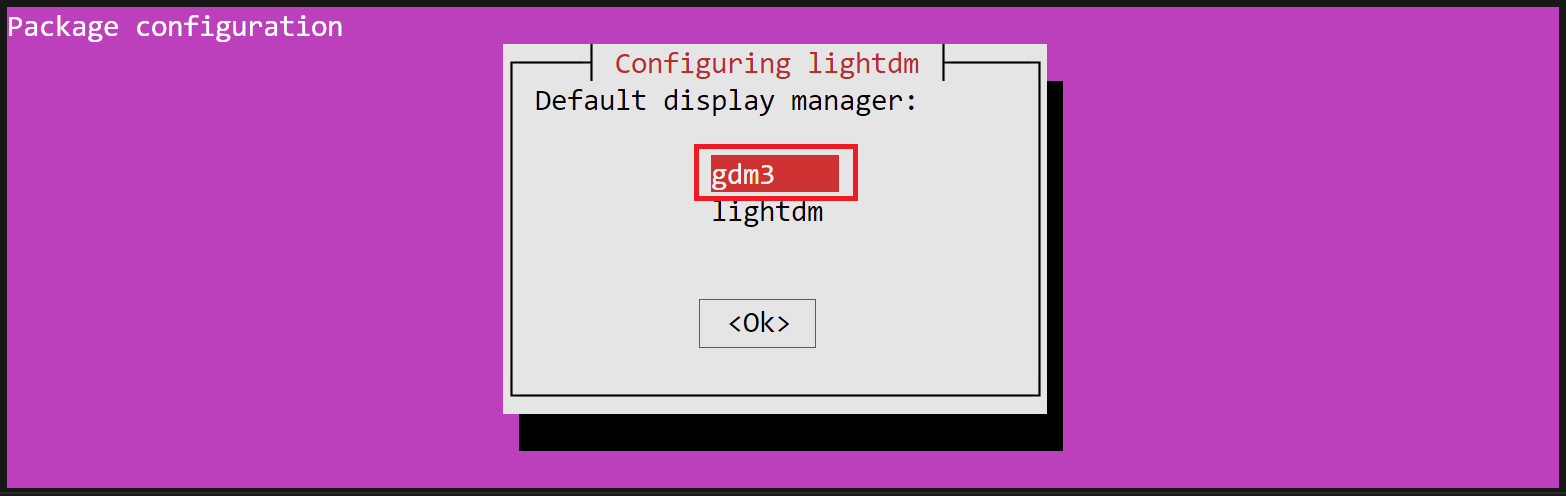
Select Display Manager
If prompted to choose a display manager, which manages graphical login mechanisms and user sessions, you can select any option from the list of available display managers. For instance, here we have gdm3 as the default selection.
Installing xrdp
To install xrdp, run the following command in the terminal:
sudo apt install xrdp -y
After installing xrdp, verify the status of xrdp using systemctl:
sudo systemctl status xrdp
This command will show the status as active (running):
Output:
● xrdp.service - xrdp daemon
    Loaded: loaded (/lib/systemd/system/xrdp.service; enabled; vendor preset: enab>
    Active: active (running) since Mon 2024-02-12 21:33:01 UTC; 9s ago
    ...
    CGroup: /system.slice/xrdp.service
            └─8839 /usr/sbin/xrdp
What if xrdp is not Running?
If the status of xrdp is not running, you may have to start the service manually with this command: sudo systemctl start xrdp. After executing the above command, verify the status again to ensure xrdp is in a running state.
Make xrdp use the desktop environment we previously created:
sudo sed -i.bak '/fi/a #xrdp multiple users configuration \n xfce-session \n' /etc/xrdp/startwm.sh
Configuring xrdp and Updating Security Groups
If you want to customize the default xrdp configuration (optional), you will need to review the default configuration of xrdp, which is stored under /etc/xrdp/xrdp.ini. xrdp.ini is the default configuration file to set up RDP connections to the xrdp server. The configuration file can be modified and customized to meet the RDP connection requirements.
Add a new security group with a RDP (port 3389) rule open to the public for a RDP connection and attach that security group to your instance as described here.
How to Update Security Group(s) on a Running VM?
Following this guide, you'll be able to attach created security group(s) with all the required rules to a running VM.
Restart the xrdp server to make sure all the above changes are reflected:
sudo systemctl restart xrdp
Testing the RDP Connection
You should now be able to connect to the Ubuntu VM via xrdp.
Testing the RDP Connection on Windows
If you are using Windows as a local desktop, Windows users have a RDP connection application by default on their machines.
Enter your VM's Floating IP and username into the fillable text boxes for Computer and User name.
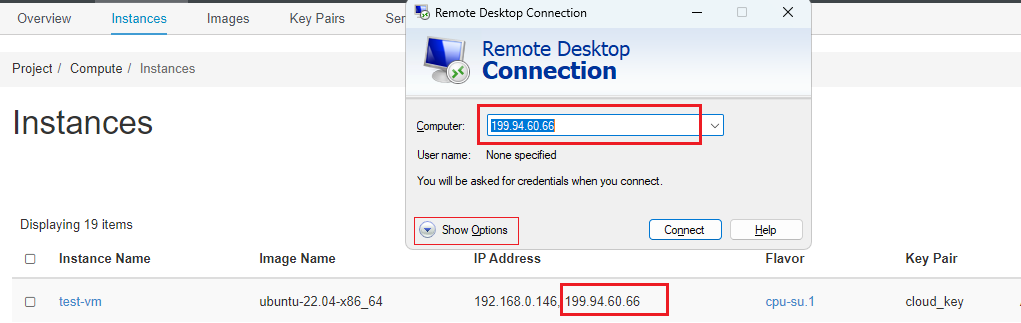
You may need to press the down arrow for "Show Options" to input the username i.e. ubuntu:
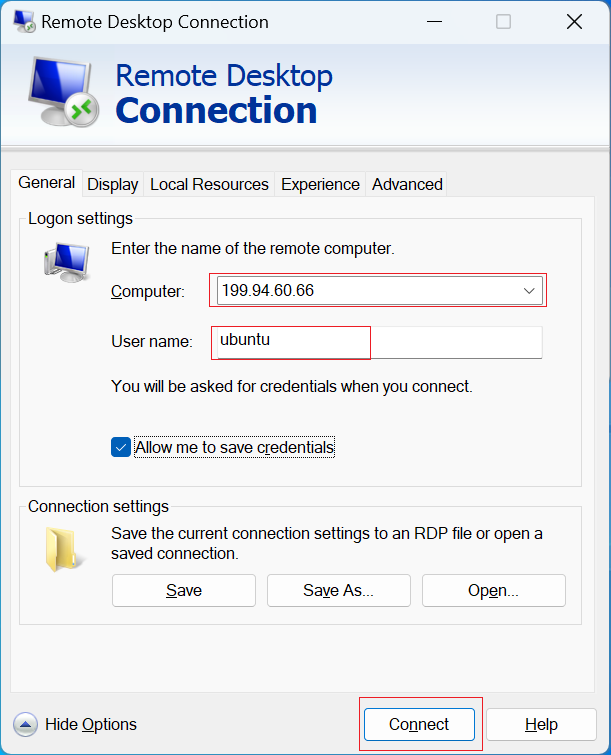
Press the Connect button. If you receive an alert that the "Remote Desktop can't connect to the remote computer", check that you have properly attached the security group with a RDP (port 3389) rule open to the public to your VM as described here.
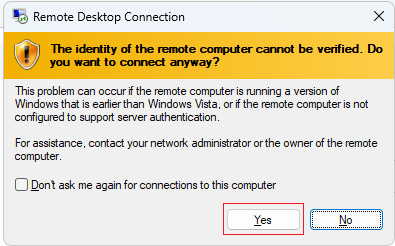
Press Yes if you receive the identity verification popup:
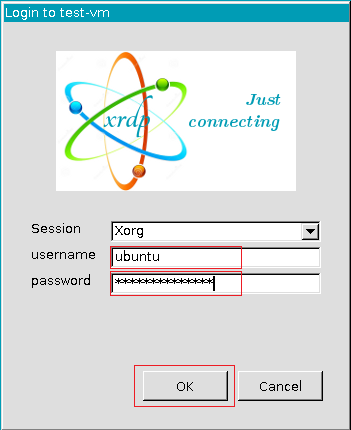
Then, enter your VM's username (ubuntu) and the password you created for user ubuntu following this steps.
Press Ok.
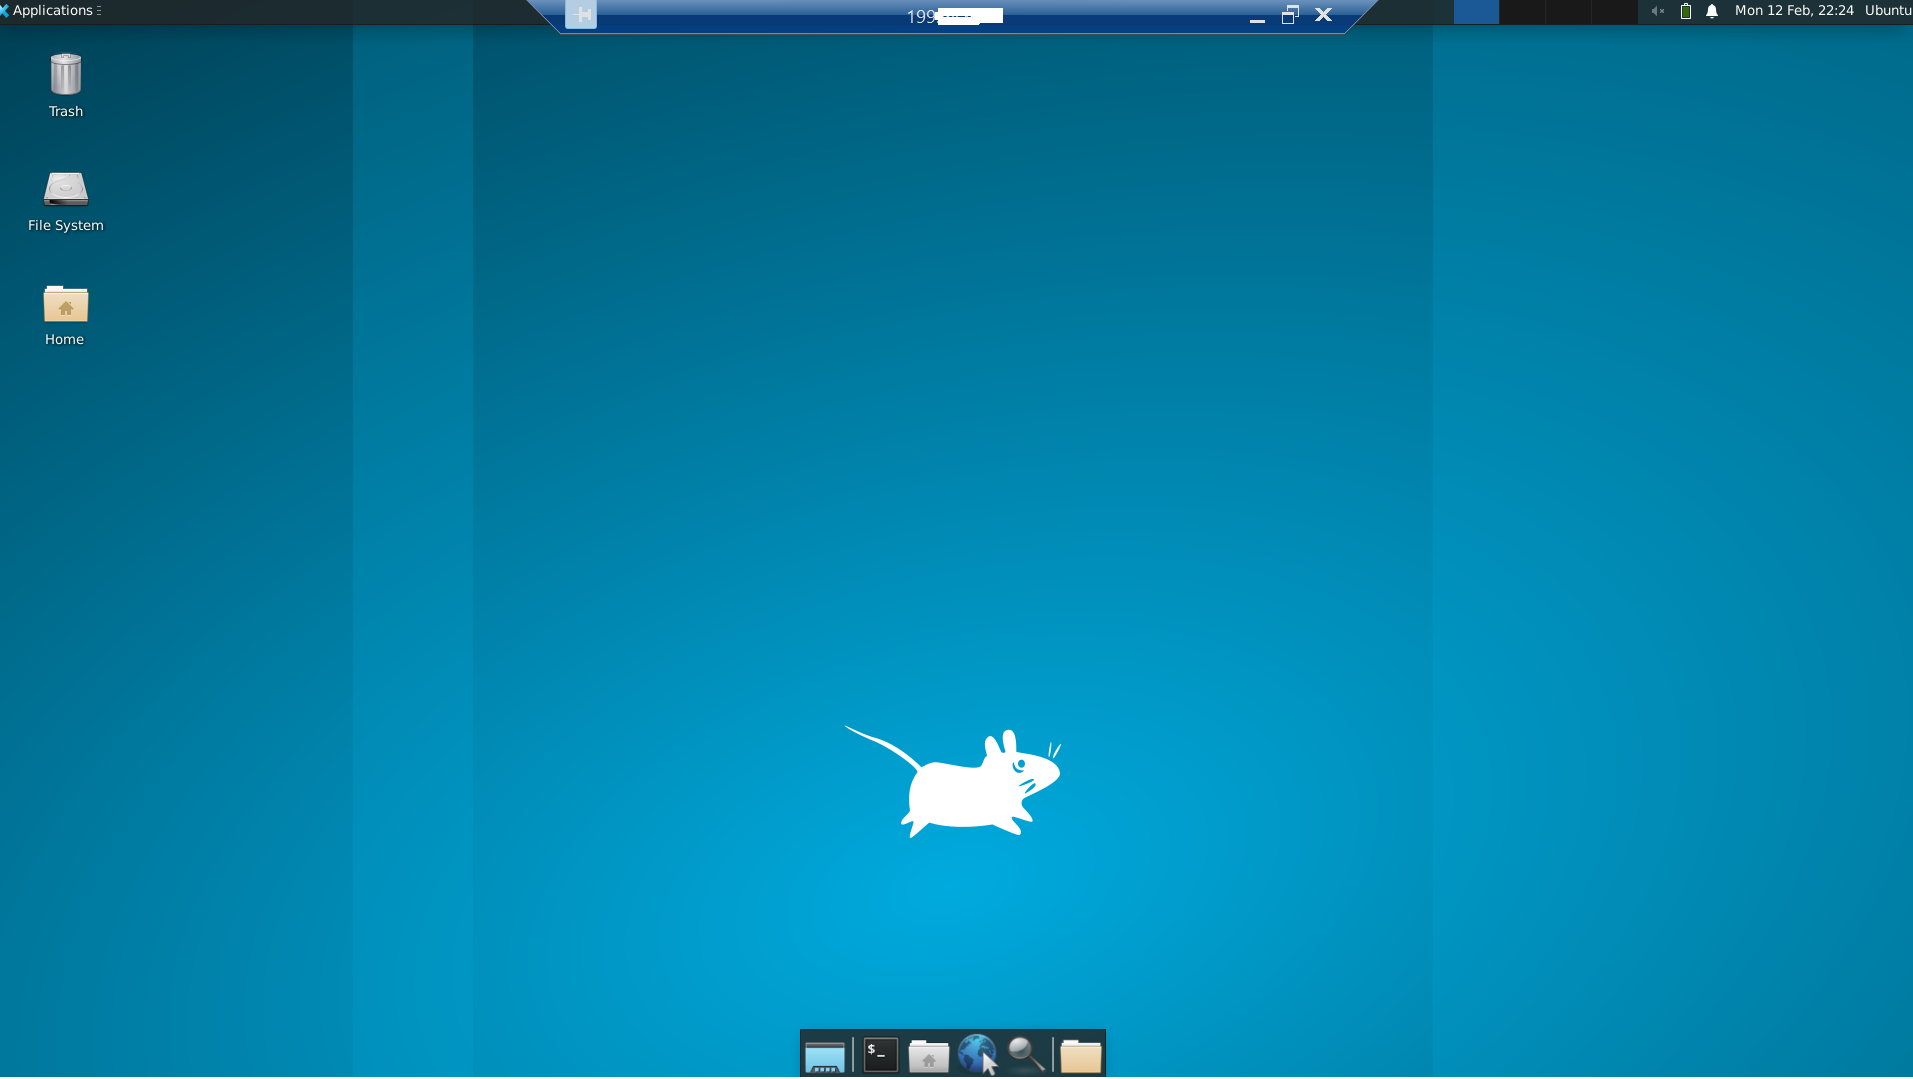
Once you have logged in, you should be able to access your Ubuntu Desktop environment:
Testing the RDP Connection on macOS
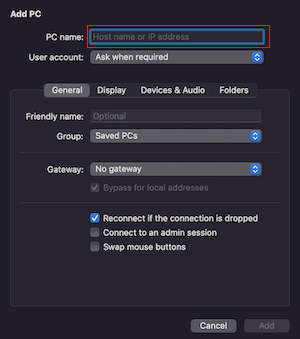
To test the connection using the Remote Desktop Connection client on macOS, first launch the Microsoft Remote Desktop Connection app.
Press Add PC, then enter your remote server's Floating IP in the PC name fillable box:
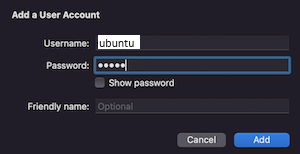
You can Add a user account when setting up the connection:
Once you have logged in, you can access your Ubuntu remote desktop. You can close it with the exit button.
Testing the RDP Connection on Linux
If you are using Linux as your Local desktop you can connect to the server via Remmina.